
Introduction
Certificate Management in SQL Server 2019 has been enhanced a lot when compared with previous versions of SQL Server, and it is part of a large set of new features and enhancements in SQL Server 2019. The most significant enhancement is that that it now allows you to directly import SSL/TLS certificates into SQL Server, thus simplifying the entire process a lot.
Before going into detail and see how we can use the enhanced certificate management in SQL Server 2019, first let’s talk a bit about SSL/TLS certificates, as well as discuss about how we can import SSL/TLS certificates in previous versions of SQL Server and thus encrypt connections to SQL Server.
SSL/TLS certificates can be used by SQL Server in order to encrypt all communication between a SQL Server instance and its client connections, by encrypting the communication channel. You can either “force encryption” for all connections, or leave it up to each client (i.e. application) to decide if encryption should be used.
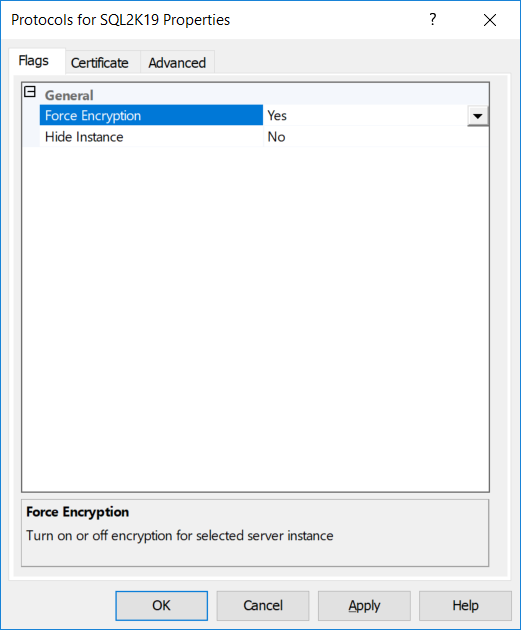
On the below screenshot, you can see the “Force Encryption” option:
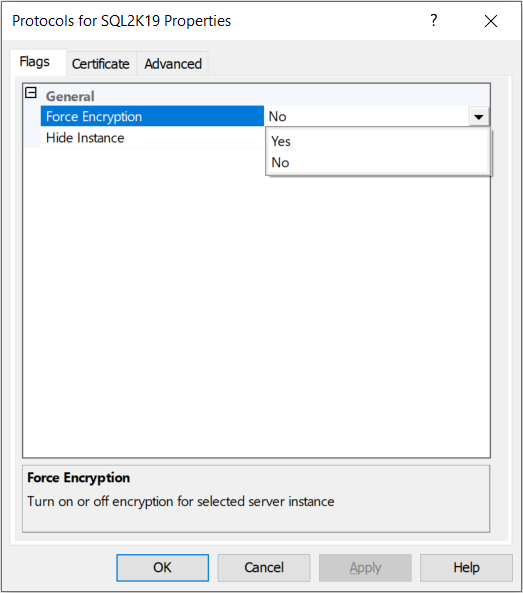
Personally, I would recommend that by the time you are setting up SSL/TLS encryption for your SQL Server instance, to set “Force Encryption” to “Yes” in order for SQL Server not to accept unencrypted connections. This of course assumes that prior to applying the certificate and setting this flag to “Yes”, you have extensively tested all applications/clients that connect to your SQL Server instance and verified that they can connect using the encrypted channel without any issues.
Certificate Management up to SQL Server 2017
When deploying SQL Server, there are 3 deployment options. Therefore, you can either:
- Set up a standalone SQL Server machine
- Set up a SQL Server Failover Cluster Instance (FCI)
- Set up a SQL Server Always On Availability Groups deployment over at least two machines
Up to SQL Server 2017, in order for an SSL/TLS certificate to be “visible” to SQL Server, the general idea was to import it into Windows\Local computers (Console Root\Certificates (Local Computer)\Personal\Certificates) and perform some additional steps.
Below, you can learn more about the procedure that was followed up to SQL Server 2017.
Certificate Management in Standalone SQL Server 2017 Machines
In the case of standalone SQL Server machines, the procedure was:
- Import the certificate in Windows for Local Computer
- Set Full-Control Permissions on the Certificate for the SQL Server service account
- Select the certificate from within SQL Server Configuration Manager and set the “Force Encryption” flag
- Restart SQL Server
Certificate Management in SQL Server 2017 Failover Cluster Instances
In the case of SQL Server Failover Cluster instances, the procedure was a little bit complex and involved additional steps. Therefore, this is what you needed to do in all participating Failover Cluster nodes in order to enable the SSL/TLS certificate:
- Import the certificate in Windows for Local Computer
- Set Full-Control Permissions on the Certificate for the SQL Server service account
- Get the Certificate’s “Clean” Thumbprint by removing the first character in case it is a question mark (?) and also remove all empty spaces (save the original value in test file and then re-open to find these characters)
- Edit Windows Registry (HKEY_LOCAL_MACHINE\SOFTWARE\Microsoft\Microsoft SQL Server\[*Instance ID]\MSQLServer\SuperSocketNetLib) and in the “Certificate” key, add the “clean” Thumbprint value acquired in the previous step
- Select the certificate from within SQL Server Configuration Manager and set the “Force Encryption” flag
- Restart SQL Server
Certificate Management in SQL Server 2017 Always On Availability Groups-enabled Instances
In the case of SQL Server Always On Availability Groups-enabled Instances, the procedure was very similar to the one for the standalone servers, with the only difference that you would perform the procedure for all servers/replicas participating to the Availability Group(s):
- Import the certificate in Windows for Local Computer
- Set Full-Control Permissions on the Certificate for the SQL Server service account
- Select the certificate from within SQL Server Configuration Manager and set the “Force Encryption” flag
- Restart SQL Server
Enhanced Certificate Management in SQL Server 2019
In SQL Server 2019 the whole process of enabling secure communication to the SQL Server Database Engine with the use of SSL/TLS certificates has been significantly enhanced but also simplified. More specifically, certificate management has been integrated in SQL Server 2019 Configuration Manager.
To this end, now SQL Server 2019 Configuration Manager allows you to easily perform the below tasks:
- Directly import an SSL/TLS certificate in SQL Server
- View and validate certificates installed in a SQL Server instance
- Identify which certificates may be close to expiring
- Deploy certificates across Availability Group machines from the node holding the primary replica
- Deploy certificates across machines participating in a Failover Cluster instance from the active node
With the below two screenshots, we can compare Configuration Manager in SQL Server 2017 vs 2019:
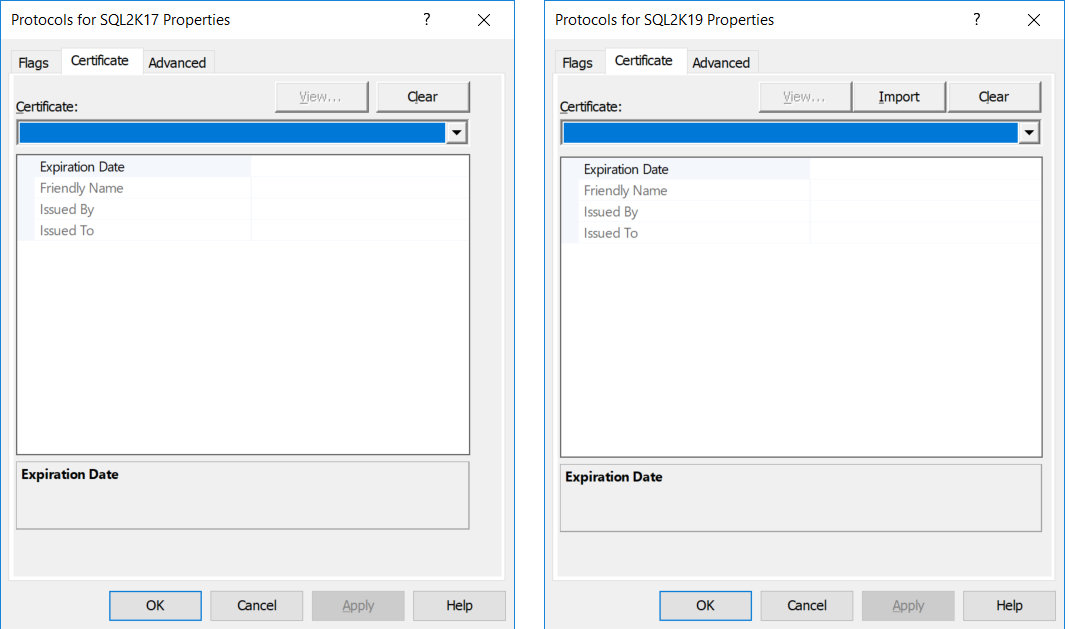
On the left, is the SQL Server protocol properties dialog using SQL Server 2017 Configuration Manager. On the right, is the SQL Server protocol properties dialog using SQL Server 2019 Configuration Manager.
As you can see, the main difference between the two dialogs is that the SQL Server 2019 Configuration Manager now has an “Import” button in the “Certificates” tab. The functionality behind this button is what actually offers an enhanced Certificate Management in SQL Server 2019.
Importing an SSL/TLS Certificate Using SQL Server 2019 Configuration Manager
In the below example, we will see how it is possible to import an SSL/TLS certificate on a standalone SQL Server machine, using the enhanced Certificate Management in SQL Server 2019.
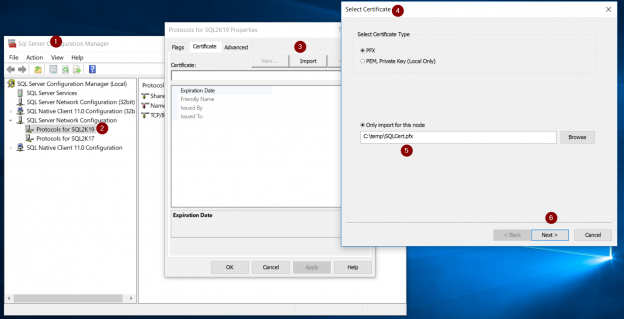
The first step, is to launch SQL Server 2019 Configuration Manager, right-click on our SQL Server instance, in this example “SQL2K19”, and select “Properties”.
Next, we are presented with the “Protocols for <instance name> Properties” dialog. In order to proceed with importing the certificate, we need to click on the “Import” button in the “Certificates” tab. After clicking on the “Import” button, we are presented with the certificate selection dialog:

On the certificate selection dialog, we are presented with two options. We can either import a PFX certificate or a PEM certificate. In this example, we are importing a password-protected PFX certificate.
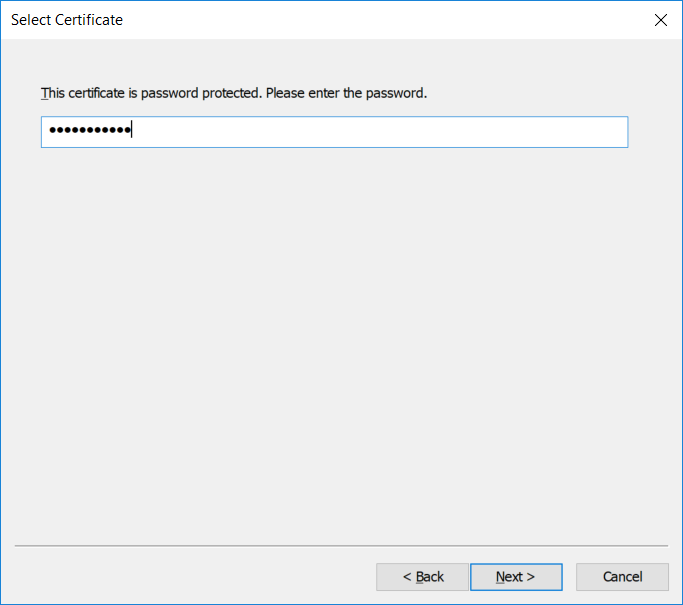
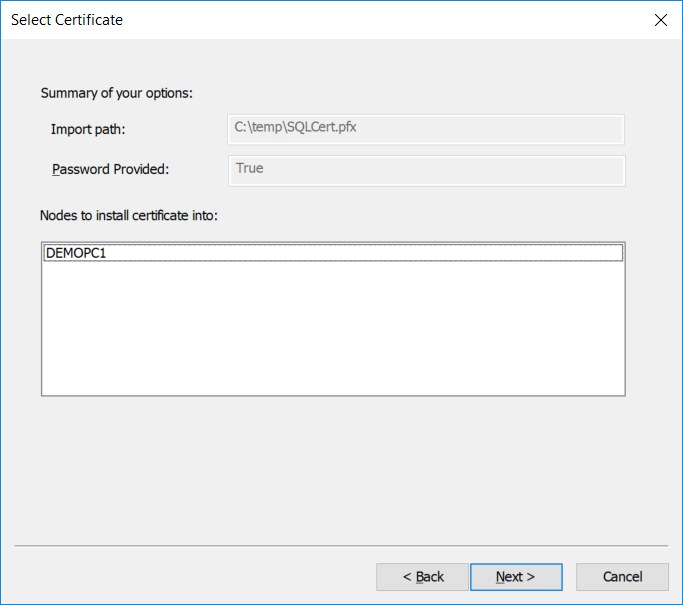
After entering the password for the certificate, we are presented with a summary of our options for the specific certificate and if all is good, we click on the “Next” button.
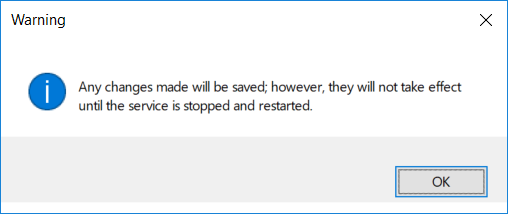
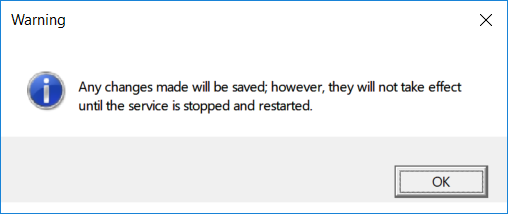
At this point we are also reminded by the certificate import wizard, that we will need to restart the SQL Server instance in order for changes to take effect.
Last, we are presented with a summary of the certificate import process in terms of actions performed.

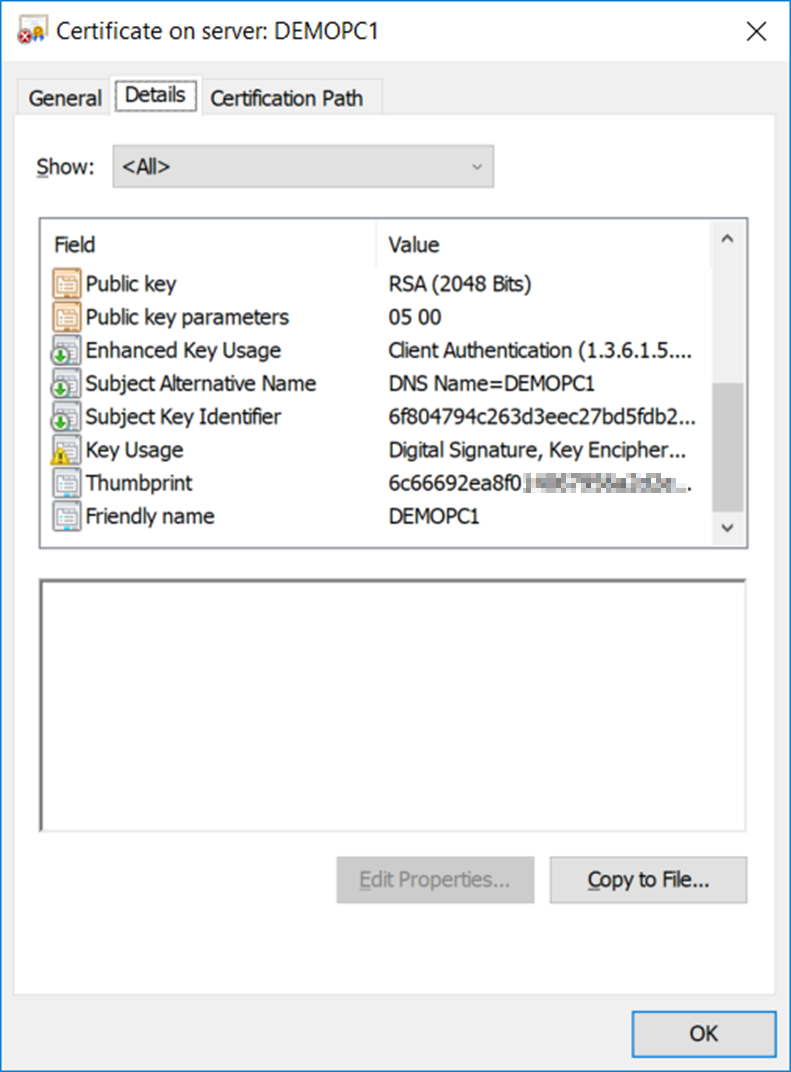
After we stop and start again our SQL Server instance, in Configuration Manager, we can right-click on our SQL Server instance name, in this example “SQL2K19”, select “Properties” and in the “Certificate” tab, we can see that our certificate has been successfully imported.
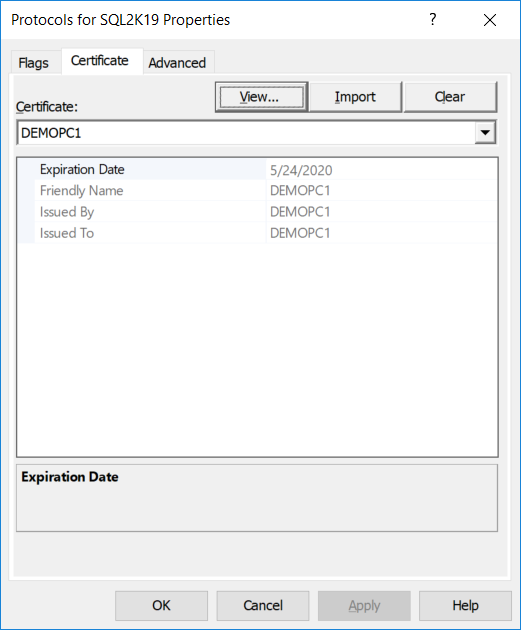
Moreover, if click on the “View” button, we can see all the details for the specific certificate, such as: Subject Alternative Name (SAN), Friendly Name, Thumbprint, and more.
OK, now that we see that our certificate has been successfully imported, it is time to decide whether all connections to our SQL Server instance will be forced to be encrypted or not. In this example, I want all connections to be encrypted, therefore, I’m setting the “Force Encryption” flag to “Yes”. However, since I changed the value of this flag from “No” to “Yes”, once more, I need to restart the SQL Server instance, in order for changes to take effect.
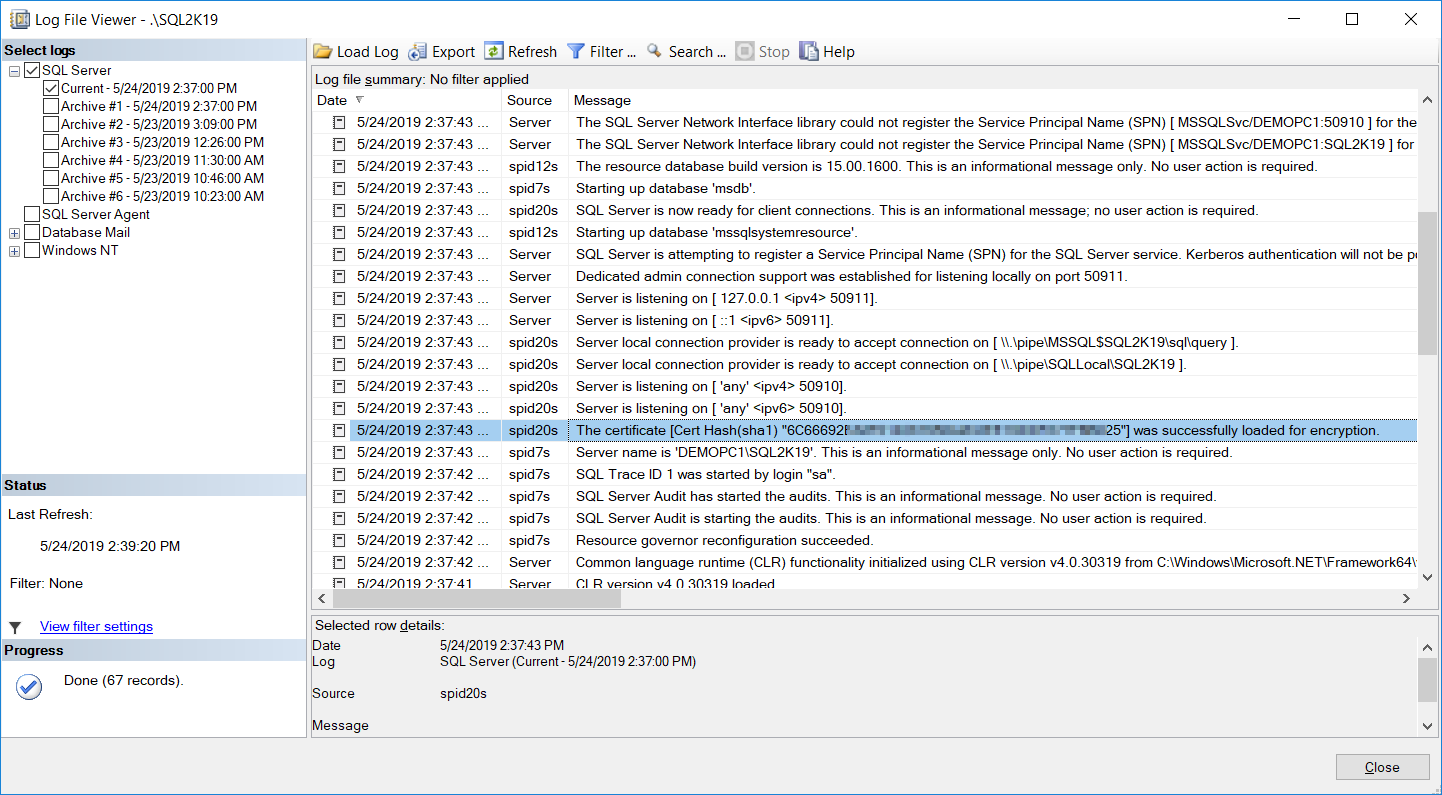
The last step, is to confirm that the SSL/TLS certificate imported in our SQL Server instance, using the new Certificate Management in SQL Server 2019, is successfully loaded when our SQL Server instance starts.
You can easily find this information by checking out SQL Server’s log right after the instance’s restart. In the below log, you can see that the certificate was successfully loaded for encryption:
Certificate Management in SQL Server Failover Cluster Instances
The above example, described how you can import an SSL/TLS certificate in a SQL Server instance, using the SQL Server 2019 Configuration Manager.
In order to import the certificate on a SQL Server Failover Cluster instance, the procedure is quite similar to the above, with the only difference that you are presented with the list of nodes, and you can choose whether you are importing the certificate just for the current node, or for each individual cluster node.
Moreover, note that the above steps must be taken on the active cluster node. Also, users must have administrative access on all nodes.
Certificate Management in SQL Server Always On Availability Groups-enabled Instances
Regarding the scenario where you are importing an SSL/TLS certificate of a SQL Server Always On Availability Group-enabled instance, again the process is quite similar like the one for the standalone SQL Server machine, with the only difference that after choosing the certificate type to import, you are presented with the list of known Availability Groups for the SQL Server instance, and you can choose certificates for each replica node.
For this scenario, note that certificates should have a file name that matches the NetBIOS name of the nodes.
Moreover, note that the above steps must be taken on the node that holds the Availability Group primary replica. Also, users must have administrative access on all nodes.
Conclusion
Certificate Management in SQL Server 2019 is significantly enhanced when compared to previous versions of SQL Server.
With SQL Server 2019 Configuration Manager, you can now import SSL/TLS certificates directly into SQL Server, even for lower versions of SQL Server, starting with SQL Server 2008, without having to work with registry settings (like in the case of failover clusters) and any other actions that might seem complex for many users.
SQL Server 2019 is full of exciting new features and enhancements, and certificate management is one of those enhancements. I have an online course on Udemy titled “SQL Server 2019: What’s New” you might want to check, in order not only to learn more about SQL Server 2019, but also see live demonstrations for many of those interesting new features and enhancements.

View all posts by Artemakis Artemiou
- Certificate Management in SQL Server 2019 - May 31, 2019
- SQL Server consolidation – Hosting multiple databases on a single SQL Server instance - December 2, 2016
- How to create and manage T-SQL code snippets - October 28, 2016