
This is the third post in the series about database development and testing using SQL Server Data Tools and Team Foundation Server.
Post 1: Continuous Integration with SSDT and TFS
Post 2: Unit testing with SQL Server Data Tools
You can run test in Visual Studio to test the quality of your build. In VS 2012 and 2013 there are 5 kind of tests that are available for the user:
- Unit tests
- Coded UI Tests
- Web performance tests
- Load tests
- Generic tests
These tests are often called smoke tests or build verification tests (BVT).
Software requirements
You will need Visual Studio 2010, 2012 or 2013 and at least Professional edition to be able to run unit tests. SQL Server Data tools integrated shell is not enough.
Configure and run scheduled tests after successfully building your Application
When creating Build Verification Tests you need to use Visual Studio, Version control and Team foundation Build (msbuild). First of all you need to write your tests, check them in with Version control. In the build definition file you can then choose which test to execute. You can then queue a build or use continuous integration to run the tests upon a successful build.
The steps to achieve that are simple:
- Define and check in a Build Definition Test
- Create a build definition
- Add the computer to TestBuildController user group
- Setup the build agent
- Run the BVT build definition
Define and check in a Build Definition Test
For the purpose of this post we will be using the same project than in the previous posts. It is attached here
If you remember from previous post, I created a simple unit test to check if my continuous deployment script had worked correctly:
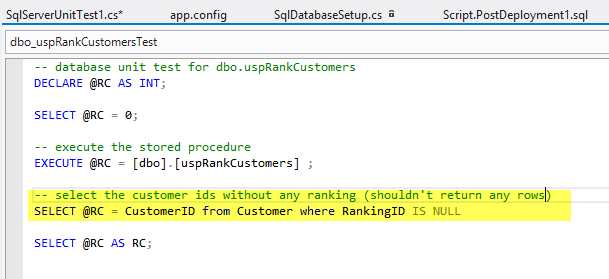
Figure 1 Very simple test script
Now I want this script to run as part of my check-in process after the database has been deployed to my integration instance.
Create a build definition
In the Build menu from the home page of Team Explorer click New Build definition:
| Remark |
| You can also use the one from the previous blog post included in the project and edit it to suit your needs |
Give a name and a description to your build. On the Trigger menu choose Continuous integration:
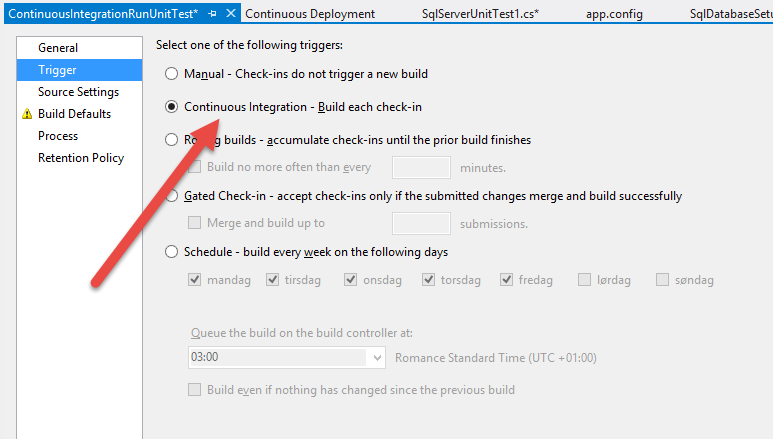
Figure 3 Output folder for the builds
Expand the Process menu to show all the details. In the Items to build menu make sure that all your projects or the solution are selected.
Under Basic -> Automated Tests -> Test Source click the ellipsis (…) and make sure that you’re test assembly is listed there. By default it specifies a pattern you can use for catching all dlls having “test” in their name. This search string will search recursively through directories to find all dlls matching the pattern in the binary directories.
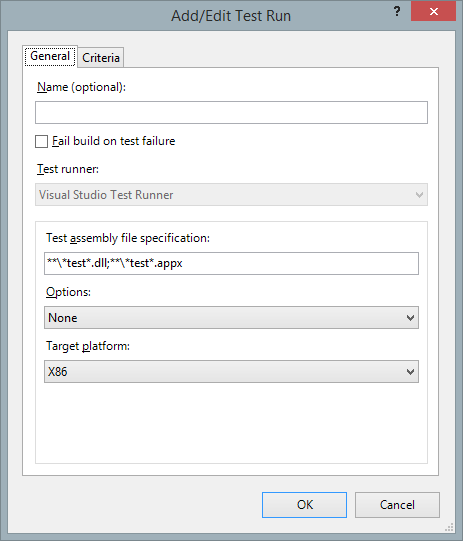
Figure 4 Test settings in build definition
So now when you check in, as part of the build process, the test will be executed.
The only problem remaining now is that the user executing the test will be your machine name in the domain, and it probably doesn’t have read permissions to whatever database you are going to run the test on. Resulting in the test result below:
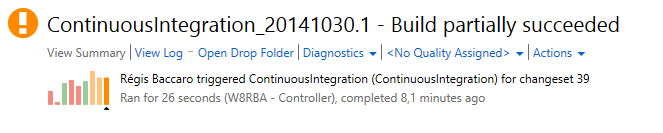
Figure 5: Partially successful test
Permissions required to perform unit tests in SQL Server Data Tools:
You must have the following permissions to perform unit tests on a database:
| Action |
Execution context connection |
Privileged context Connection |
| Execute a test |
1 |
|
| Execute a pre-test or post-test |
1 |
|
| Run TestInitialize and TestCleanup scripts |
1 |
|
| Deploy database changes before you run tests |
1 |
|
| Generate data before you run tests |
1 |
As you can see there are two types of context database connection: Execution Context and Privileged Context. Where the privileged context connection requires more permissions due to the tasks performed.
Modifying Context permissions
To modify context permissions you need to right click on your test project and choose SQL Server Test configuration:
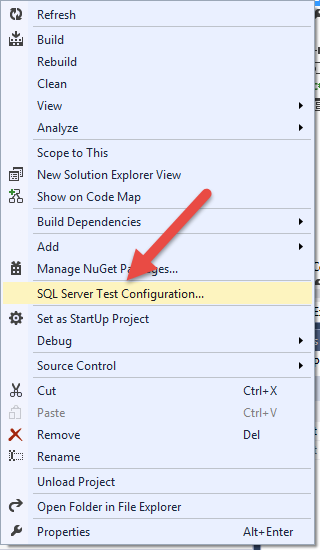
Figure 6 Modifying permissions context
You will see a dialog where you can specify or create a connection to a database and a few other options, like deploying the database before you run the test. Which in our case is not necessary since we are already doing that as part of a continuous integration project.
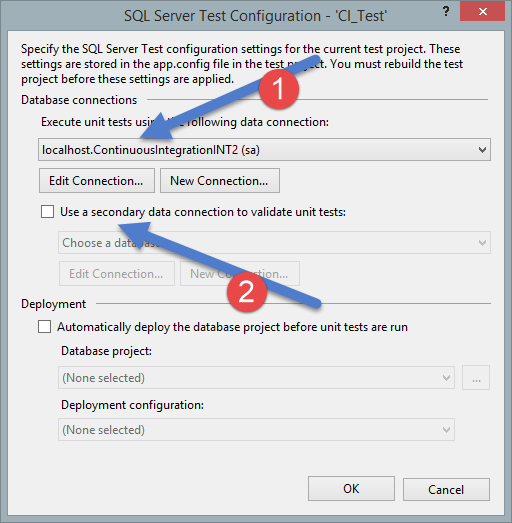
1 is the Execution context and 2 if you specify it will be the Privileged Context (for running pre or post build scripts and/or deploying the database before running the tests).
Gotchas
If you use integrated authentication in your execution context it will use the identity of the user running the build controller, in my case it is my machine name on the domain. I probably don’t want to give access to the continuous integration database to machine user.
If you use a SQL Server user like I do in my example, its password will not be saved and you will end having to edit the app.config file of the test project to add the user password. This is one way to do it. But you probably either don’t want to user SQL Server users (remember those best practices) and you definitely don’t want to have its password in clear text in the app.config of your project!!
Using integrated security with unit tests
Your tests will always be run by the controller. In my case it has the same name than my machine name and it is running under NT AUTHORITY \ NETWORK SERVICE. It is a Windows Service running with configurable identity so changing it is simple.
Start the Team Foundation Server Administration Console and choose build configuration in the left pane:
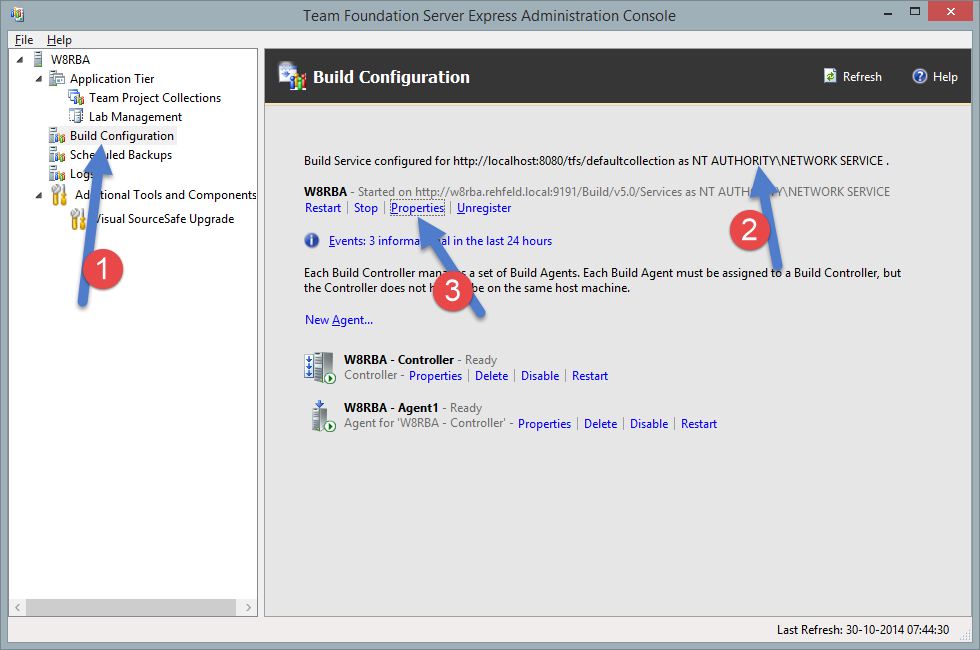
Figure 7: Configuring the build agent service user
Here you can see what users it is running as.
Click on properties to change it. Beware that you will need to restart the service in order to do that.
Pick a domain user who has access to your database.
By the way it is not necessary for the build agent to run as the same user than the one connection to Team Foundation Server. But I find it easier. If you want them to run under 2 different users just remove the check-mark when altering the user:
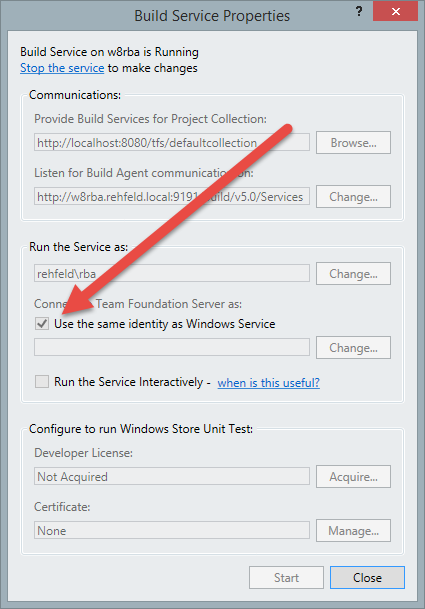
Figure 8 Changing the service agent identity
Now try to run your test again and it will run under this user. And succeed: D

And showing that the test itself has passed!!

Figure 9: Test results are green!
In the next post I will explain one technique for deploying several databases automatically under the build process. Obviously it is not possible with only one line of command arguments for the msbuild agent.
We will need to modify the deployment XAML file or use post build scripts.
Meanwhile happy testing!

His background and work experience mixes technology and business, providing him a unique edge to contribute to datawarehouse and SharePoint projects, being able to effectively interact with technical and business decision makers.
Régis is a frequent speaker at SQL Server conferences and is a board member of the Danish SQL Server User Group and the founder of the SQL Saturday Denmark community event.
In april 2014 Régis received the MVP award for SQL Server for his involvment in the product and the community.
View all posts by Régis Baccaro
- Continuous Deployment using SQL Server Data Tools and Visual Studio Online - February 2, 2015
- Creating Azure automation to start Azure VMs - February 2, 2015
- Deployment to several databases using SQL Server Data Tools and TFS using a Custom Workflow file - January 16, 2015