
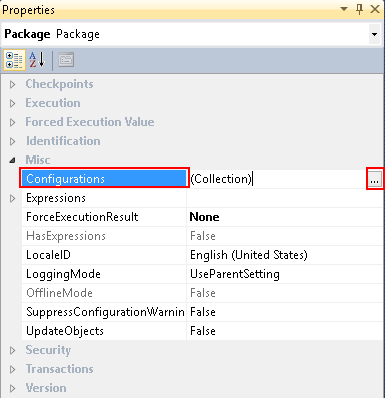
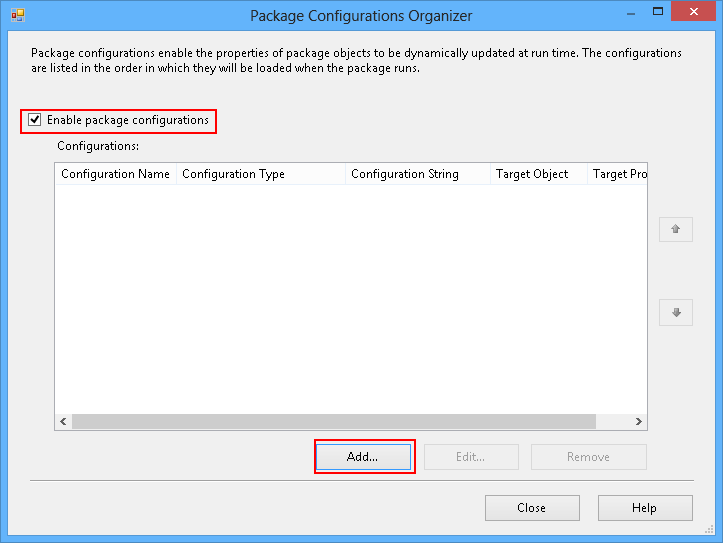
 This will open the Package Configurations Organizer window. In order to create the file, the Enable package configurations box must be checked. To create the new file, the user needs to click the Add button like shown in the image below
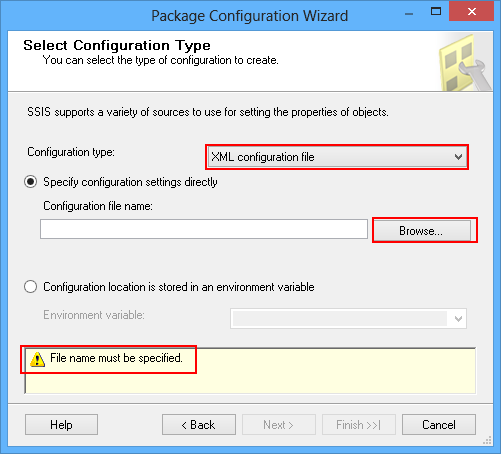
 Clicking the Add button will open the Package Configuration Wizard where the user can choose the type of the configuration file. In the Configuration type drop down list there are various types such as: XML configuration file, Environment variable, Registry entry, Parent package variable, and SQL Server type
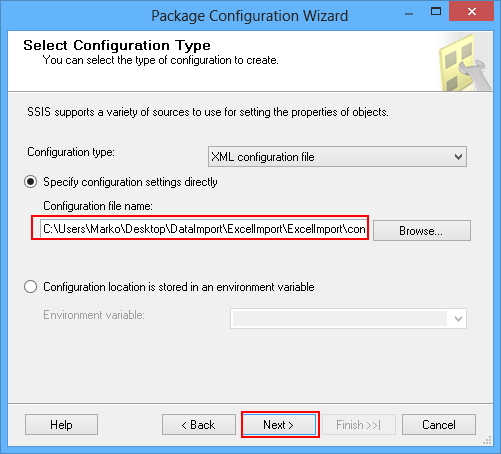
The name of the file must be specified in order to move on through the wizard, which is explicitly requested by the application in the message box at the bottom of the Package Configuration Wizard window. Clicking the Browse button the name and the location of the file can be specified, like shown in the image below
Clicking the Add button will open the Package Configuration Wizard where the user can choose the type of the configuration file. In the Configuration type drop down list there are various types such as: XML configuration file, Environment variable, Registry entry, Parent package variable, and SQL Server type
The name of the file must be specified in order to move on through the wizard, which is explicitly requested by the application in the message box at the bottom of the Package Configuration Wizard window. Clicking the Browse button the name and the location of the file can be specified, like shown in the image below
 If the file with the same name already exists, the pop up dialog box will appear offering to overwrite the existing file, or to change its name. When the type and the name of the file are specified, the process can be continued to the next step clicking the Next button, like shown in the image below
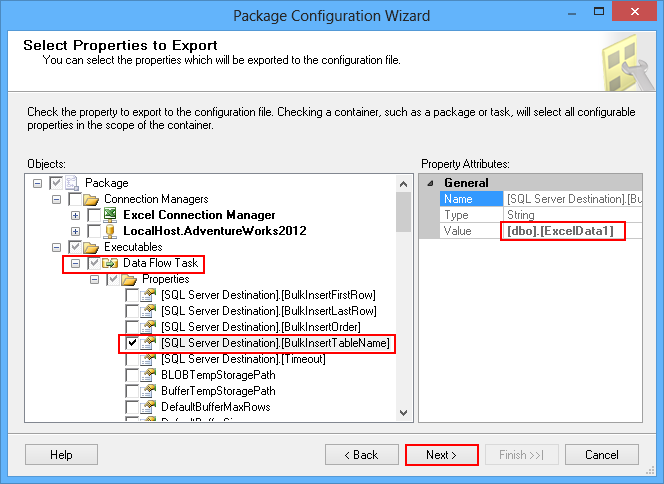
 The next step requires from the user to specify the exact objects and the properties that will be included in the configuration file. This is an important step, because only the objects and the properties checked here will be added to the configuration file
For the objects that were not included, the user must either add them later by modifying the file clicking the Edit button in the Package Configurations Organizer window, or manually change the property value using BIDS. The SSIS package used in this blog imports the Excel worksheet data into the database table. Therefore, the Excel connection and the SQL Server Destination connection has been created
All properties for both of the connections will be in the object list, and also, the properties for all objects from the package, as the Executables or the Variables. The property included in the configuration file is checked as shown in the image below. At least one of the box from any of the property/object must be checked in order to move on forward to the next step
Using the created XML configuration file, the name of the table in the destination database will be changed from “ExcelData1” to “ExcelData2”, and the Excel worksheet data will be imported to a new table. Of course, the ExcelData2 table must be properly created before the file has been modified. As shown in the image below, the current value of the selected object is [dbo].[ExcelData1]
The next step requires from the user to specify the exact objects and the properties that will be included in the configuration file. This is an important step, because only the objects and the properties checked here will be added to the configuration file
For the objects that were not included, the user must either add them later by modifying the file clicking the Edit button in the Package Configurations Organizer window, or manually change the property value using BIDS. The SSIS package used in this blog imports the Excel worksheet data into the database table. Therefore, the Excel connection and the SQL Server Destination connection has been created
All properties for both of the connections will be in the object list, and also, the properties for all objects from the package, as the Executables or the Variables. The property included in the configuration file is checked as shown in the image below. At least one of the box from any of the property/object must be checked in order to move on forward to the next step
Using the created XML configuration file, the name of the table in the destination database will be changed from “ExcelData1” to “ExcelData2”, and the Excel worksheet data will be imported to a new table. Of course, the ExcelData2 table must be properly created before the file has been modified. As shown in the image below, the current value of the selected object is [dbo].[ExcelData1]
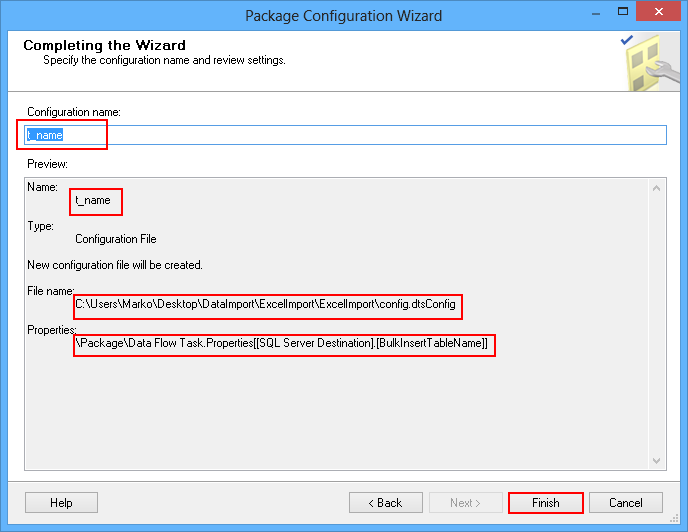
 Clicking the Next button will move the process to the next step. This is a summary for the entire process where the name for the configuration must be specified. The name will be automatically updated in the Preview box
In the same box are: type of the file, location, and all the properties previously selected, that will be included in the configuration file. After the configuration name is specified, and all the information from the Preview box is being reviewed and confirmed, clicking the Finish button will close the Package Configuration Wizard window, and points to the Package Configuration Organizer window. The created file should be listed in this window. If it is so, the window can be closed
Clicking the Next button will move the process to the next step. This is a summary for the entire process where the name for the configuration must be specified. The name will be automatically updated in the Preview box
In the same box are: type of the file, location, and all the properties previously selected, that will be included in the configuration file. After the configuration name is specified, and all the information from the Preview box is being reviewed and confirmed, clicking the Finish button will close the Package Configuration Wizard window, and points to the Package Configuration Organizer window. The created file should be listed in this window. If it is so, the window can be closed
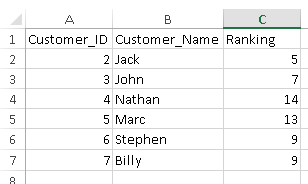
 After executing the SSIS package without making any changes in the XML file, the data should be imported in the ExcelData1 table like shown in the image below. The ExcelData2 table is still empty
 Changing the name of the destination table in the XML file will redirect importing data to the ExcelData2 table like shown in the image below
 After the Configured Value has been changed, the file needs to be saved. An Excel worksheet will be redirected to the new table at the next run of the SSIS package, like shown in the image below
 Instead of opening the entire project in BIDS, and changing the table name in the connection manager, using an XML file allows user to accomplish this in a simpler way. The configuration file can also be applied to other SSIS packages as well
Useful resources:
- Package configurations
- Adding the configuration file to an existing package
- Deploying package with XML configuration

Marko is an IT and technical education teacher, who likes movies, video games, and heavy metal music.
He uses his spare time to play guitar, ride a bike and hang out with his friends. During winter, he likes skiing the most, but all other snow activities, too.
He is also author of various SQL Shack articles about SSIS packages and knowledgebase articles about ApexSQL Doc.
View all posts by Marko Radakovic
Latest posts by Marko Radakovic (see all)