
When you have created a series of Azure VMs – for example for doing demos – you might want to be able to start it and shut it down easily. For convenience purposes but also for keeping the cost down while you’re not using the Azure VMs. In this case Azure Automation comes handy.
Azure automation is a Microsoft Cloud Service for automating the maintenance, deployment, monitoring and creation of Azure Services. In Azure Automation, Windows PowerShell workflows (called runbooks) help you work smarter by allowing you to integrate with the services you depend on like Websites, Virtual Machines, SQL Server and other Azure Services. They can also be used with any other Public Internet APIs.
Azure Automation gives you dashboards and log records for easier monitoring, it also gives the opportunity to create checkpoints for restarting your workflows after unexpected errors, crashes or network issues making the setup even more reliable.
First of all you need an Azure subscription and add a certificate to it .
Finding your subscription certificates
is done by clicking on Subscriptions ➜ Manage subscriptions
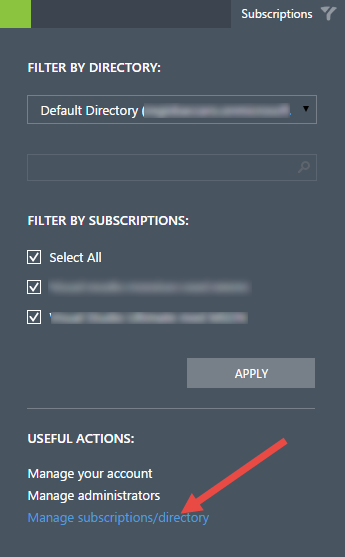
Or by navigating to :
https://manage.windowsazure.com/@<default_directory_name>#Workspaces/AdminTasks/SubscriptionMapping
You need to note the subscription id GUID : 7ffxxxxx-xxxx-xxxx-xxxx-xxxxxxxxxx
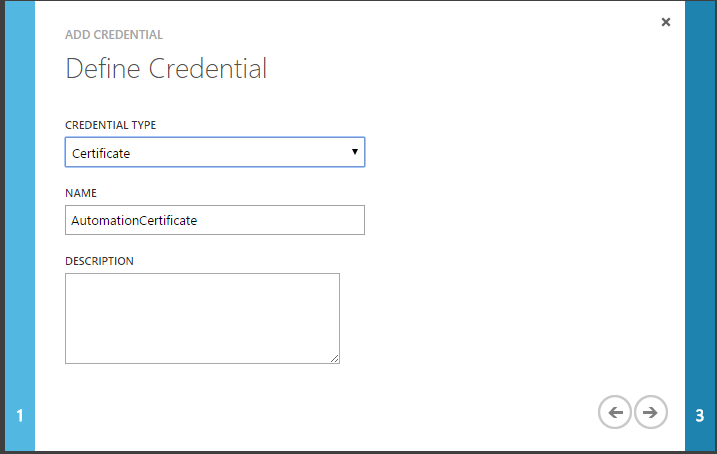
Click on management certificates and import a .cer file from a real or a self signed certificate.
How to create a self signed certificate
This is out of topic but anyway very useful so I include it here.
- Find a server running IIS
- Start Internet Information Services manager (inetmgr)
Click Server certificate

On the right pane chose Create self-signed certificate
- Choose a friendly and meaningful name i.e AutomationCertificate and click OK
- Now you need to create two files from this certificate : a .cer and a .pfx (with the private key)
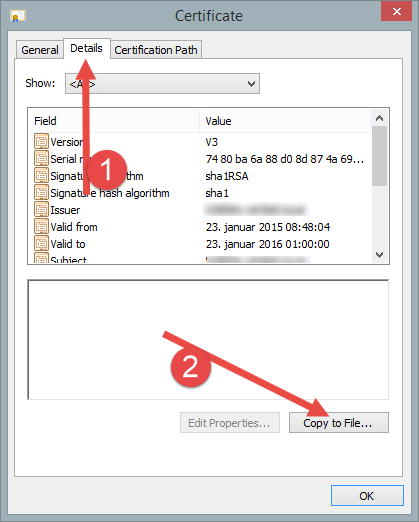
- Once the certificate is created right click on it and choose View
On the Details pane choose Copy to File
Call it AutomationCertificate, keep all the default settings, and save it. You should now have a AutomationCertificate.cer file.
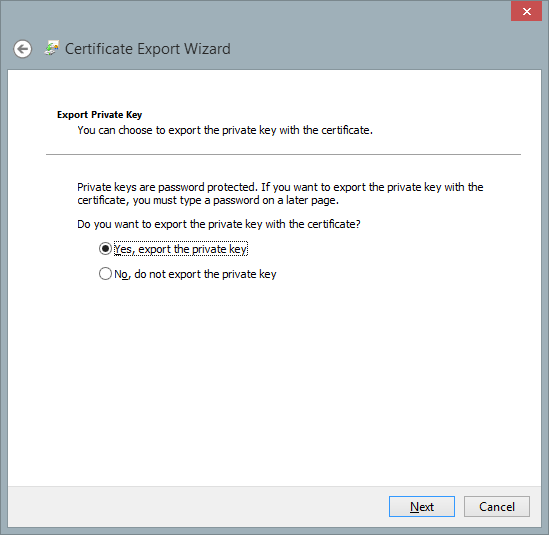
For making the .pfx file the repeat step 8 to 10 and then on the second step of the wizard choose to Export the Private key
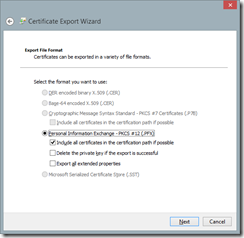
Leave the Export file format settings as is :
Pick a password (that you can remember) and save the .pfx file next to the .cer file. You should now have an AutomationCertificate.pfx file

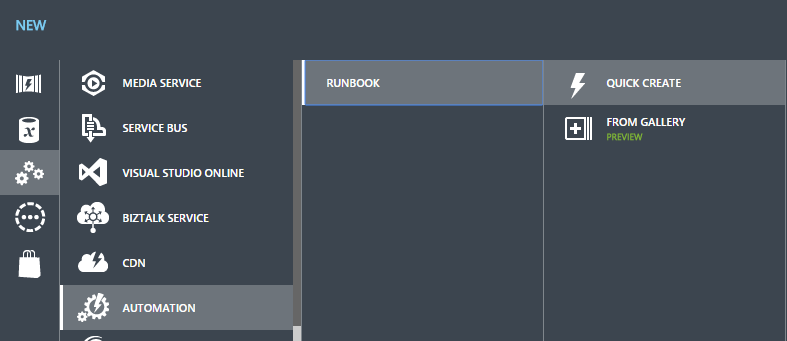
Create an Automation in Azure
Pick automation in the management portal, choose Automation and +Create in the bottom. Give it a meaningful name, choose a region and a subscription.
You should now have a new Azure Automation and ready to add assets and runbooks.
Adding the necessary Assets for the Runbooks
In order for the runbooks to run you will need 3 elements. These are created as Assets ➜ Settings in the Automation
| # | Type | Name |
| 1 | Credentials ➜ Certificate | AutomationCredential |
| 2 | Connection | BIAzure01 |
| 3 | Module | Azure |
When adding the Certificate, you will be prompted to add a .pfx certificate file. Choose the certificate you created earlier.
When creating the Connection you will need to add the certificate name and your subscription ID (GUID).
- The Module is created automatically when creating the automation
Once this is done you’re ready to add a runbook…
Adding a runbook
This is done by clicking on +New in the bottom left corner.
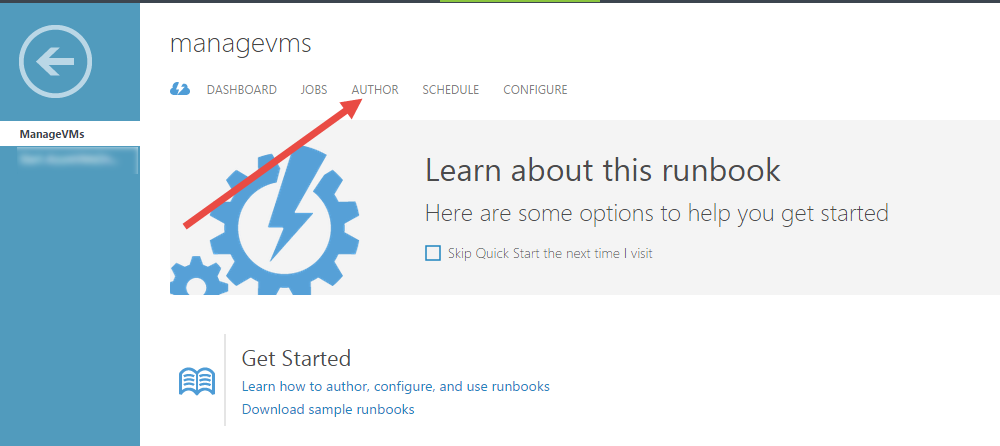
In my case I want to create a runbook to start up and stop VMs so I called it ManageVMs
Once it is created click on it and you are ready to edit it by clicking on Author.
The runbook I am using here is freely inspired by the blog post written by Peter Selch Dahl.
The file can be downloaded from here
|
1 2 3 4 5 6 7 8 9 10 11 12 13 14 15 16 17 18 19 20 21 22 23 24 25 26 27 28 29 30 31 32 33 34 35 36 37 38 39 40 41 42 43 44 45 46 47 48 49 50 51 52 53 54 55 56 57 58 59 60 61 62 63 64 65 66 67 68 69 70 71 72 73 74 75 76 77 78 79 80 |
workflow ManageVMs { param( # Start or Stop - default = stop [Parameter(Mandatory = $true)] [string]$Action="Stop" ) $MyConnection = "BIAzure01" $MyCert = "AutomationCredential" $MySubscriptionName = "<Azure Subscription Name>" # Get the Azure Automation Connection $Con = Get-AutomationConnection -Name $MyConnection if ($Con -eq $null) { Write-Output "Connection entered: $MyConnection does not exist in the automation service. Please create one " } else { $SubscriptionID = $Con.SubscriptionID $ManagementCertificate = $Con.AutomationCertificateName Write-Output "--------------------------" Write-Output "Connection Properties: " Write-Output "SubscriptionID: $SubscriptionID" Write-Output "Certificate setting name: $ManagementCertificate " } # Get Certificate & print out its properties $Cert = Get-AutomationCertificate -Name $MyCert if ($Cert -eq $null) { Write-Output "Certificate entered: $MyCert does not exist in the automation service. Please create one " } else { $Thumbprint = $Cert.Thumbprint # Write-Output "Certificate Properties: " # Write-Output "Thumbprint: $Thumbprint" } #Set and Select the Azure Subscription Set-AzureSubscription -SubscriptionName $MySubscriptionName -Certificate $Cert -SubscriptionId $SubscriptionID Select-AzureSubscription -SubscriptionName $MySubscriptionName Write-Output "--------------------------" #Virtual Machines $vmS = @() $vmS += 'vm1' #$vmS += 'vm2' #$vmS += 'vm3' #Action if ($Action.ToUpper() -eq 'START') { foreach ($vm in $vmS) { Get-AzureVM -ServiceName $vm -Name $vm | Start-AzureVM Write-Output "Started $vm" } } else { foreach ($vm in $vmS) { Get-AzureVM -ServiceName $vm -Name $vm | Stop-AzureVM -Force Write-Output "Stopped $vm" } } Write-Output "--------------------------" } |
The main point of interests in this script are :
Workflow name
Needs to be the same than the runbook name. Here : ManageVMs
Input parameter
Start or Stop (default)
Variables
$vmS : A String array to store all the Virtual Machines you need to start or stop. Here
$vmS += ‘VirtualMachine1’
$vmS += ‘VirtualMachine2’
$vmS += ‘VirtualMachine3’
$vmS += …
$MyConnection : The name of the connection you created in the assets.
$MyCert : The name of the management certificate from your subscription and the one you created as a credentials in the assets. Here : AutomationCredential
$MySubscriptionName : The name of your azure subscription
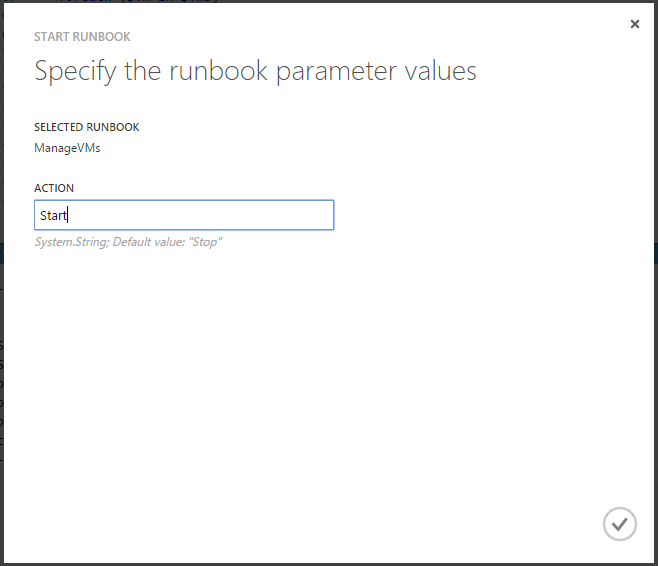
Once you’ve pasted this powershell with the right values for the variables you should be able to test it by clicking on Test. Then a dialog windows should appear where you can specify what action you want to perform (Start or Stop)
After a few minutes :
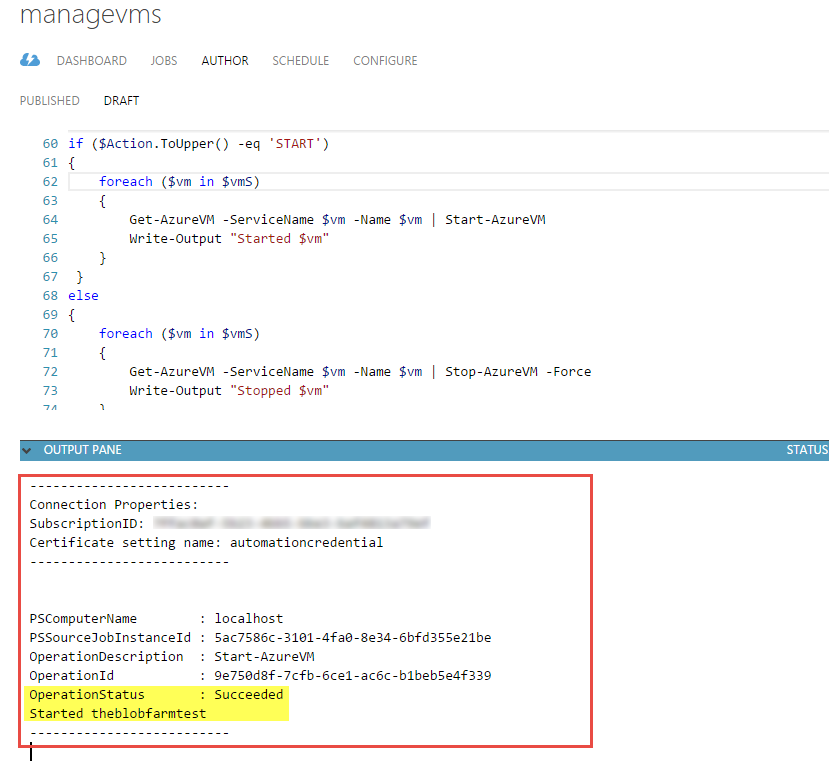
You should then be able to schedule this runbook to run with your input parameters.
Happy automationing !!

His background and work experience mixes technology and business, providing him a unique edge to contribute to datawarehouse and SharePoint projects, being able to effectively interact with technical and business decision makers.
Régis is a frequent speaker at SQL Server conferences and is a board member of the Danish SQL Server User Group and the founder of the SQL Saturday Denmark community event.
In april 2014 Régis received the MVP award for SQL Server for his involvment in the product and the community.
View all posts by Régis Baccaro
- Continuous Deployment using SQL Server Data Tools and Visual Studio Online - February 2, 2015
- Creating Azure automation to start Azure VMs - February 2, 2015
- Deployment to several databases using SQL Server Data Tools and TFS using a Custom Workflow file - January 16, 2015