
Karla is a production database administrator and she has a lot in common with you. Being responsible for database backups and recovery, she has implemented a well-structured automated backup system. Maybe she’s using Ola Hallengren’s Maintenance Solution, custom T-SQL stored procedures, or a set of PowerShell scripts. She has heard the saying, “a DBA only needs one thing, either a backup or a resume, but never both,” and is confident that she won’t be dusting off the resume any time soon.
Karla is employed by a medium size company which is now growing concerned with overseers and regulation compliance, such as with the Sarbanes-Oxley Act of 2002. As the company prepares to prove their compliance with the regulations which now apply to it, management establishes procedures for performing internal practice audits.
Suddenly, Karla is less certain of her backups when presented with this inquiry, “how can you prove that your backups are recoverable?” Karla begins to wonder if her backups were enough and realizes that the best way to prove that the backups are not corrupted and can be restored successfully, is to restore them and run integrity checks.
The plan
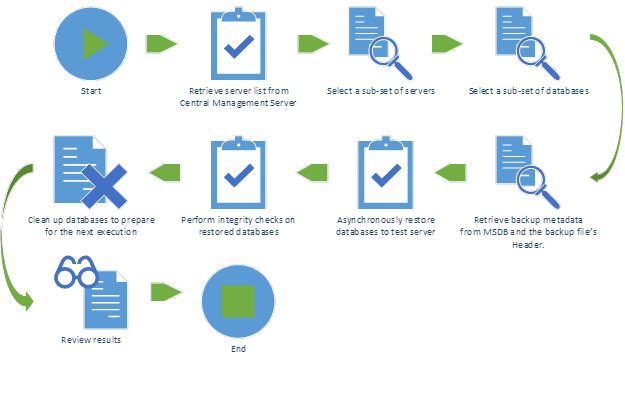
The ideal solution to any problem that a DBA faces is one which requires minimal interaction by the DBA. So, Karla built a list of goals.
- Backup tests and integrity checks are 100% automatic.
- Every production user database must have at least one full backup tested each quarter.
- Evidence of test and results must be logged as part of the automated system.
-
Test results must be available without DBA interaction.
- Queries must be pre-written and available to be run by unprivileged users such as via SQL Server Reporting Services.
Given the above goals Karla has recorded her technical requirements and choices.
- A database instance list will be maintained and organized as registered servers on a SQL Server Central Management Server.
-
The restore tests and integrity checks will be written in PowerShell 3.0 so that its powerful asynchronous abilities can be leveraged.
- Windows Management Framework 3.0 must be installed for operating systems older than Windows 8 or Windows Server 2012.
- SQL Server Management Objects (SMO) and PowerShell module SQLPS (available in SQL Server 2014 Feature Pack) will be used to interact with SQL Server.
- Queries to produce evidence of tests and results will be written in T-SQL.
-
The process will be initiated by a SQL Server Agent Job and repeat on a schedule to maximize usage of the test server’s resources and to maximize the number of backups being tested in a given quarter.

tl;dr – Complete PowerShell script
|
1 2 3 4 5 6 7 8 9 10 11 12 13 14 15 16 17 18 19 20 21 22 23 24 25 26 27 28 29 30 31 32 33 34 35 36 37 38 39 40 41 42 43 44 45 46 47 48 49 50 51 52 53 54 55 56 57 58 59 60 61 62 63 64 65 66 67 68 69 70 71 72 73 74 75 76 77 78 79 80 81 82 83 84 85 86 87 88 89 90 91 92 93 94 95 96 97 98 99 100 101 102 103 104 105 106 107 108 109 110 111 112 113 114 115 116 117 118 119 120 121 122 123 124 125 126 127 128 129 130 131 132 133 134 135 136 137 138 139 140 141 142 143 144 145 146 147 148 149 150 151 152 153 154 155 156 157 158 159 160 161 162 163 164 165 166 167 168 169 170 171 172 173 174 175 176 177 178 179 180 181 182 183 184 185 186 187 188 189 190 191 192 193 194 195 196 197 198 199 200 201 202 203 204 205 206 207 208 209 210 211 212 213 214 215 216 217 218 219 220 221 222 223 224 225 226 227 228 229 230 231 232 233 234 235 236 237 238 239 240 241 242 243 244 245 246 247 248 249 250 251 252 253 254 255 256 257 258 259 260 261 262 263 264 265 266 267 268 269 270 271 272 273 274 275 276 277 278 279 280 281 282 283 284 285 286 287 288 289 290 291 292 293 294 295 296 297 298 299 300 301 302 303 304 305 306 307 308 309 310 311 312 313 314 315 316 317 318 319 320 321 322 323 324 325 326 327 328 329 330 331 332 333 334 335 336 337 338 339 340 341 342 343 344 345 346 347 348 349 350 351 |
<# .synopsis the test-backups script will reach out to a sql server central management server, derive a server list and database backup list. then asynchronously restore them to a test server followed by integrity checks. .example .\test-backups.ps1 -cmsname "localhost" -servergroup "Production" -testservername "localhost" -randommultiplier 0.1 -loggingdbname "BackupTest" .\test-backups.ps1 -cmsname "localhost" -servergroup "Production" -testservername "localhost" -randommultiplier 0.5 -loggingdbname "BackupTest" -recurse .inputs [string]$cmsname - the central management server to connect to. [string]$servergroup - the root server group to parse. [string]$testservername - the test server to restore to. [string]$loggingdbname - name of the database on the test server to log results to. [decimal]$randommultiplier - decimal multiplier for the number of servers and databases to test at a time. e.g. 0.1=10%, 1=100%. [switch]$recurse - switch to determine whether the server group should be recursively searched. .outputs none. #> [CmdletBinding()] param ( [Parameter(Mandatory=$true)] [ValidateNotNullorEmpty()] [string]$cmsName, [Parameter(Mandatory=$true)] [ValidateNotNullorEmpty()] [string]$serverGroup, [Parameter(Mandatory=$true)] [ValidateNotNullorEmpty()] [string]$testServerName, [Parameter(Mandatory=$true)] [ValidateNotNullorEmpty()] [string]$loggingDbName, [Parameter(Mandatory=$true)] [ValidateNotNullorEmpty()] [decimal]$randomMultiplier, [parameter(Mandatory=$false)] [switch]$recurse ) Import-Module SQLPS -DisableNameChecking $ErrorActionPreference = "Continue"; Trap { $err = $_.Exception while ( $err.InnerException ) { $err = $err.InnerException write-output $err.Message throw $_.Exception; }; continue } Function Parse-ServerGroup($serverGroup) { $results = $serverGroup.RegisteredServers; foreach($group in $serverGroup.ServerGroups) { $results += Parse-ServerGroup -serverGroup $group; } return $results; } Function Get-ServerList ([string]$cmsName, [string]$serverGroup, [switch]$recurse) { $connectionString = "data source=$cmsName;initial catalog=master;integrated security=sspi;" $sqlConnection = New-Object ("System.Data.SqlClient.SqlConnection") $connectionstring $conn = New-Object ("Microsoft.SQLServer.Management.common.serverconnection") $sqlconnection $cmsStore = New-Object ("Microsoft.SqlServer.Management.RegisteredServers.RegisteredServersStore") $conn $cmsRootGroup = $cmsStore.ServerGroups["DatabaseEngineServerGroup"].ServerGroups[$serverGroup] if($recurse) { return Parse-ServerGroup -serverGroup $cmsRootGroup | select ServerName } else { return $cmsRootGroup.RegisteredServers | select ServerName } } [scriptblock]$restoreDatabaseFunction = { Function Restore-Database { <# .synopsis restores a full database backup to target server. it will move the database files to the default data and log directories on the target server. .example restore-database -servername "localhost" -newdbname "testdb" -backupfilepath "D:\Backup\testdb.bak" restore-database -servername "localhost" -newdbname "testdb" -backupfilepath "\\KINGFERGUS\Shared\Backup\testdb.bak" -dropdbbeforerestore -conductintegritychecks .inputs [string]$servername - the server to restore to. [string]$newdbname - the database name that you'd like to use for the restore. [string]$backupfilepath - local or unc path for the *.bak file (.bak extension is required). [string]$origservername - name of the server where the backup originated. used for logging purposes. [string]$loggingdbname - name of the logging database. [switch]$dropdbbeforerestore - set if you would like the database matching $newdbname to be dropped before restored. the intent of this would be to ensure exclusive access to the database can be had during restore. [switch]$conductintegritychecks - set if you would like dbcc checktables to be run on the entire database after restore. .outputs none. #> [CmdletBinding()] param ( [Parameter(Mandatory=$true)] [ValidateNotNullorEmpty()] [string]$serverName, [Parameter(Mandatory=$true)] [ValidateNotNullorEmpty()] [string]$newDBName, [parameter(Mandatory=$true)] [ValidateNotNullorEmpty()] [string]$backupFilePath, [parameter(Mandatory=$true)] [ValidateNotNullorEmpty()] [string]$origServerName, [parameter(Mandatory=$true)] [ValidateNotNullorEmpty()] [string]$loggingDbName, [parameter(Mandatory=$false)] [switch]$dropDbBeforeRestore, [parameter(Mandatory=$false)] [switch]$conductIntegrityChecks ) Import-Module SQLPS -DisableNameChecking ## BEGIN input validation ## $ErrorActionPreference = "Stop"; Trap { $err = $_.Exception while ( $err.InnerException ) { $err = $err.InnerException write-output $err.Message throw $_.Exception; }; continue } if($backupFilePath -notlike "*.bak") { throw "the file extension should be .bak." } if(!(test-path -Path $backupFilePath)) { throw "Could not find the backup file." } # Test connection $server = New-Object ("Microsoft.SqlServer.Management.Smo.Server") $serverName if($server.Version.Major -eq $null) { throw "Could not establish connection to $serverName." } ## END input validation ## # Create restore object and specify its settings $smoRestore = new-object("Microsoft.SqlServer.Management.Smo.Restore") $smoRestore.Database = $newDBName $smoRestore.NoRecovery = $false; $smoRestore.ReplaceDatabase = $true; $smoRestore.Action = "Database" # Create location to restore from $backupDevice = New-Object("Microsoft.SqlServer.Management.Smo.BackupDeviceItem") ($backupFilePath, "File") $smoRestore.Devices.Add($backupDevice) # Get the file list from backup file $dbFileList = $smoRestore.ReadFileList($server) # Specify new data file (mdf) $smoRestoreDataFile = New-Object("Microsoft.SqlServer.Management.Smo.RelocateFile") $defaultData = $server.DefaultFile if (($defaultData -eq $null) -or ($defaultData -eq "")) { $defaultData = $server.MasterDBPath } $smoRestoreDataFile.PhysicalFileName = "$defaultData$newDBName" + ".mdf"; $smoRestoreDataFile.LogicalFileName = $dbFileList.Select("FileId = 1").LogicalName $smoRestore.RelocateFiles.Add($smoRestoreDataFile) | Out-Null # Specify new log file (ldf) $smoRestoreLogFile = New-Object("Microsoft.SqlServer.Management.Smo.RelocateFile") $defaultLog = $server.DefaultLog if (($defaultLog -eq $null) -or ($defaultLog -eq "")) { $defaultLog = $server.MasterDBLogPath } $smoRestoreLogFile.PhysicalFileName = "$defaultData$newDBName" + "_Log.ldf"; $smoRestoreLogFile.LogicalFileName = $dbFileList.Select("FileId = 2").LogicalName $smoRestore.RelocateFiles.Add($smoRestoreLogFile) | Out-Null # Loop through remaining files to generate relocation file paths. $smoRestoreFile = New-Object("Microsoft.SqlServer.Management.Smo.RelocateFile") foreach($file in $dbFileList.Select("FileId > 2")) { $smoRestoreFile = New-Object("Microsoft.SqlServer.Management.Smo.RelocateFile") $smoLogicalName = $file.LogicalName; $smoRestoreFile.LogicalFileName = $smoLogicalName $smoRestoreFile.PhysicalFileName = "$defaultData$smoLogicalName" + ".ndf"; $smoRestore.RelocateFiles.Add($smoRestoreFile) | Out-Null } # Ensure exclusive access if($dropDbBeforeRestore -and $server.Databases[$newDBName] -ne $null) { $server.KillAllProcesses($newDBName); $server.KillDatabase($newDBName); } #Log restore process - start [string]$restoreResultId = [System.Guid]::NewGuid().ToString(); [string]$sql = "INSERT INTO [dbo].[RestoreResult] ([restoreResultId] ,[originatingServerName] ,[databaseName] ,[backupFilePath]) VALUES ('$restoreResultId' ,'$origServerName' ,'$newDBName' ,'$backupFilePath');" Invoke-Sqlcmd -ServerInstance $serverName -Database $loggingDbName -Query $sql -QueryTimeout 30; # Restore the database $errList = @(); try { $smoRestore.SqlRestore($server) } catch { [System.Exception] $err = $_.Exception $errList += $err; while ( $err.InnerException ) { $err = $err.InnerException $errList += $err; write-output $err.Message }; } #Log restore process - end $restoreEndUtc = Get-Date; [string]$restoreEnd = $restoreEndUtc.ToUniversalTime(); [string]$errMsg; foreach($msg in $errList) { $errMsg += $msg + "'r'n"; } $sql = "UPDATE [dbo].[RestoreResult] SET [endDateTime] = '$restoreEnd' "; if($errMsg -ne $null) { $sql += ",[errorMessage] = '$errMsg' "; } $sql += "WHERE restoreResultId = '$restoreResultId';"; Invoke-Sqlcmd -ServerInstance $serverName -Database $loggingDbName -Query $sql -QueryTimeout 30; if($conductIntegrityChecks) { #Log integrity checks - start [string]$checkDbResultId = [System.Guid]::NewGuid().ToString(); [string]$sql = "INSERT INTO [dbo].[CheckDbResult] ([checkDbResultId] ,[restoreResultId]) VALUES ('$checkDbResultId' ,'$restoreResultId');" Invoke-Sqlcmd -ServerInstance $serverName -Database $loggingDbName -Query $sql -QueryTimeout 30; #Integrity checks $errList = @(); try { $server.Databases[$newDBName].CheckTables("None"); } catch { [System.Exception] $err = $_.Exception $errList += $err; while ( $err.InnerException ) { $err = $err.InnerException $errList += $err; write-output $err.Message }; } #Log integrity checks - end $checkDbEndUtc = Get-Date; [string]$checkDbEnd = $restoreEndUtc.ToUniversalTime(); [string]$errMsg; foreach($msg in $errList) { $errMsg += $msg + "'r'n"; } $sql = "UPDATE [dbo].[CheckDbResult] SET [endDateTime] = '$checkDbEnd' "; if($errMsg -ne $null) { $sql += ",[errorMessage] = '$errMsg' "; } $sql += "WHERE checkDbResultId = '$checkDbResultId';"; Invoke-Sqlcmd -ServerInstance $serverName -Database $loggingDbName -Query $sql -QueryTimeout 30; } # clean up databases $server.KillAllProcesses($newDBName); $server.KillDatabase($newDBName); Write-Host -Object "Restore-Database has completed processing." } } if($recurse) { $serverList = Get-ServerList -cmsName $cmsName -serverGroup $serverGroup -recurse } else { $serverList = Get-ServerList -cmsName $cmsName -serverGroup $serverGroup } $servers = $serverList | Get-Random -Count ([Math]::Ceiling([decimal]$serverList.Count * $randomMultiplier)) $jobs = @() foreach($svr in $servers) { $server = New-Object ("Microsoft.SqlServer.Management.Smo.Server") $svr.ServerName; $databaseList = $server.Databases | Where-Object { $_.IsSystemObject -eq $false }; $databaseList = $databaseList | Get-Random -Count ([Math]::Ceiling([decimal]$databaseList.Count * $randomMultiplier)) | select Name; $backupSetQuery = "SELECT TOP 1 BMF.physical_device_name FROM msdb.dbo.backupmediafamily BMF INNER JOIN msdb.dbo.backupset BS ON BS.media_set_id = BMF.media_set_id WHERE BS.database_name = '`$(databaseName)' AND BS.type = 'D' AND BS.is_copy_only = 0 AND BMF.physical_device_name NOT LIKE '{%' ORDER BY BS.backup_finish_date DESC"; foreach($database in $databaseList) { $params = "databaseName = " + $database.Name; $results = @(); $results += Invoke-Sqlcmd -ServerInstance $server.Name -Query $backupSetQuery -Variable $params -QueryTimeout 30; if($results.Count -eq 0 -or $results -eq $null) { continue; } [string]$backupPath = $results[0].physical_device_name; # set arguments $arguments = @() $arguments += $testServerName; $arguments += $database.Name; $arguments += $backupPath; $arguments += $loggingDbName; $arguments += $svr.ServerName; # start job $jobs += Start-job -ScriptBlock {Restore-Database -serverName $args[0] -newDBName $args[1] -backupFilePath $args[2] -loggingDbName $args[3] -origServerName $args[4] –dropDbBeforeRestore -conductIntegrityChecks} ` -InitializationScript $restoreDatabaseFunction -ArgumentList($arguments) -Name $database.Name; } } $jobs | Wait-Job | Receive-Job $jobs | Remove-Job |
Central Management Server
Setup
As previously mentioned, Karla is using SQL Server’s Central Management Server (CMS) to organize her database server list and this will be the source of truth for her backup testing process. She has her servers registered to server groups, one group per environment, by following MSDN’s instructions when using SSMS.
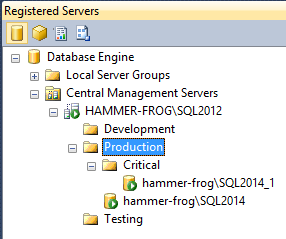
The Production folder, seen above, will be the list of servers to be selected from for testing. First she will need to import the SQLPS module. This will load all of the assemblies necessary for using the SQL Server Management Objects and a number of useful Cmdlets, some of which she will be using later.
|
1 2 3 |
Import-Module SQLPS -DisableNameChecking |
NOTE: The DisableNameChecking switch is used because some of the commands in the SQLPS module do not comply with PowerShell’s list of approved verbs, such as Backup and Restore.
Data retrieval
Next we’ll build the functions which will derive a server list from the CMS server group.
|
1 2 3 4 5 6 7 8 9 10 11 12 13 14 15 16 17 18 19 20 21 22 23 24 25 26 27 28 |
Function Parse-ServerGroup($serverGroup) { $results = $serverGroup.RegisteredServers; foreach($group in $serverGroup.ServerGroups) { $results += Parse-ServerGroup -serverGroup $group; } return $results; } Function Get-ServerList ([string]$cmsName, [string]$serverGroup, [switch]$recurse) { $connectionString = "data source=$cmsName;initial catalog=master;integrated security=sspi;" $sqlConnection = New-Object ("System.Data.SqlClient.SqlConnection") $connectionstring $conn = New-Object ("Microsoft.SQLServer.Management.common.serverconnection") $sqlconnection $cmsStore = New-Object ("Microsoft.SqlServer.Management.RegisteredServers.RegisteredServersStore") $conn $cmsRootGroup = $cmsStore.ServerGroups["DatabaseEngineServerGroup"].ServerGroups[$serverGroup] if($recurse) { return Parse-ServerGroup -serverGroup $cmsRootGroup | select ServerName } else { return $cmsRootGroup.RegisteredServers | select ServerName } } |
The Get-ServerList function will accept the CMS server name, the root server group name (Production in our case), and an optional switch for making the function recursive. The goal with this function is to retrieve the Microsoft.SqlServer.Management.RegisteredServers.RegisteredServersStore object and then return a list of RegisteredServers.
Selecting backup files to test
Once the server list is retrieved, a randomly selected sub-set of the servers is needed, followed by a randomly selected sub-set of the databases from those servers.
Get-Random
For this Karla will pipe the server list into the Get-Random PowerShell Cmdlet using the –Count option to designate the number of objects to select.
|
1 |
$servers = Get-ServerList -cmsName “localhost\SQL2012” -serverGroup “Production” -recurse | Get-Random -Count 1 |
For this example, randomly selecting one server from the list would be ok, since there are only two servers registered. This, however, wouldn’t scale so Karla is going to derive the count based on a percentage of the servers. Here, the Math.Ceiling static method is being used to guarantee that zero is not selected.
|
1 2 3 4 5 |
[decimal]$randomMultiplier = 0.1; $serverList = Get-ServerList -cmsName $cmsName -serverGroup $serverGroup -recurse $servers = $serverList | Get-Random -Count ([Math]::Ceiling([decimal]$serverList.Count * $randomMultiplier)) |
The same concept will apply to retrieving the list of databases. The SMO.Server and Database objects will be used to retrieve a list of databases for each server. This loop will also be where the restores and integrity checks are initiated, discussed further in the next few sections.
|
1 2 3 4 5 6 7 8 9 |
foreach($svr in $servers) { $server = New-Object ("Microsoft.SqlServer.Management.Smo.Server") $svr.ServerName; $databaseList = $server.Databases | Where-Object { $_.IsSystemObject -eq $false }; $databaseList = $databaseList | Get-Random -Count ([Math]::Ceiling([decimal]$databaseList.Count * $randomMultiplier)) | select Name; ... } |
Get backup paths
Next Karla will need to find the most recent full backup that was taken for the list of databases chosen above. For this she will need to use T-SQL to query msdb.dbo.backupset and msdb.dbo.backupmediafamily to extract the physical file paths.
NOTE: Local or UNC paths are acceptable for this process. Understand that restore commands are sent to the SQL Server and then the restore itself is run on the SQL Server. This means that local paths must be local to the SQL Server not to the PowerShell script.
|
1 2 3 4 5 6 7 8 9 10 |
SELECT TOP 1 BMF.physical_device_name FROM msdb.dbo.backupmediafamily BMF INNER JOIN msdb.dbo.backupset BS ON BS.media_set_id = BMF.media_set_id WHERE BS.database_name = 'myDbName' --Database name to look-up AND BS.type = 'D' --D = Database AND BS.is_copy_only = 0 --0 = false AND BMF.physical_device_name NOT LIKE '{%' --filter out SQL Server VSS writer service backups ORDER BY BS.backup_finish_date DESC |
To execute this script Karla will use the SQLPS module, imported earlier on. The Invoke-SqlCmd cmdlet will be used to execute the T-SQL. The cmdlet accepts a query variable and a set of parameters, in this case, the database name.
|
1 2 3 4 5 6 7 8 9 10 11 12 13 14 15 16 17 18 19 20 21 22 |
$backupSetQuery = "SELECT TOP 1 BMF.physical_device_name FROM msdb.dbo.backupmediafamily BMF INNER JOIN msdb.dbo.backupset BS ON BS.media_set_id = BMF.media_set_id WHERE BS.database_name = '`$(databaseName)' AND BS.type = 'D' AND BS.is_copy_only = 0 AND BMF.physical_device_name NOT LIKE '{%' ORDER BY BS.backup_finish_date DESC"; foreach($database in $databaseList) { $params = "databaseName = " + $database.Name; $results = @(); $results += Invoke-Sqlcmd -ServerInstance $server.Name -Query $backupSetQuery -Variable $params -QueryTimeout 30; if($results.Count -eq 0 -or $results -eq $null) { continue; } [string]$backupPath = $results[0].physical_device_name; ... } |
Asynchronous jobs
Up to this point everything has been about collecting the data required to issue a restore command. The Restore-Database function will be called asynchronously for each of our backup files that we wish to restore. This is a custom function which will be covered in depth in the following section.
In PowerShell 3.0 the Start-Job cmdlet was introduced. This cmdlet creates and starts a job which executes on an asynchronous thread. It returns an object representing the job which is important for keeping track of its progress and retrieving output from the thread.
|
1 2 3 4 5 6 7 8 9 10 11 12 13 14 15 |
$jobs = @() ... # set arguments $arguments = @() $arguments += $testServerName; $arguments += $database.Name; $arguments += $backupPath; $arguments += $loggingDbName; $arguments += $svr.ServerName; # start job $jobs += Start-job -ScriptBlock {Restore-Database -serverName $args[0] -newDBName $args[1] -backupFilePath $args[2] -loggingDbName $args[3] -origServerName $args[4] –dropDbBeforeRestore -conductIntegrityChecks} ` -InitializationScript $restoreDatabaseFunction -ArgumentList($arguments) -Name $database.Name; |
As can be seen, the Restore-Database function will accept the server name, the name for the database to be restored, the backup file path, the name of a database to log test results in, the originating server name, an optional switch to drop the existing database before restoring, and finally our switch to conduct integrity checks (CheckTables) after the restore.
In order to execute our thread we pass in a script block object to the Start-Job cmdlet calling our function. Next we pass in another script block object to initialize the session. In this case, the Restore-Database function definition is supplied in a scriptblock variable format. Finally, the argument list parameter accepts an array of objects to be used as variables in the original script block.
Later in the script the array of $jobs will be used to wait on the threads to complete and return their output like this.
|
1 2 3 4 |
$jobs | Wait-Job | Receive-Job $jobs | Remove-Job |
The Wait-Job cmdlet pauses the current session and waits for all of the threads in the $jobs array to complete before moving on. Then the jobs are looped through and Receive-Job is called for each of them to retrieve the output, whether of the type information, warning, or error. Finally, Remove-Job to kill the background job.
Restore with SMO
At the heart of the Restore-Database function are the SQL Server Management Objects. The Server object and the Database objects have already been touched on when the backup files were selected for restore. In the Restore-Database function, SMO is taken a bit further.
Restore-Database function break-down
Parameter definitions
|
1 2 3 4 5 6 7 8 9 10 11 12 13 14 15 16 17 18 19 20 21 22 23 |
CmdletBinding()] param ( [Parameter(Mandatory=$true)] [ValidateNotNullorEmpty()] [string]$cmsName, [Parameter(Mandatory=$true)] [ValidateNotNullorEmpty()] [string]$serverGroup, [Parameter(Mandatory=$true)] [ValidateNotNullorEmpty()] [string]$testServerName, [Parameter(Mandatory=$true)] [ValidateNotNullorEmpty()] [string]$loggingDbName, [Parameter(Mandatory=$true)] [ValidateNotNullorEmpty()] [decimal]$randomMultiplier, [parameter(Mandatory=$false)] [switch]$recurse ) |
By using the CmdletBinding attribute and defining a set of parameters Karla is able to produce a function that is invoked as if it were a built-in cmdlet. The Parameter and ValidateNotNullorEmpty attributes are great for pre-validating the inputs before the function even begins.
Custom validation
|
1 2 3 4 5 6 7 8 9 10 11 12 13 14 15 16 17 18 19 20 21 22 23 24 25 26 27 28 29 30 31 32 |
## BEGIN input validation ## $ErrorActionPreference = "Stop"; Trap { $err = $_.Exception while ( $err.InnerException ) { $err = $err.InnerException write-output $err.Message throw $_.Exception; }; continue } if ($backupFilePath -notlike "*.bak") { throw "the file extension should be .bak." } if (!(test-path -Path $backupFilePath)) { throw "Could not find the backup file." } # Test connection $server = New-Object ("Microsoft.SqlServer.Management.Smo.Server") $serverName if($server.Version.Major -eq $null) { throw "Could not establish connection to $serverName." } ## END input validation ## |
To move inside the function, Karla has coded some additional parameter validation. First, the file path extension is verified. Next, the Test-Path cmdlet is used to verify that the path is syntactically correct.
The Server class is instantiated partially for its use later in the function and partially as a means of validating the inputted server name. When the object is instantiated a connection is not attempted. So, she checks the major version of the server. This will establish a connection and retrieve the version number. If the return object is $null then the connection could not be established and an exception is thrown.
Instantiate the Restore object
|
1 2 3 4 5 6 7 8 9 10 11 12 13 14 15 |
# Create restore object and specify its settings $smoRestore = new-object("Microsoft.SqlServer.Management.Smo.Restore") $smoRestore.Database = $newDBName $smoRestore.NoRecovery = $false; $smoRestore.ReplaceDatabase = $true; $smoRestore.Action = "Database" # Create location to restore from $backupDevice = New-Object("Microsoft.SqlServer.Management.Smo.BackupDeviceItem") ($backupFilePath, "File") $smoRestore.Devices.Add($backupDevice) # Get the file list from backup file $dbFileList = $smoRestore.ReadFileList($server) |
The Restore object represents the settings which would normally be scripted in the T-SQL RESTORE DATABASE command. The basic settings are applied directly to the object, as seen above, immediately after the New-Object cmdlet.
Where things become a bit more complicated is when files need to be moved from the location stored in the backup file’s file list. This will almost always be the case for Karla because she is restoring production backups to a test server. It is not likely that every database server in the enterprise will have identical file paths for all databases which means that the restore command has to be told where to restore these files. Traditionally, the T-SQL MOVE option in the RESTORE DATABASE statement would be used but a list of all of the files is required to produce the MOVE paths.
In order to retrieve a list of the files dynamically she will execute her first restore operation, a restore of the backup’s file list. The backup file path is used to instantiate a BackupDeviceItem and is added to the restore object. Then a variable will be populated with the ReadFileList method output.
Generate RelocateFile objects
|
1 2 3 4 5 6 7 8 9 10 11 12 13 14 15 16 17 18 19 20 21 22 23 24 25 26 27 28 29 30 31 32 33 |
# Specify new data file (mdf) $smoRestoreDataFile = New-Object("Microsoft.SqlServer.Management.Smo.RelocateFile") $defaultData = $server.DefaultFile if (($defaultData -eq $null) -or ($defaultData -eq "")) { $defaultData = $server.MasterDBPath } $smoRestoreDataFile.PhysicalFileName = "$defaultData$newDBName" + ".mdf"; $smoRestoreDataFile.LogicalFileName = $dbFileList.Select("FileId = 1").LogicalName $smoRestore.RelocateFiles.Add($smoRestoreDataFile) | Out-Null # Specify new log file (ldf) $smoRestoreLogFile = New-Object("Microsoft.SqlServer.Management.Smo.RelocateFile") $defaultLog = $server.DefaultLog if (($defaultLog -eq $null) -or ($defaultLog -eq "")) { $defaultLog = $server.MasterDBLogPath } $smoRestoreLogFile.PhysicalFileName = "$defaultData$newDBName" + "_Log.ldf"; $smoRestoreLogFile.LogicalFileName = $dbFileList.Select("FileId = 2").LogicalName $smoRestore.RelocateFiles.Add($smoRestoreLogFile) | Out-Null # Loop through remaining files to generate relocation file paths. $smoRestoreFile = New-Object("Microsoft.SqlServer.Management.Smo.RelocateFile") foreach($file in $dbFileList.Select("FileId > 2")) { $smoRestoreFile = New-Object("Microsoft.SqlServer.Management.Smo.RelocateFile") $smoLogicalName = $file.LogicalName; $smoRestoreFile.LogicalFileName = $smoLogicalName $smoRestoreFile.PhysicalFileName = "$defaultData$smoLogicalName" + ".ndf"; $smoRestore.RelocateFiles.Add($smoRestoreFile) | Out-Null } |
There are three different file types that are targeted for relocation. Each of the files that are worked with will be identified by selecting the FileId attribute of the $dbFileList object. For the primary file it will be FileId 1, for the log file it will be FileId 2, and all other data files will have FileIds greater than 2.
For each file, a number of operations will take place. First, a RelocateFile object is instantiated and then the logical and physical file names are set. For the primary and log file, Karla will populate string variables derived from either the $server.DefaultFile and $server.DefaultLog paths, or the $server.MasterDBPath and $server.MasterDBLogPath. Finally, the RelocateFile object is added to the Restore object that has been maintained thus far.
Prepare server for restore
|
1 2 3 4 5 6 7 8 |
# Ensure exclusive access if($dropDbBeforeRestore -and $server.Databases[$newDBName] -ne $null) { $server.KillAllProcesses($newDBName); $server.KillDatabase($newDBName); } |
Given the defined process flow, each time this script executes there should only be system databases on the server. In case of a problem, though, the script will be self-healing. The dropDbDBeforeRestore switch is used to check for the existence of the database and, if exists, kill all connections to it and drop the database. With a T-SQL restore, this is normally accomplished by setting the SINGLE_USER mode but the SMO objects do not support this. SINGLE_USER mode could be set with T-SQL by using the Invoke-SqlCmd cmdlet, used early in the script, but the connection context would have to be maintained between it and the restore operation. The method seen above utilizes SMO and guarantees that the server is prepared for restore operations.
Restore and check integrity
|
1 2 3 4 5 6 7 8 9 10 11 12 13 14 15 16 17 18 19 20 21 22 23 24 25 |
# Restore the database $smoRestore.SqlRestore($server) try { #Integrity checks if($conductIntegrityChecks) { $server.Databases[$newDBName].CheckTables("None"); } } catch { [System.Exception] $err = $_.Exception while ( $err.InnerException ) { $err = $err.InnerException write-output $err.Message }; } ... } |
NOTE: This is a simplified version of the restore command and integrity checks. In the second part of this series, there will be modifications to this section to support logging the results. For a preview of the differences refer to the complete script at the beginning of the article.
Up to this point everything that was executed was in preparation for the restore operation and integrity checks. Here is where it all happens. The $smoRestore object contains all of the configurations and is ready to execute with the SqlRestore method. Normally a Try-Catch block would not be required to handle exceptions thrown from SMO. In this case, one is used because of the CheckTables method which handles the integrity checking. If there is corruption detected in the restored database, the normal error is less than useful.
|
1 2 3 4 5 6 7 8 |
Exception calling "CheckTables" with "1" argument(s): "Check tables failed for Database 'SQLHammerRocks'. " At line:5 char:1 + $server.Databases[$newDBName].CheckTables("None"); + ~~~~~~~~~~~~~~~~~~~~~~~ + CategoryInfo : NotSpecified: (:) [], MethodInvocationException + FullyQualifiedErrorId : Failed |
By using the Try-Catch and looping through the inner exceptions the corruption details that are desired can now be seen, such as the specific object_ids, object names, and column_ids.
|
1 2 3 4 5 6 7 8 9 10 |
Check tables failed for Database 'SQLHammerRocks'. An exception occurred while executing a Transact-SQL statement or batch. Check Catalog Msg 3853, State 1: Attribute (object_id=1977021079) of row (object_id=1977021079,column_id=1) in sys.columns does not have a matching row (object_id=1977021079) in sys.objects. Check Catalog Msg 3853, State 1: Attribute (object_id=1977021079) of row (object_id=1977021079,column_id=2) in sys.columns does not have a matching row (object_id=1977021079) in sys.objects. CHECKDB found 0 allocation errors and 2 consistency errors not associated with any single object. CHECKDB found 0 allocation errors and 2 consistency errors in database 'SQLHammerRocks'. |
Clean up
The final steps in the script will be to drop the database that was just restored so that disk space is available for further executions.
|
1 2 3 4 5 6 7 8 9 |
# clean up databases $server.KillAllProcesses($newDBName); $server.KillDatabase($newDBName); Write-Host -Object "Restore-Database has completed processing." } + |
Scheduling script execution
With the Central Management Server setup, servers registered, and script complete, all that must be done is schedule its execution. In Karla’s technical requirements, recorded at the beginning of the article, she has decided to use the SQL Server Agent for job scheduling. She will be using the PowerShell job step type because, in SQL Server 2012 and above, it uses the natively installed PowerShell components for execution.
Server setup
To prepare for this configuration, Karla will need to set her test server’s execution policy to RemoteSigned with the Set-ExecutionPolicy cmdlet. This only has to occur once on the test server so the manual method is demonstrated here, however, setting execution policy with group policy is recommended because it saves DBA time.
|
1 |
Set-ExecutionPolicy RemoteSigned -Force |
With the above script, Karla is able to execute script files. The file should be loaded on the server locally, possibly in a Scripts folder located on the operating system drive. The command must be run “As Administrator” and the –Force switch is used to bypass the confirmation question.
Creating the job
Creating a SQL Agent job to run a PowerShell script is extremely similar to how you would create a job to execute T-SQL or even SSIS packages. The only difference is in the options selected for the job step.
- Open SSMS and verify that the SQL Agent is started.
-
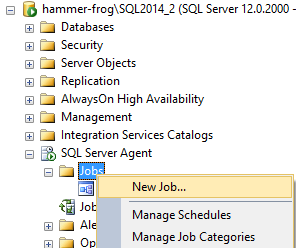
Drill into the SQL Server Agent in the object explorer and right-click on Jobs selecting New Job
-
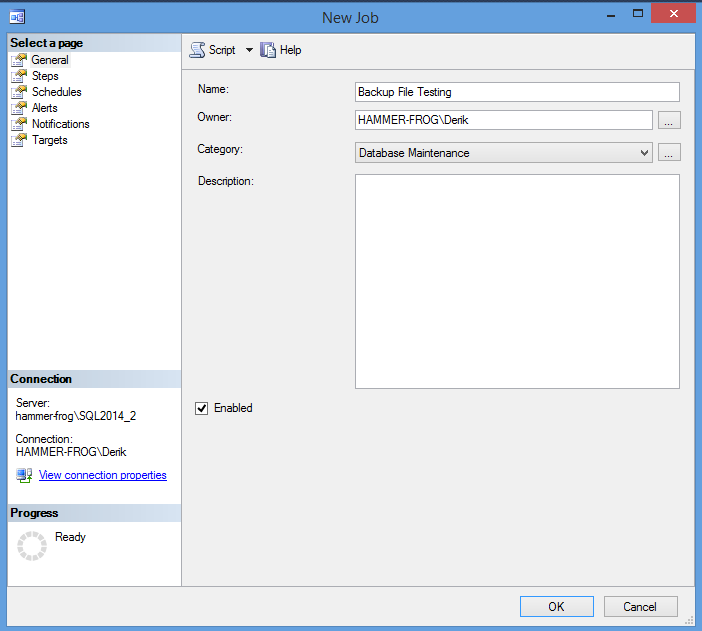
Give your job a name and make sure that the Enabled checkbox is checked. It is preferable to change the category to Database Maintenance as well but this is not required.
-
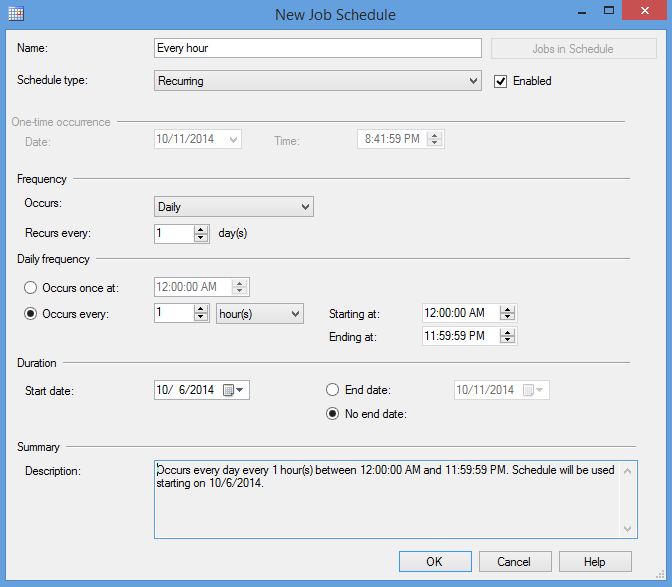
Jump down to the Schedules page, listed on the left.
- Click New…
-
Name your schedule, set frequency as desired. In Karla’s case, she will set the schedule to run daily, every hour, all day, with no end. This will keep the job running nearly 24 hours a day, 7 days a week to maximize the amount of tests possible in a given quarter.
-
Click OK.
- Navigate to the Steps page, listed on the left. Click New…
-
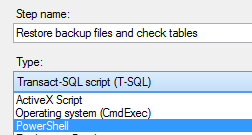
Once in the New Job Step window, name your step and open up the Type drop-down box.
NOTE: In versions of SQL Server equal to or greater than 2012, the PowerShell type will use the installed PowerShell executable and its execution policy, which was set in the last section. When running SQL Server 2008 or 2008 R2, the PowerShell type will run in a mini-shell called SQLPS.exe and use the execution policy RemoteSigned. The SQLPS.exe was created before the SQLPS PowerShell module was available and it was the best way of accessing the necessary assemblies. Unfortunately, it was compiled with limited cmdlets from PowerShell 2.0 and has not been updated. When using SQL Server 2008/R2 it is recommended to use the Operating Sytem (CmdExec) type instead because you can explicitly call the proper PowerShell.exe.
- Select PowerShell.
-
Using the Run As drop-down, select SQL Server Agent Service Account.
NOTE: This account is the one which will need file system access to the backup files. Karla’s SQL Server Agent account has the required read access to the backup shares. If yours doesn’t, then you will need to create a proxy which will then appear in this drop-down box.
-
Paste the PowerShell command for calling your script into the Command textbox.
1234Set-Location "C:\Scripts\".\Test-Backups.ps1 -cmsName localhost\sql2012 -serverGroup Production -testServerName localhost\sql2014_2 -loggingDbName BackupTest -randomMultiplier .1 -recurseREMINDER: The location passed into the Set-Location cmdlet is relative to the SQL Server. In this case, the Test-Backups.ps1 script must be located in the C:\Scripts folder and the SQL Server Agent account must have read and execute access to it.
- For ease of troubleshooting, navigate to the Advanced page and check the checkbox labeled Include step output in history.
- Click OK
- Click OK again on the New Job page.
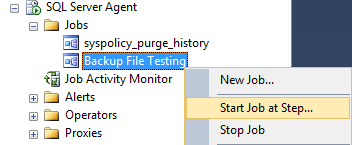
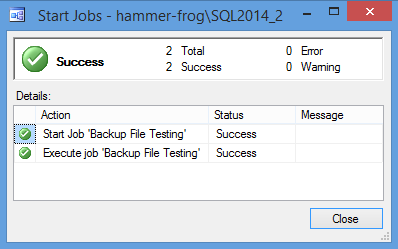
Test it!
The SQL Server Agent job is created all that is left is to start it. Right-click on the job in the object explorer and click Start Job at Step…
Wrap up
That was exciting! A lot has been covered.
- A system plan and process flow was established.
- A registered server list was added to the Central Management Server.
- Backup files were retrieved and restored.
- Databases were checked for data integrity.
- The process was scheduled for automated execution via a SQL Server Agent job.
In part 2 of this series, Reporting Results, different methods of querying the data will be explored. In addition, tweaks to the existing script will be made for result logging and a SQL Server Reporting Services Report will be setup.
Next article in this series:
SPOOLER ALERT: The descriptive section of this article didn’t include the logging mechanisms but the complete script referenced in the beginning did. Maybe there are hints of where part 2 will be heading in there.

Derik thanks our #sqlfamily for plugging the gaps in his knowledge over the years and actively continues the cycle of learning by sharing his knowledge with all and volunteering as a PASS User Group leader.
View all posts by Derik Hammer
- SQL query performance tuning tips for non-production environments - September 12, 2017
- Synchronizing SQL Server Instance Objects in an Availability Group - September 8, 2017
- Measuring Availability Group synchronization lag - August 9, 2016