
Azure SQL database is Database as a Service offering under the PaaS model in the Azure cloud. It is a fully managed SQL Server database engine that uses the latest stable version of SQL Server enterprise edition. This database service offers rich functionalities to increase the availability with the help of in-built high availability capability and reduce the manageability efforts by using easy and smooth deployments, automatic backup, and patching, etc. We generally use this deployment for modern cloud-compatible applications or if we want to leverage hyperscale or serverless options. This article will explain Azure SQL database backups to help you understand how backups work for these databases in the background and how can we use them for our data protection and recovery requirements.
Azure SQL Database Backup
Backups are managed internally by Azure for their PaaS database products like SQL database or Azure SQL managed instances. It also reduces administration complexities and the efforts DBAs spent on managing database backups. Azure SQL database supports 3 types of backups like SQL Server to achieve a point in time recovery.
- Full Backup
- Differential Backup
- Transaction Log backup
The full backup is a complete dump of your database including everything present in the database and transaction log file. Differential backup captures only those changes which were done since the last full backup and Transaction log backup captures the log records from the transaction log file. It is also used for point-in-time recovery. Transaction log backup captures log details in the incremental format so if you have missed any previous log backup then you cannot recover your database beyond that log backup.
Automatic backups for these databases run one full backup weekly, differential backup on every 12 to 24 hours interval, and transaction log backup on every 5 to 10 minutes. The first full backup will be taken by Azure as soon as you deploy your Azure SQL database. You don’t need to configure anything for that. Azure does it on your behalf whenever you deploy any SQL database. The remaining differential and transaction log backup will start running after this full backup in the background. The system will decide when to run which backup and their schedules based on the workload on your database. These backups can be used for point-in-time recovery, or to restore databases to another Azure location or region, or you need to restore this database from a very old backup that is kept under a long-term retention policy.
Backup Redundancy
Backup storage redundancy is also supported for automatic backups. There are three options available as part of backup storage redundancy. If we talk about costing or pricing standpoint then each type has its different price so the cost will be impacted if you are making any changes in backup storage redundancy type.
- Geo-redundant backup storage
- Local redundant backup storage
- Zone redundant backup storage
Geo-redundant backup storage is the default configuration. It creates multiple copies of your backup files to paired regions to ensure the backup is safe and always available. This option is very useful in case the primary region has become inaccessible or you want to restore your database to a different region. This can also be one of the cheapest disaster recovery solutions for your databases.
Local redundant backup storage keeps all your backup copies locally in the same data center where Zone redundant backup storage keeps backup files in different availability zones of the same region. These two options are suitable if you want to keep your backup copies near your primary site.
Backup storage redundancy cannot be changed after deploying SQL-managed instances whereas you can change it anytime for Azure SQL databases. You can choose desired backup storage redundancy for SQL managed instances during its creation only.
Retention period
Azure SQL databases support two types of backup retention policies:
- Short term retention policy
- Long term retention policy
Short term retention policy is used to address point-in-time restores whereas a long-term retention policy is used to address restores from long-term or older backups for various audit and compliance purposes. We can also save these backup files as part of a short-term retention policy for up to 7-35 days. Default backup retention is 7 days, but it varies depending on your service tier. The basic service tier under the DTU purchasing model has a maximum retention period of 7 days whereas standard and premium service tiers under the DTU purchasing model have a maximum retention period is 35 days. You can set this retention period as per your need using the Azure portal.
Long term retention policy is applicable if you want to save backup files for a longer time. You can keep a long-term retention period maximum of 10 years. It means if you have chosen 10 years as a long-term retention period then you would have the capability to restore your 10 years-old data. Long-term retention i.e. LTR executes a weekly backup and saves backup copies to Azure BLOB storage for up to 10 years. You should also not worry about data security as all backups are encrypted whether it is kept on storage or in transit.
I will create a PaaS database on Azure cloud and demonstrate to you its backup is being created automatically by Azure SQL.
Demonstration of Automatic Backup
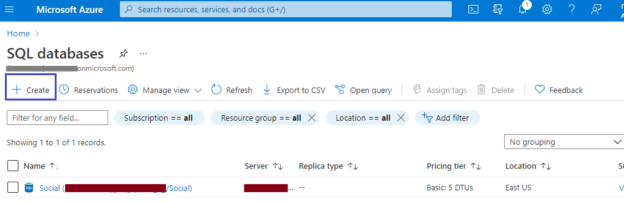
Log in to the Azure portal. Search SQL database and click on this option once it will appear in the dropdown menu. The database dashboard page will appear once you click on this in the above step. You can see here all your previously deployed SQL databases. If you want to create a new database click on the “+ Create” option showing on the below screen.

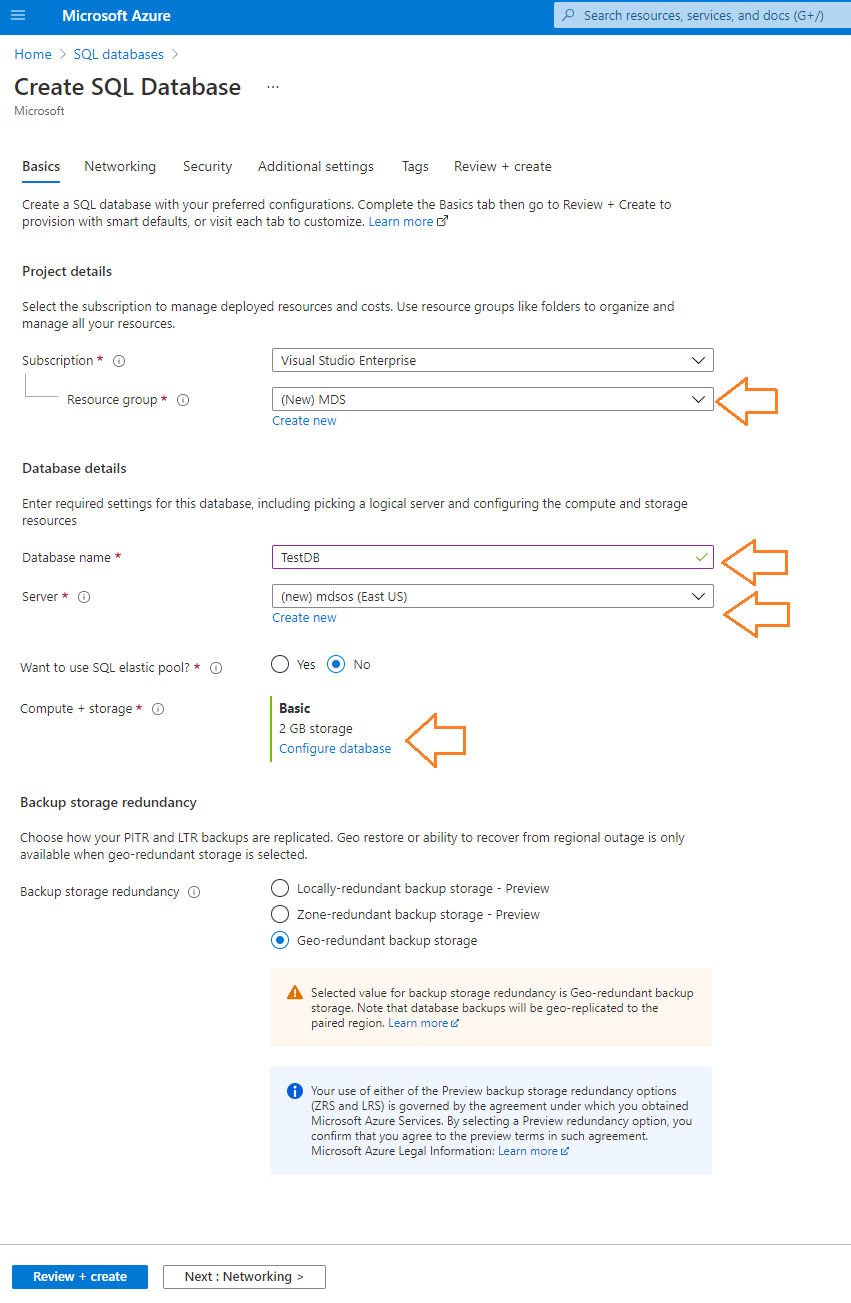
The below screen will appear once you click on Create button highlighted on the above screen. Make sure to fill and review all options showing in the orange color arrow of the below image while creating a new database. I will create this database now with keeping all default options. If you are creating it for your project then you must click on each tab shown in the below screen like Networking, Security, Additional settings, tags, etc.
Once you will fill in the details, hit the Review + create button to create your database.
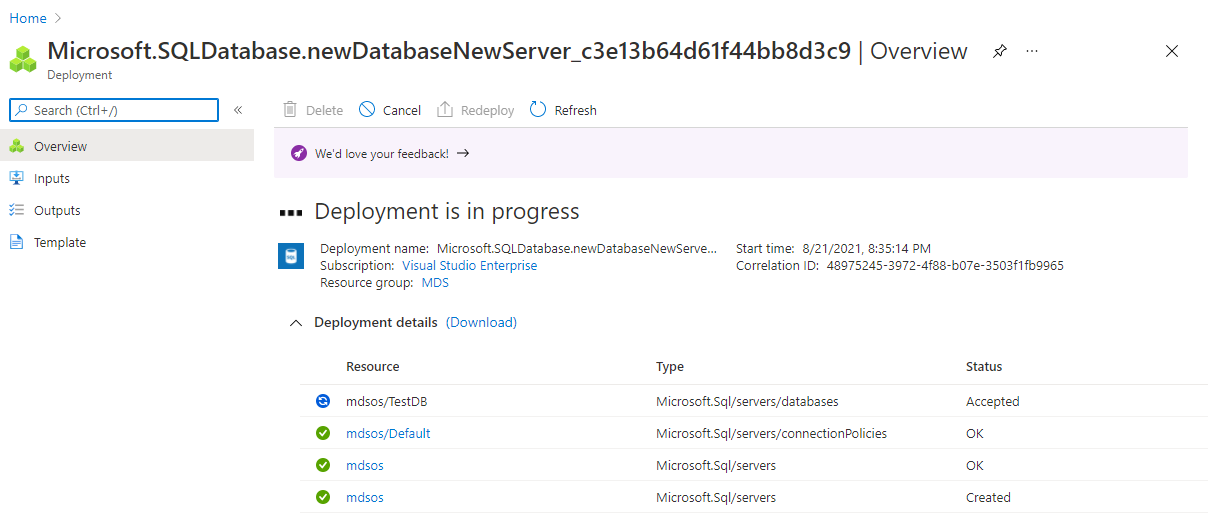
Deployment has started and is in the process now. Wait for few minutes to complete this process. Once deployment will complete, you can click on the “Go to Resource” option to jump to the database dashboard page.
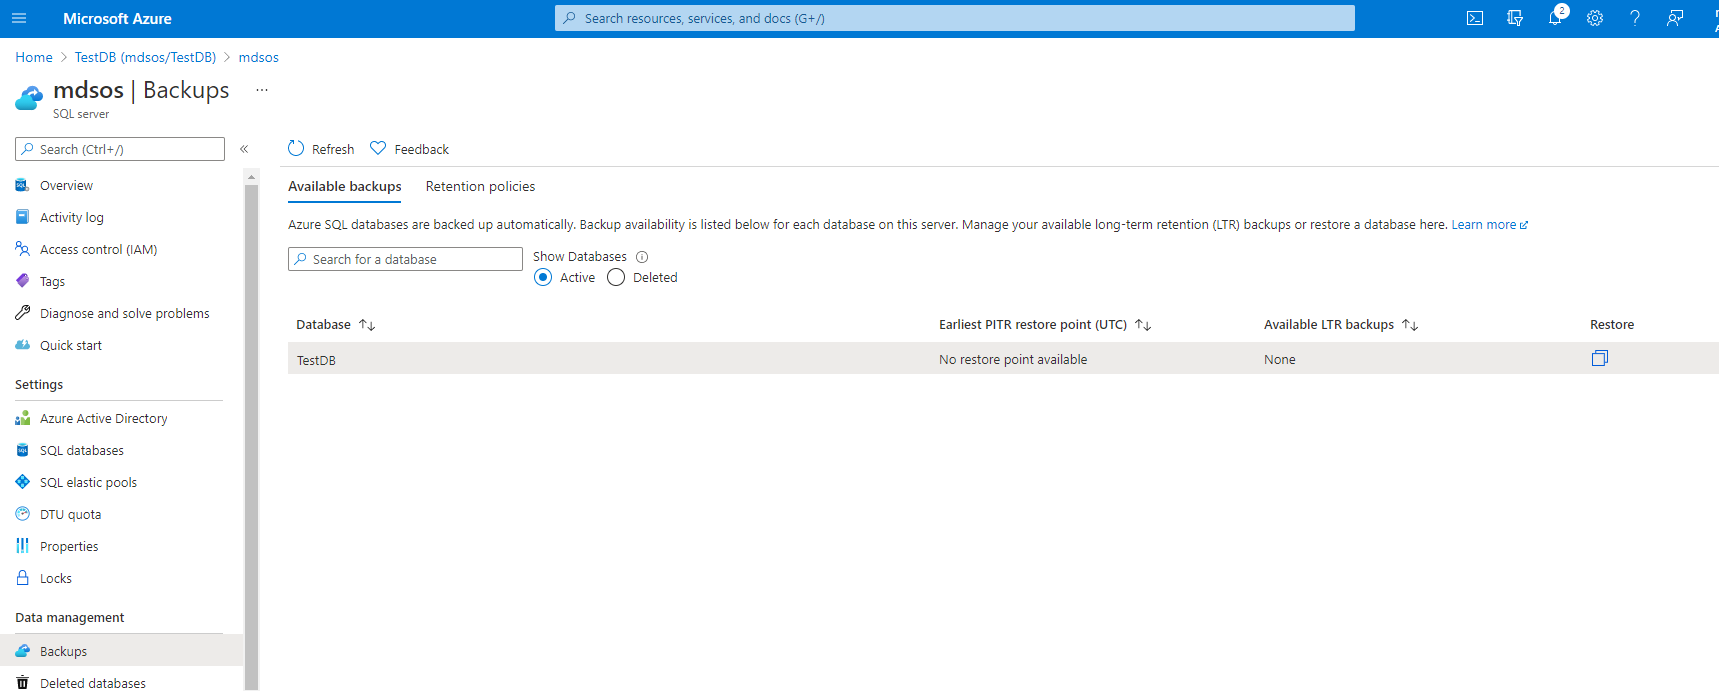
You need to access the logical server page to see all available backups. We have kept the logical server’s name as mdsos as it is showing as deployed in the above screen. Go ahead and access that page now by clicking at the logical server mdsos to see if the full backup has been created for this database or not.
There is no restore point is available as of now for this database, but Azure SQL will automatically create a full backup and create a restore point within few minutes. If you click on the restore option at this stage where there is no recovery point is available, then all options on the restore page will be shown as grayed out.
When you will refresh this page after few minutes you can see that a restore point has been created for this database as shown in the below image. It means full backup has been completed for this database and it is now restorable as well.
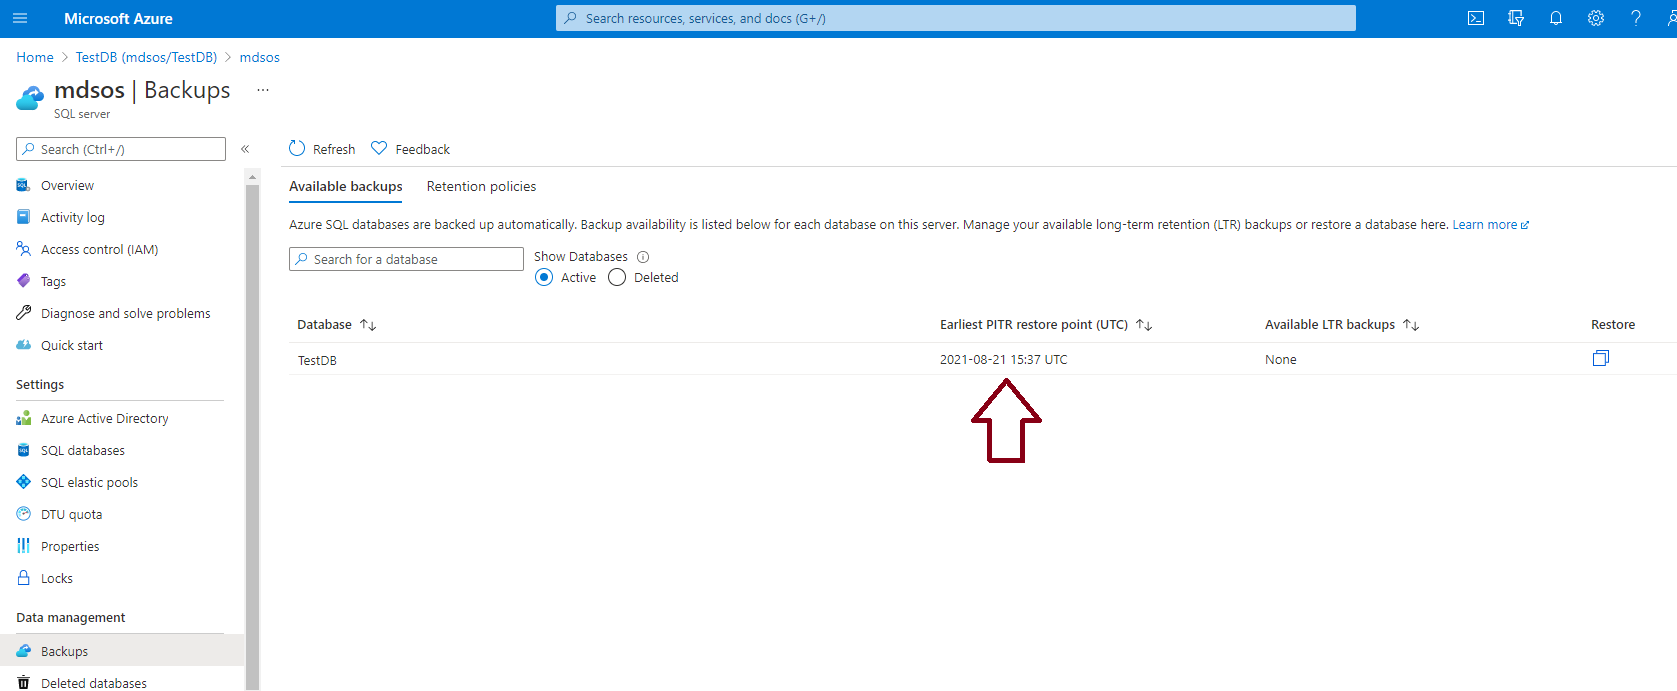
When you deploy this database with default options, network access will be blocked to access this database. If you are observing that your first full backup is not creating and still showing as “No restore point available” as shown in the above image, then you must check its firewall and networking settings to enable Allow Azure services and resources to access this server.
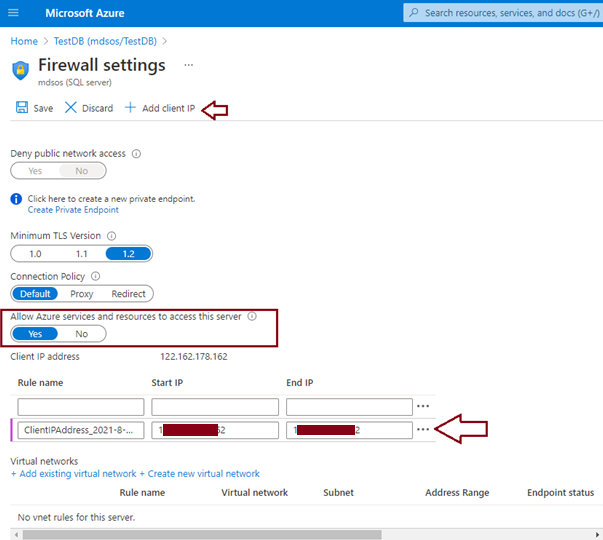
You can access this setting by clicking on the “Set server firewall” tab from the SQL database overview page. The below page will appear once you access the “Set server firewall” tab, here you can choose “Yes” for Allow Azure services and resources to access this server option and click at “Add client IP“. Save these settings by hitting the save button showing in the below image. Wait for few more minutes and you will see your database backup and restore point will be created after these changes.
You can also check its retention by accessing the Retention policies tab of the backup dashboard as shown in the below image.
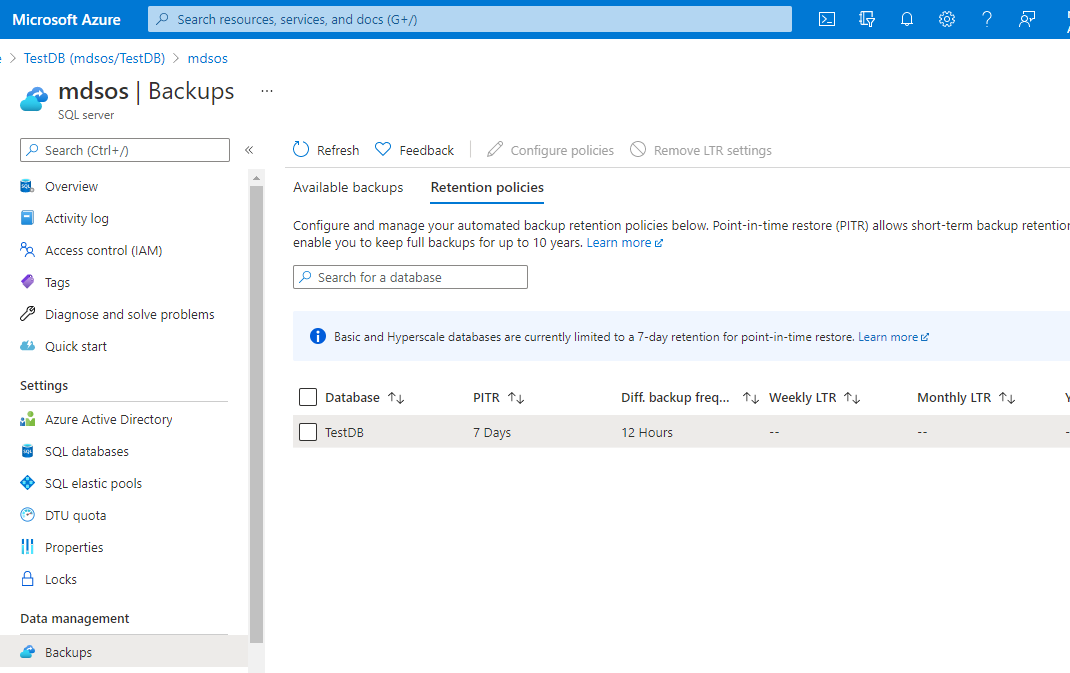
As I explained above, we can see short-term retention is set to 7 days for point-in-time recovery which is also a default value, and differential backup is configured every 12 hours. We can also observe that long-term retention (LTR) is not set by default for this database which we need to do it manually as per our retention policy.
Conclusion
Database backups are very important for data protection and recovery requirements. We must always ensure that our databases are being backed up considering our RPO (Recovery Point Objective) policy to prevent any data loss. Choosing a PaaS database product in Azure makes your life easy in getting these jobs done effortlessly because they are fully managed databases that take care of database backups internally and automatically without having any configuration from the user side. We have learned the basics of Azure SQL database backup one of such PaaS database products in Azure and saw how its backup runs and is configured automatically once we deploy SQL databases on Azure cloud in this article.

He loves to talk and write about database technologies. He has lead and delivered many projects from designing to deployments on Migrations to the cloud, heterogeneous migrations, Database consolidations, upgrades, heterogeneous replication, HA / DR solutions, automation, and major performance tuning projects.
You can also find him on LinkedIn
View all posts by Manvendra Singh
- Configure backup storage redundancy for Azure Cosmos DB account - May 15, 2024
- Difference between SQL SELECT UNIQUE and SELECT DISTINCT - January 16, 2024
- How to do a group by clause - April 12, 2023