
This third part of the BPE series shows the basics of Buffer Pool Extension and know how to implement and troubleshoot it.
During all the Buffer Pool Extension (BPE) series we have been explaining base concepts related to this new technology, as well as its benefits. We understood how the Buffer Pool works and the main benefits of implement the Buffer Pool Extension together with In-Memory technology. I recommend you to read the previous articles, if you are not familiarized with those concepts, so everything into this article will make more sense 🙂
We can describe the Buffer Pool Extension as “another cache level”, and in fact it is another level of cache. Microsoft describes it as “A caching architecture that can take advantage of present and future low-cost memory drives”.
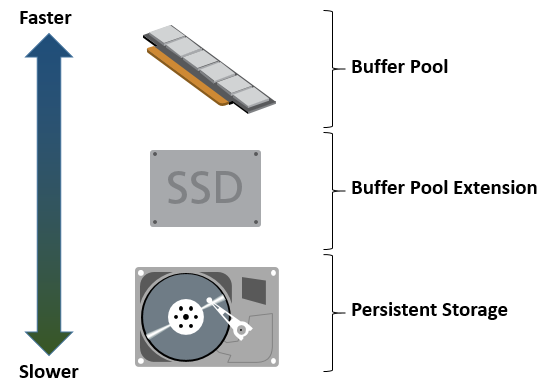
Observing the image, we can relate the speed with the role of each component. The Buffer Pool uses the RAM memory, since it needs the faster possible response. The RAM memory is a volatile kind of memory, so as soon as the system turns off we lose all the data stored.
The database files are stored in the non-volatile storage, normally mechanical spindles, where the storage capacity matters more than the speed. In the end of the day, its role is store as much data as it can. We have some kinds of storage available, some with a good performance, others with a higher storage capacity, but the Solid-State Drives, SSD, are evolving more and more, being more reliable, offering more capacity and, maybe the best of all, becoming affordable.
For who don’t understand the “fame” of Solid-State Drives, it is a kind of non-volatile storage device without moving parts. SSDs are based on semiconductor integrated circuits, using NAND-based flash memory. This the main characteristic that differs SSDs from magnetic systems, as HDs, or optical, as CDs and DVDs. This kind of disk is more resistant to shock, have a better latency and lower access time. Another advantage in not have moving components, as well as no spinning disks, is that it produces less noise (or I can dare to say zero noise), less heat energy is issued, which consequently consumes less electricity.
All those factors, make SSDs faster than the conventional storage. Of course there are constraints, unfortunately SSDs are not only based on good things…. At least so far. Well, talk about SSDs is not the main interest here… All of this was a way to explain that SSDs are much closer to the memory speed than mechanical disks. But even being much faster, the memory is unbeatable.
Taking advantage of SSD characteristics, Microsoft decided to create an extension of the Buffer Pool, based on that kind of storage devices, avoiding this way the access to slower disks in order to copy pages, in a low memory scenario.
Feature characteristics
The Buffer Pool Extension was introduced on SQL Server 2014. Its object is create a hot-area based on evicted pages from the Buffer Pool, using solid-state drives to extend the Buffer Pool. We will talk in details how this flow works.
The Buffer Pool Extension is only supported on 64-bit systems, but the good news is that we don’t need an Enterprise Edition to enable the feature!! In a product where the nice features are more and more requiring the Enterprise Edition this is an exception, so if you plan to deploy (or already have) a Standard Edition of SQL Server 2014, this is a good news, you can use the Buffer Pool Extension.
As the Buffer Pool Extension introduces another level of cache, avoiding evicted pages to be “lost”, the OLTP workload is improved.
To better explain this, let’s pretend that a user ran an ad-hoc query that moved a good number of pages into the Buffer Pool. All those pages will remain there, until SQL Server decides that a set of, or all those pages, are not interesting and are just taking the precious memory space assigned to the Buffer Pool. On that moment, the Buffer Manager will evict the selected pages. Nevertheless, SQL Server cannot predict what a user is going to do… So what if the same query runs again? All the evicted pages need to be fetched from the disk…and this is an expensive operation. By enabling the Buffer Pool Extension, this will not happen. Instead of just evict the page, the Buffer Pool Extension will analyze if the page is something interesting, and retain it in the SDD. This way, if the same case happens, we avoid to access a slow disk, and just copy the requested page from the SSD to the memory. This is the basic concept of the Buffer Pool Extension: create an intermediate between the very fast memory and the very lazy storage.
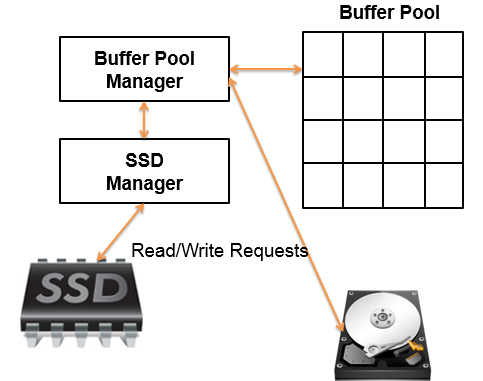
By implementing the Buffer Pool Extension, no application changes are needed, as it’s transparent. The Buffer Pool Extension is projected to be encapsulated in a way that all the SQL Server components don’t notice that it’s enabled. Just the Buffer Manager interacts with the SDD, in order to transfer pages to and from the Buffer Pool Extension.
Another important advantage is that enabling the Buffer Pool Extension will not take your data integrity in risk. The Buffer Pool Extension only deals with Clean Pages (remember the article about the Buffer Pool?) and this means that in case of disk failure, no data will be lost, as we have a persisted copy of all the pages that are stored into the SSD. In case of a disk failure, the Buffer Pool Extension feature will be disabled and SQL Server will keep working as usual, this way the BPE don’t represent an additional point of failure and won’t affect your instance’s availability.
Summarizing the Buffer pool benefits:
- Improves the OLTP performance.
- No application changes are required.
- Easy to setup and maintain.
- Deals with clean pages only – no data loss possibility.
How to deal with BPE?
There’s no user interface to enable this feature, or change the Buffer Pool Extension file path or size. At least, the syntax is very simple and generic:
|
1 2 3 4 5 |
ALTER SERVER CONFIGURATION SET BUFFER POOL EXTENSION { ON ( FILENAME = 'os_file_path_and_name' , SIZE = [ KB | MB | GB ] ) | OFF } |
From this syntax we can enable, disable and change the BPE configuration. And the best: no restart is required, all the changes take effect immediately.
Here goes an example on how to enable the BPE based in a disk “F” with 30 Gb available:
|
1 2 3 4 5 6 |
ALTER SERVER CONFIGURATION SET BUFFER POOL EXTENSION { ON (FILENAME='F:\Folder\BPEFile.bpe',SIZE=30GB) } |
To disable the BPE, simply execute the following code:
|
1 2 3 4 |
ALTER SERVER CONFIGURATION SET BUFFER POOL EXTENSION OFF GO |
Easy, hum?
And now… how can I change the file path and/or its size? This is simple, just disable the BPE feature and define it again!
|
1 2 3 4 5 6 7 8 9 10 11 |
ALTER SERVER CONFIGURATION SET BUFFER POOL EXTENSION OFF GO ALTER SERVER CONFIGURATION SET BUFFER POOL EXTENSION { ON ( FILENAME='F:\Folder\BPEFile_new.bpe',SIZE=60GB ) } |
Some Remarks
A recommendation from Microsoft is that the BPE file should be sized by values between 4 and 10 times the size of the physical available memory, but of course it depends of many factors…
Oh, remember that if you have an instance with a high amount of writes, the BPE may have no effects. But again, it depends…
Troubleshooting
With this new feature, a new DMV was introduced and new columns were added to an existing one, in order to reflect this new feature. New Extended Events and also performance counters were added. Following you can see the complete list:
DMVs:
- sys.dm_os_buffer_pool_extension_configuration
- sys.dm_os_buffer_descriptors
XEvents:
- sqlserver.buffer_pool_extension_pages_written
- sqlserver.buffer_pool_extension_pages_read
- sqlserver.buffer_pool_extension_pages_evicted
- sqlserver.buffer_pool_page_threshold_recalculated
Performance Counters:
- Extension page writes/sec
- Extension page reads/sec
- Extension outstanding IO counter
- Extension page evictions/sec
- Extension allocated pages
- Extension free pages
- Extension page unreferenced time
- Extension in use as percentage on buffer pool level
The following query, shows information regarding the pages in the Buffer Pool and Buffer Pool Extension, and help to understand if your BPE is being used:
|
1 2 3 4 5 6 7 8 9 10 |
SELECT (CASE WHEN ([is_modified] = 1 AND ([is_in_bpool_extension] IS NULL OR [is_in_bpool_extension] = 0)) THEN N'Dirty' WHEN ([is_modified] = 0 AND ([is_in_bpool_extension] IS NULL OR [is_in_bpool_extension] = 0)) THEN N'Clean' WHEN ([is_modified] = 0 AND [is_in_bpool_extension] = 1) THEN N'BPE' END) AS N'Page State', (CASE WHEN ([database_id] = 32767) THEN N'Resource Database' ELSE DB_NAME ([database_id]) END) AS N'Database Name', COUNT (*) AS N'Page Count' FROM sys.dm_os_buffer_descriptors GROUP BY [database_id], [is_modified], [is_in_bpool_extension] ORDER BY [database_id], [is_modified], [is_in_bpool_extension]; GO |
Another piece of the puzzle was delivered! This third part of the series showed the basics of Buffer Pool Extension and know how to implement and troubleshoot it. The next, and last, part will dive into the internals of this feature, so if you are curious to understand how it works, I recommend the reading 🙂

With experience working in Portugal, Holland, Germany and United Kingdom, he's always available to learn and share his knowledge, in order to contribute to SQL Server community,
View all posts by Murilo Miranda
- Understanding backups on AlwaysOn Availability Groups – Part 2 - December 3, 2015
- Understanding backups on AlwaysOn Availability Groups – Part 1 - November 30, 2015
- AlwaysOn Availability Groups – Curiosities to make your job easier – Part 4 - October 13, 2015