

Azure SQL Database is a cloud database hosted on Microsoft’s Azure platform. It is an enterprise-grade database service that supports a wide range of advanced features, and it can be used to store and process data. Customers can migrate data from an on-premises SQL Server without downtime and minimal disruption.
This article teaches about the migration of encrypted columns data from on-premises to Azure SQL Database.
IntroductionIn the digital era, an organization needs to protect itself from data stealers. It requires protection of your infrastructure, including servers, databases, networks, firewalls. Database encryption is also helpful to protect data if someone(hacker) gets data access to sensitive data such as PII data, credit card numbers, bank account numbers. It obfuscates existing data using certificates, keys, or passwords. Therefore, the data is helpful unless a person decrypts it using the same encryption method.
SQL Server has many encryption techniques such as Column level encryption, Transparent data encryption, Always Encrypted. It encrypts data using hierarchical encryption and key management infrastructure.
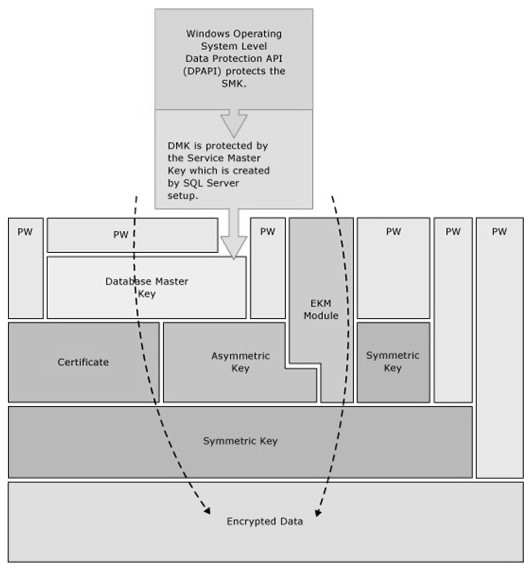
As shown above, it has a combination of certificates, symmetric and asymmetric keys. Let’s understand these terminologies in short.
Certificates
The public key certificate is a digitally signed statement, and it contains the public key of a corresponding private key. This private key is held by a person, device, or service. The certificate authority(CA) issues these certificates. SQL Server can also create self-signed certificates that follow the X509 standards
Asymmetric Keys
The asymmetric key consists of a private key with the corresponding public key. It has different keys for encryption and decryption
Symmetric Keys
The symmetric key uses the same key for both encryption and decryption purposes
In the articles, An overview of the column level SQL Server encryption and Column-level SQL Server encryption with SQL Server Always On Availability Groups, we explore how to use the column level encryption for a standalone and Always on an instance in SQL Server.
Requirements
The requirement is to migrate an on-prem SQL Server database (or table) encrypted using column level encryption to Azure SQL Database.
- Is it possible to migrate encrypted data from on-premise to Azure SQL Server?
- How do we migrate encrypted data?
- Users do not have directory access in Azure SQL. Therefore, you cannot copy existing certificates from on-prem to Azure. How will we move the certificates for encrypting or decrypting data?
For this article, I am using SQL Server 2019 (on-prem SQL instance) and Azure SQL Database for all demonstrations.
You can refer to the SQL Azure ctegory for deploying Azure resources.
Steps required on on-premise SQL Server database
As stated earlier, the requirement is to migrate encrypted data from the On-prem SQL instance to Azure DB. Therefore, In this section, we will do column-level encryption for the on-premise SQL database. These scripts uses a sample database [DemoDatabase] and table [userData].
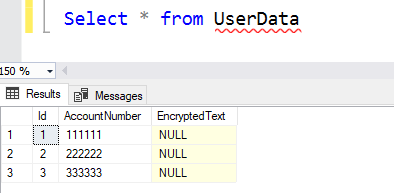
The [UserData] table has a column [AccountNumber] that we want to encrypt. We have an additional column [EncryptedText] with VARBINARY(MAX) data type to store the encrypted text.
Step 1: Prepare database and tables
Execute the following script to create a sample database and [UserData] table with a few records in it.
|
1 2 3 4 5 6 7 8 9 10 11 12 |
Use DemoDatabase Go CREATE TABLE dbo.UserData ( Id INT IDENTITY(1,1), [AccountNumber] VARCHAR(100) NOT NULL, EncryptedText VARBINARY(MAX) ); Go Insert into UserData ([AccountNumber]) values('111111') Insert into UserData (AccountNumber) values('222222') Insert into UserData (AccountNumber) values('333333') |
As shown below, a user having access to the [UserData] can view the customers’ account numbers.
Step 2: Create a master key
In this step, we create a database master key. This key is protected by the service master key that gets created during SQL Server installation. The service master key is also encrypted using the Windows Data Protection API (DPAPI).
You need to specify a complex password in the following script.
|
1 2 |
CREATE MASTER KEY ENCRYPTION BY PASSWORD = 'Demo@123'; GO |
Step 3: Create a Certification and Symmetric key
This step creates a self-signed certificate [MySQLCertificate] and the symmetric key. In the symmetric key, we specify the following values.
- Algorithm: AES_256
- Specify values for the IDENTITY_VALUE and KEY_Source to identify the certificate
- Specify the certificate name in the argument ENCRYPTION BY CERTIFICATE
|
1 2 3 4 5 6 7 8 |
CREATE CERTIFICATE MySQLCertificate WITH SUBJECT = 'Encrypt my Data'; GO CREATE SYMMETRIC KEY Cert_sym_key1 WITH ALGORITHM = AES_256, IDENTITY_VALUE = 'Rajendra Gupta', KEY_SOURCE = 'Lab Environment' ENCRYPTION BY CERTIFICATE MySQLCertificate GO |

Step 4: Encrypt data using the symmetric key
Once we have a symmetric key, we can encrypt column values using the following steps.
- Open the symmetric key and decrypt it using the certificate
- User the function ENCRYPTBYKEY() and store encrypted values in the column [EncryptedText]
|
1 2 3 4 5 6 7 |
OPEN SYMMETRIC KEY Cert_sym_key1 DECRYPTION BY CERTIFICATE MySQLCertificate GO UPDATE dbo.UserData SET EncryptedText = ENCRYPTBYKEY(KEY_GUID('Cert_sym_key1'), AccountNumber) GO Select ID, AccountNumber, EncryptedText from dbo.UserData GO |
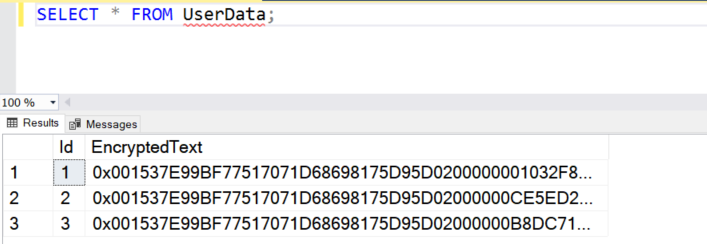
As shown below, we have encrypted account numbers in the [EncryptedText] column.

You can decrypt column values using the DECRYPTKEY() function in the same connection after opening the symmetric key, as shown below.
|
1 2 3 |
SELECT a.ID, a.AccountNumber, a.EncryptedText , CAST(DECRYPTBYKEY(a.EncryptedText) AS VARCHAR(100)) AS NameAsDecryptedText FROM dbo.UserData AS a |

Step 5: Migrate data from on-premises SQL Database to Azure SQL Database
We need to migrate encrypted data to Azure SQL Database. There are multiple ways to migrate databases from On-prem to Azure SQL Database. Here, we can use the BCP command-line utility.
In the command prompt, run the following BCP script. This script runs the select statement on the specified server (here WIN-CDKN1T5F5EG) and saves BCP data in C:\Temp\EncryptedData.BCP
>bcp “Select Id,EncryptedText from DemoDatabase.dbo.UserData” queryout
c:\sql\EncryptedData.bcp -S WIN-CDKN1T5F5EG -c -T
As shown below, it copied 3 data rows in the BCP output file.

Before importing data to Azure, we require a table with relevant columns. Here, we create an SQL table [UserData] with two columns. We are not transferring data from the column [AccountNumber] because it is already stored in an encrypted form in another column.
|
1 2 3 4 5 6 |
CREATE TABLE dbo.UserData ( Id INT IDENTITY(1,1), EncryptedText VARBINARY(MAX) ); Go |
Run another BCP script that pulls data from the BCP output file and imports it into the Azure SQL table. In the BCP script, you need to specify the SQL user name in the form of user@azureservername.
bcp azuredemodatabase.dbo.UserData in c:\sql\EncryptedData.bcp -S azuredemosqldemo.database.windows.net -c -U sqladmin@azuredemosqldemo
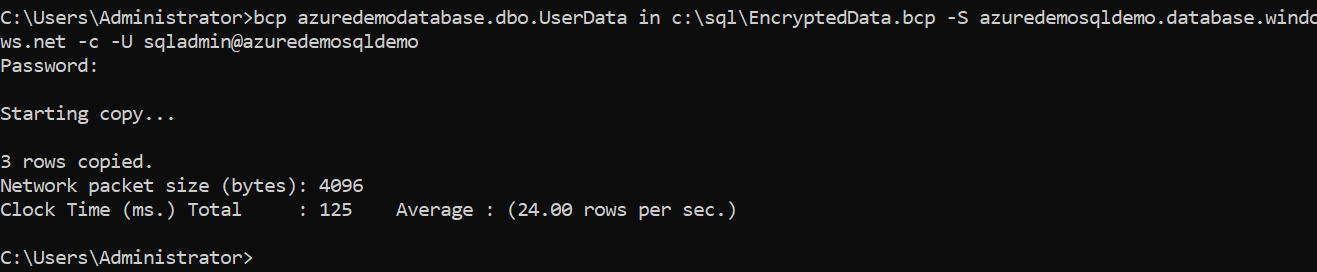
Once data import is done, run the select statement to verify that the encrypted data exists.
Step 6: Backup Certificate on on-premises SQL Server
We have imported encrypted data in step 5. However, this data is not helpful until we can decrypt it successfully on Azure SQL Database.
Therefore, run the following BACKUP CERTIFICATE script and backup the existing certificate we created earlier. We specified a password as well in the script that we will require later as well.
It creates a certificate and private key file, as shown below:
|
1 2 3 |
BACKUP CERTIFICATE Certificate1 TO FILE = 'C:\SQL\Certificate1.cert' WITH PRIVATE KEY (FILE = 'C:\SQL\Certificate1.pvk', ENCRYPTION BY PASSWORD = 'India@123'); |

Step 7: Import certificate in Azure SQL Database
We have taken certificate backup from the on-premises SQL Server. However, we cannot copy it to Azure because Azure SQL does not access the file system. Therefore, we will use CREATE CERTIFICATE … FROM BINARY for importing certificates in Azure.
For this purpose, we need to extract the binaries from the backup certificates.
|
1 2 3 4 5 |
SELECT 1, BulkColumn FROM OPENROWSET(BULK N'C:\sql\Certificate1.cert', SINGLE_BLOB) rs SELECT 1, BulkColumn FROM OPENROWSET(BULK N'C:\sql\Certificate1.pvk', SINGLE_BLOB) rs |

We will require the output of the script ( column- BulkColumn) in Step 9.
Step 8: Create a master key in Azure SQL Database
Connect to Azure SQL and create a master key with a similar password as of Step 2.
|
1 |
CREATE MASTER KEY ENCRYPTION BY PASSWORD = 'Demo@123'; |
Step 9: Import or Create Certificates in Azure SQL Database
In the CREATE CERTIFICATE FROM BINARY,
- copy the value of BulkColumn of the .cer file and place on the from binary =
- copy the value of BulkColumn of the .pvk file and place it on the private key ( binary =)
- Note: The binary data takes multiple lines. Therefore, I am putting a part of it in the script for demonstration purposes
In the DECRYPTION BY PASSWORD, specify the password that we used in Step 6.
|
1 2 3 4 5 6 |
CREATE CERTIFICATE MySQLShackDemo FROM BINARY = 0x308202B63082019EA00302010202107F7D693E5B52F8AB42EB4FA9C5FFA8BF30045EF77CB96860DA497DE0F90AB7A375484446D37D41B0D86872AD9A1433A847988B603A23152F15F39419F7DFAA20659D92E4B972C9EB7EA28E3A68D9E4E99A1AA9FF5 WITH PRIVATE KEY ( BINARY = 0x1EF1B5B00000000001000000010000001000000094040000BD6E9050B29C4E2B459129F9026B439DC922EF154731E566EBCEF309197DD5153EDE01FD0C08DD14087F4671DBD4749139 , DECRYPTION BY PASSWORD = 'India@123') GO |
Step 10: Create a symmetric key from the certificate
In this step, you can create the symmetric key decrypted by the certificate created in Step 9.
- Note: You need to use the same algorithm, IDENTITY_VALUE and KEY_SOURCE, as you used in Step 3
|
1 2 3 4 5 |
CREATE SYMMETRIC KEY MyTestKey WITH ALGORITHM = AES_256, IDENTITY_VALUE = 'Rajendra Gupta', KEY_SOURCE = 'Lab Environment' ENCRYPTION BY CERTIFICATE MySQLShackDemo GO |
Step 11: Open the symmetric key and verify the decrypted data
To decrypt data, first, open the symmetric key and use DECRYPTBYKEY() function as shown below.
|
1 2 3 4 5 6 |
OPEN SYMMETRIC KEY MyTestKey DECRYPTION BY CERTIFICATE MySQLShackDemo GO SELECT a.ID, a.EncryptedText , CAST(DECRYPTBYKEY(a.EncryptedText) AS VARCHAR(100)) AS NameAsDecryptedText FROM dbo.UserData AS a |
You can see decrypted data in the column [NameAsDecryptedText].

Conclusion
This article explored moving encrypted data from an on-premises SQL Server to an Azure SQL Server. We cannot copy a certificate to the Azure SQL Database directory. Therefore, we used CREATE CERTIFICATE FROM BINARY method. This way, you can have encrypted data into Azure for safeguarding against malicious activities.

I am the author of the book "DP-300 Administering Relational Database on Microsoft Azure". I published more than 650 technical articles on MSSQLTips, SQLShack, Quest, CodingSight, and SeveralNines.
I am the creator of one of the biggest free online collections of articles on a single topic, with his 50-part series on SQL Server Always On Availability Groups.
Based on my contribution to the SQL Server community, I have been recognized as the prestigious Best Author of the Year continuously in 2019, 2020, and 2021 (2nd Rank) at SQLShack and the MSSQLTIPS champions award in 2020.
Personal Blog: https://www.dbblogger.com
I am always interested in new challenges so if you need consulting help, reach me at rajendra.gupta16@gmail.com
View all posts by Rajendra Gupta
- How to install PostgreSQL on Ubuntu - July 13, 2023
- How to use the CROSSTAB function in PostgreSQL - February 17, 2023
- Learn the PostgreSQL COALESCE command - January 19, 2023