
The recent articles (see below) about the SQL Server Policy Based Management and Audit features explained terms, principles, and their use in various scenarios and for different purposes. SQL Server Policy Based Management provides means to define state of SQL Server instances and their objects across an enterprise environment and verify whether their current status complies with the declared policies. Among other SQL Server objects, there is a way to evaluate declared policies against the SQL Server Audit objects too. It’s possible to check whether the configuration of the audit and audit specification objects were altered and get notified about that.
In the following example, we are going to see how once created auditing can be monitored for changes. We are going to set up an auditing on SQL Server instance, create an appropriate Policy Based Management policy, and describe how to evaluate the policy and get notifications about potential policy violations. We are going to focus on SQL Server Management Studio use in the example, although T-SQL can be used as well. If needed, you can check appropriate T-SQL using the Script as options in SQL Server Management Studio for each object we are going to create.
To set up the auditing on a SQL Server instance, an audit object must be created first:
- Expand the Security node in Object Explorer
- Select the New Audit context menu option of the Audits node
-
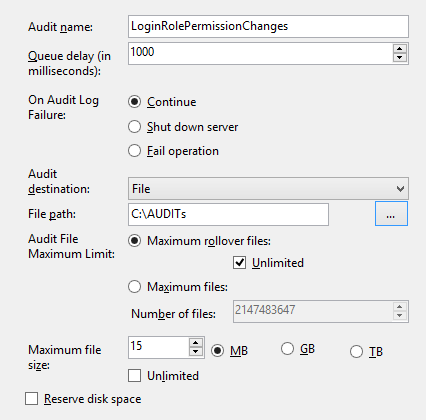
Use the Create Audit dialog to define the audit object. Type in the name of the audit object (e.g. LoginRolePermissionChanges), select File in the Audit destination dropdown menu, and set the desired Maximum file size value (e.g. 15 MB). For the File path value, specify the desired folder where auditing repository files will be saved (e.g. C:\AUDITs)

-
Click OK to confirm the audit object creation
The next step is to create an appropriate audit specification, which will specify the target and properties we want to audit. In our example, we are going to create auditing on SQL Server logins and changes applied on them regarding role and permission changes.
To create the audit specification on SQL Server instance level (note that audit specifications can be declared on database level for appropriate objects and values too):
- Expand the Security node and select the New Server Audit Specification context menu option in the Server Audit Specification node
-
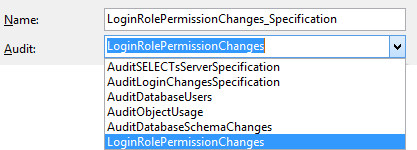
Use the Create Server Audit Specification dialog to define the new audit specification. Type in the name of the specification in the Name textbox (e.g. LoginRolePermissionChanges_Specification). Select the audit object we have created previously from the Audit dropdown. Note that the dropdown shows all existing SQL Server instance audit objects, so this is the point where the audit specification is linked to the appropriate audit object
-
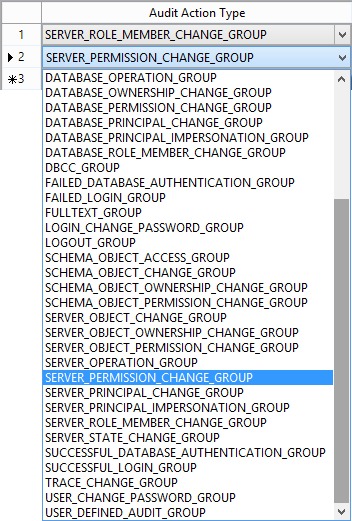
To define the items and actions to be audited for changes (in our case SQL Server login objects) use the Actions grid. Use the Audit Action Type dropdown in the grid and select the SERVER_ROLE_MEMBER_CHANGE_GROUP item. An additional empty row will be automatically created. Similarly as for the previous row, select the SERVER_PERMISSION_CHANGE_GROUP item using the Audit Action Type dropdown
The selected action types cannot be additionally tuned using the Object Class, Object Schema, Object Name, or Principal Name values (columns) in the grid, as they are tied to the SQL Server instance itself
- Click OK to save the audit specification
Note that once created audit object and audit specification are disabled by default and they need to be enabled. To enable them, use the appropriate context menu options (Enable Audit and Enable Audit Server Specification)
Next, create appropriate Policy Based Management policies that will be used to evaluate the declared auditing state with the state at the moment of evaluation. In other words, create policies based on the current auditing configuration and use them as a sort of snapshot when evaluating
To create a policy tied up to the current state of the audit object:
-
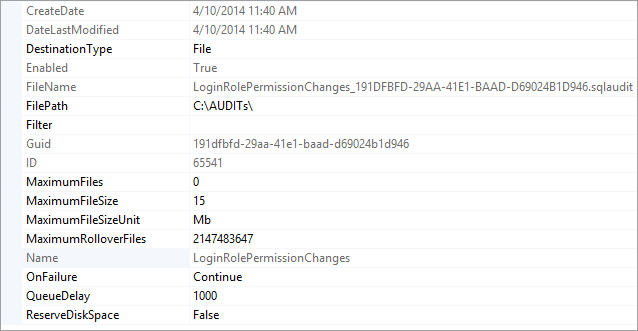
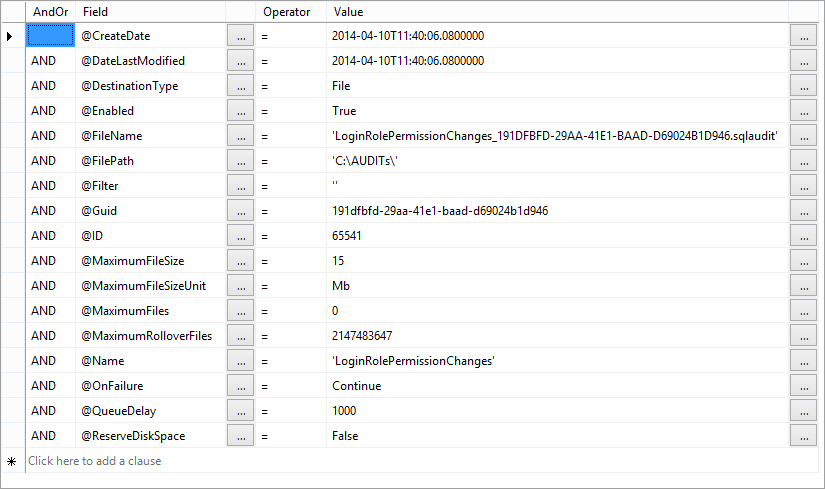
Right click the LoginRolePermissionChanges audit object and select the Facets option. The View Facets dialog will open and provide the current properties of the audit object that can be evaluated using the SQL Server Policy Based Management feature
-
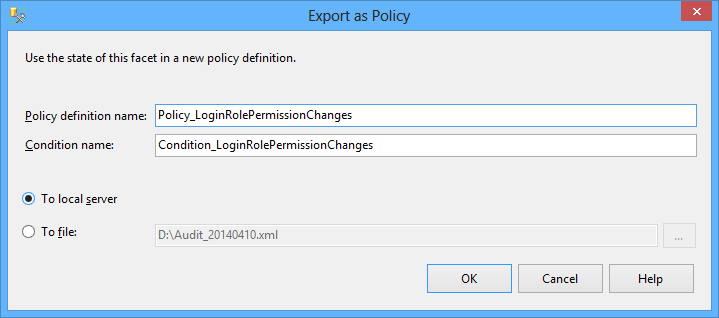
Click the Export Current State as Policy button to open the Export as Policy dialog. Type in the name for the new policy (e.g. Policy_LoginRolePermissionChanges) and the name for the corresponding policy condition (e.g. Condition_LoginRolePermissionChanges)
The policy can be saved either to the current SQL Server instance (the To local server option), or to an XML file and imported for later use on the same or another SQL Server instance
-
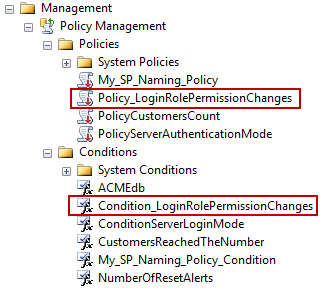
Click OK to create the policy and its condition. The newly created policy and condition will show up under the appropriate Object Explorer nodes
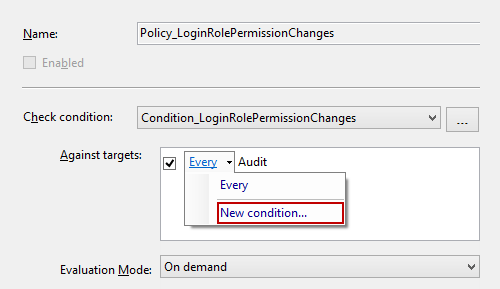
The created policy and condition can be modified additionally, if needed. Let’s say the policy is created so that it is evaluated against all audit objects on the SQL Server instance. That is far from convenient, as it’s not likely that other audit objects comply with the current state of the LoginRolePermissionChanges audit object (e.g. the Create Date value). To change the policy target to the specific audit target instead of Every:
- Select the Properties option in the Policy_LoginRolePermissionChanges policy context menu
-
Click the New condition option in the Every dropdown list in the Against targets box
-
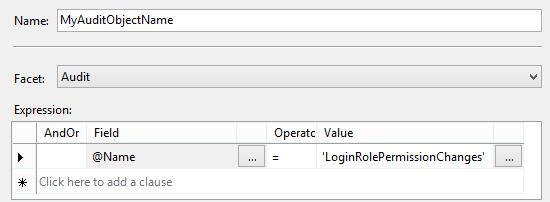
Define the appropriate condition (@Name = ‘LoginRolePermissionChanges’) and save the condition
- The Policy_LoginRolePermissionChanges policy will now be declared against the specific audit object only
Also, the Condition_LoginRolePermissionChanges condition we previously created by exporting the current audit object state can to be adjusted if needed. To do that:
- Select the Properties option of the Condition_LoginRolePermissionChanges context menu
-
The Expression grid will provide all the condition items created by default
Adjust existing rows by changing their values, add additional or remove the ones which are not required. Click OK to save condition changes
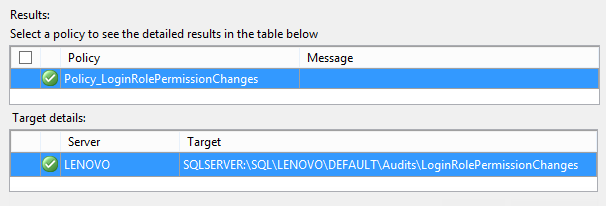
To evaluate the policy against the audit object, select the Evaluate option from the policy context menu. Since the audit object was not modified in the meantime, the audit object will comply with the declared policy:
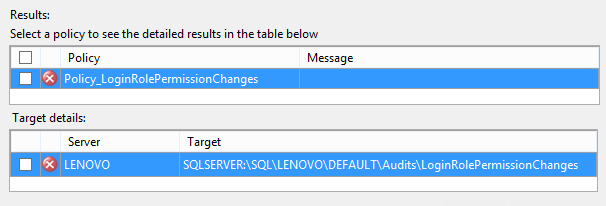
If we change any property of the audit object and then evaluate the policy again, the result will show that the audit object does not comply with the declared state and that it was altered. Note that in order to be modified, an audit object must be previously disabled
We have used the manual policy evaluation in the example. However, as we have previously described in the SQL Server security and Policy Based Management – Alerting article, evaluation can be scheduled with an appropriate alert notification

View all posts by Ivan Stankovic
- Using Extended Events to review SQL Server failed logins - August 5, 2014
- SQL Server backup – models and types - May 26, 2014
- SQL Server Policy Based Management – Categories and Database Subscriptions - May 21, 2014