
SQL Server Network Configuration involves enabling the protocols that manage the connection to the SQL Server and configuring the available options for these network protocols. It also provides the means to encrypt the communication between the SQL Server instance and the client applications and hide the SQL Server instance from being browsed. SQL Server Network Configuration can be managed using the SQL Server Configuration Manager tool.
There are three main network protocols that you can configure in SQL Server. All these network protocols are installed by default when installing the SQL Server instance, but you need to enable one or more network protocols that the clients will use to communicate with the SQL Server.
To enable or disable a specific network protocol, open the SQL Server Configuration Manager and expand the SQL Server Network Configuration node to view the Protocols for <instance name>. At the details area in the right, right-click on the protocol you are interested in and click on Enable or Disable as below:

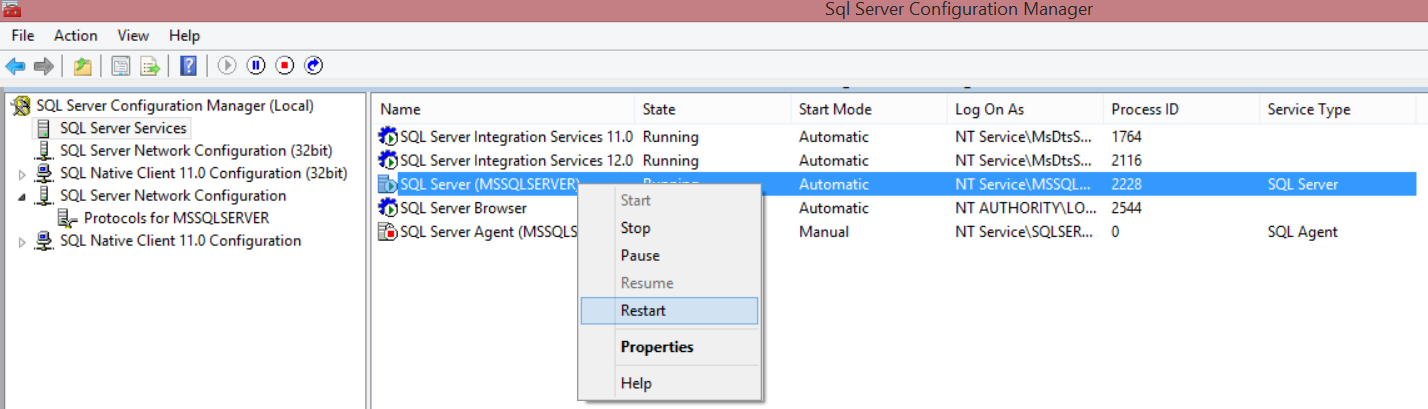
Enabling or disabling the SQL Server network protocols requires restarting the SQL Server service to take effect, which can be done from the same console. From the SQL Server Configuration Manager, click on the SQL Server Services. From the details area in the right, right-click on the SQL Server (<instance name>) service for the configured SQL Server instance and choose Restart.
Shared Memory Protocol
SQL Server Shared Memory protocol is used by clients to connect to the SQL Server instance that is running on the same machine. SQL Server Shared Memory protocol is the simplest protocol, as it has no configurable settings to be tuned in order to use it. Shared Memory protocol can be used to troubleshoot other network protocols if these protocols are not configured correctly.
TCP/IP Protocol
The most commonly used network protocol in SQL Server is the TCP/IP protocol. This protocol connects computers with different hardware and operating systems specs and allows it to communicate together, as it includes network traffic routing standards with advanced security protection.
By default, the SQL Server instance listens on TCP port 1433, where the named instances located in the same server will be configured for dynamic TCP ports, selecting an available TCP port each time the SQL Server service restarted. SQL Server Bowser Service helps the client identifying that used TCP port when he tries to connect. It is better to configure the SQL Server named instance to listen on a specific static port rather than using dynamic ports, in order to configure the firewall to allow communication to the SQL Server on that specific TCP port.
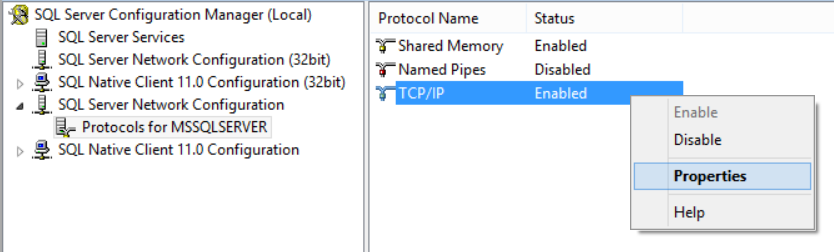
To configure the SQL Server instance with a specific TCP port, open the SQL Server Configuration Manager and expand the SQL Server Network Configuration node to view the Protocols for <instance Name>. At the details area in the right, right-click on the TCP/IP protocol and choose Properties:
From the TCP/IP Properties window, choose the IP Addresses tab, where you can see a node for each IP address on that server, in addition to the IP 127.0.0.1 loopback adaptor. First, you need to make sure that the TCP Dynamic Ports box is empty, preventing the SQL Server instance from using different TCP port on each server restart. In the TCP Port box under each IPn node, type the TCP port number that you want this IP address to listen on. Once you finish with all IP addresses, click OK.

Changing the TCP protocol that the SQL Server Instance is listening on requires restarting the SQL Server service to take effect, which can be done from the SQL Server Services node of the SQL Server Configuration Manager console as described previously.
Changing the default TCP port of the SQL Server instance will prevent clients from connecting to the SQL Server instance without specifying that new port. In order to allow clients to connect to the SQL Server instance with the new TCP port, you need to enable and start the SQL Server Browser Service, which helps the clients in getting the TCP port for that SQL Server instance. You can also customize the connection string that the client uses by specifying the ServerName,TCP_Port_Number rather than using the server name only. Another option is to create an alias on the client’s machine that specifies the port number for that SQL Server instance.
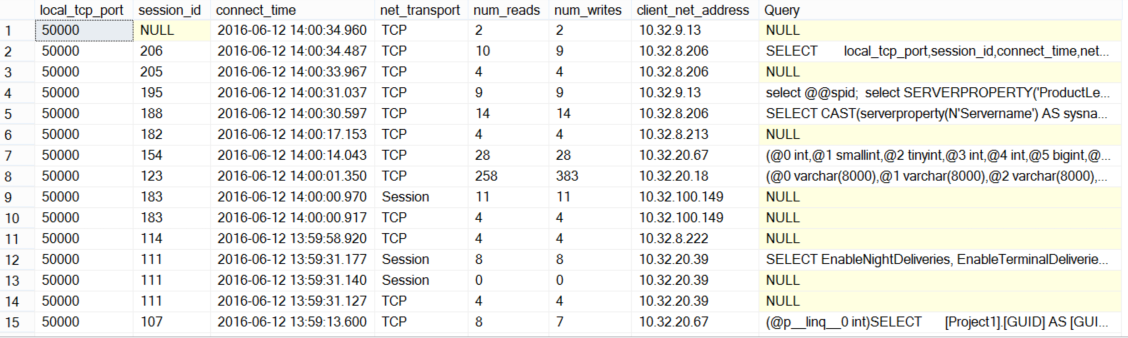
If the SQL Server instance is configured to listen on multiple TCP ports, you can identify the TCP port used by each SQL Session using the sys.dm_exec_connections DMV. This DMV returns all connected sessions with the TCP port, source IP and other useful information.
We can optimize the use of this DMV, as it returns only the SQL handle for that session and not the actual query text. To get the query text, the sys.dm_exec_sql_text DMV can be used with the complete script below:
|
1 2 3 4 5 6 7 |
SELECT local_tcp_port,session_id,connect_time,net_transport ,num_reads ,num_writes,client_net_address , (select text from sys.dm_exec_sql_text(most_recent_sql_handle)) as Query FROM sys.dm_exec_connections order by connect_time desc |
The result will be like the following:
Named Pipes Protocol
The last network protocol we will discuss here is Named Pipes. This protocol is designed for local area networks, to provide a way for inter-process communication among the processes running on the same machine or on a remote computer in the same LAN, where the output of one process is the input of the second one, without having the penalty of involving the network stack.
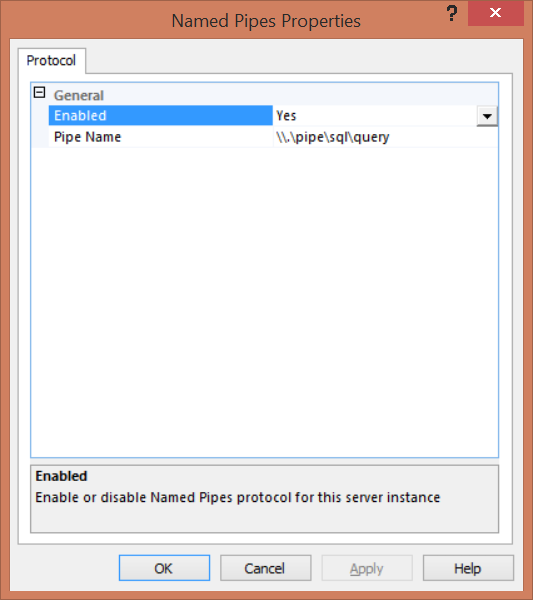
The Named Pipes protocol default value for the default SQL Server instance is \\.\pipe\sql\query, and \\.\pipe\MSSQL$<instancename>\sql\query for the named SQL instance. You can configure the SQL Server instance to listen to one pipe only.
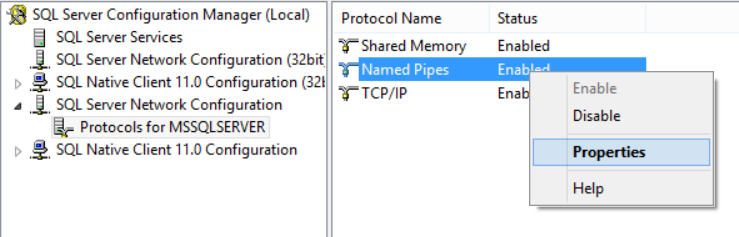
To configure the SQL Server instance with a specific pipe value, open the SQL Server Configuration Manager and expand the SQL Server Network Configuration node to view the Protocols for <instance Name>. At the details area in the right, make sure that the Named Pipe protocol is enabled then right-click on that protocol and choose Properties:
On the Protocol tab of the Named Pipes Properties window, type in the Pipe Name the new pipe value you want your SQL Server instance to listen to and click OK.
You will be asked to restart the SQL Server Service to make sure that the Named Pipe protocol new value will take effects. You can restart it from the SQL Server Services node of the SQL Server Configuration Manager console as described before.
Again, the clients will not be able to connect to the SQL Server instance with the default settings if the Named Pipe protocol default value changed. The SQL Server Browser Service should be enabled and started to help the clients in getting the new pipe for that SQL instance. You can also customize the connection string that the client uses to include this pipe value. Another option is to create an alias on the client’s machine that specifies the pipe value for that SQL Server instance.
If you have fast LAN connection, both the TCP/IP Sockets and Named Pipes clients will have good performance. With slower networks, such as WANs or dial-up networks, Named Pipes protocol can be very costly and cause excessive network traffic, as the Named Pipes network communications are more interactive. Using TCP/IP, data transmissions are more streamlined with less overhead, which makes the TCP/IP very helpful in slow network connections.
In General, TCP/IP protocol is better in a slow LAN, WAN, or dial-up network. The Named Pipes protocol can be a better choice when the network speed is high, as it offers more functionality, easier to use, and have more configuration options.
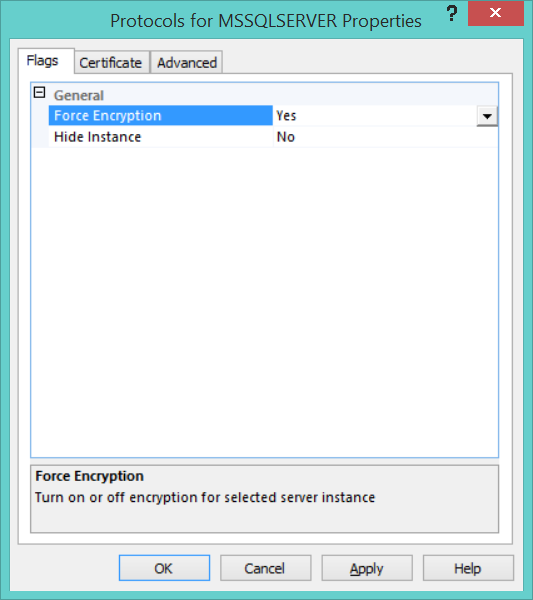
Force Encryption
Another SQL Server Network Configuration option that can be configured to encrypt the communication between the applications and the SQL Server instance is Force Encryption. If the communication encryption is forced, the server should have a certificate installed on it and imported to the Windows, and the client machine should be configured to trust the root authority for that certificate.
To encrypt the communication between the SQL Server instance and the application, install the certificate in the Windows certificate store of the server and open the SQL Server Configuration Manager. Expand the SQL Server Network Configuration node then right-click on Protocols for <instance Name> and choose Properties. On the Certificate tab, configure the SQL Server instance to use the installed certificate. On the Flag tab, make sure that the Force Encryption option is enabled. If not, set it to Yes and then restart the SQL Server Service to take effect.
If the Force Encryption is enabled but no certificate installed, SQL Server will generate a self-signed certificate when the SQL Server instance started. This certificate will encrypt the data transmitted across the network between the SQL Server instance and the application connected to that instance, but it will not protect against identity spoofing by the server or man-in-the-middle attack.
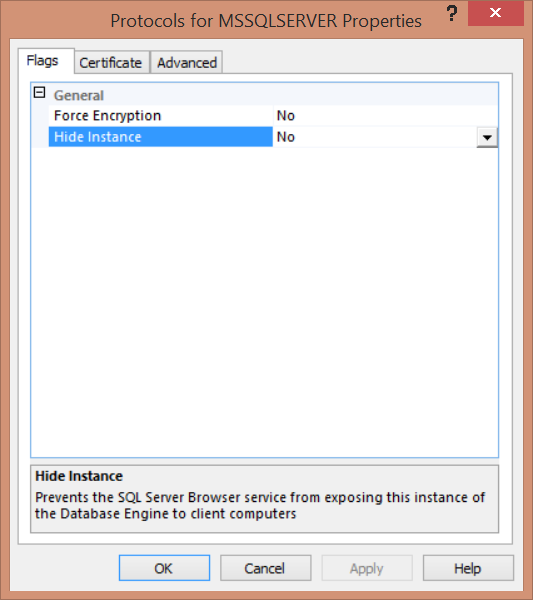
Hide Instance
SQL Server provides the ability to hide the SQL Server instance. In normal cases, the SQL Server Browser provides the connected users with the instance name, version, and the connection information. When you set the Hide Instance flag to YES, the SQL Server Browser will not respond to the connecting queries with the instance information. In this case, the client application should know the connection information in order to connect to the SQL instance successfully. Hiding the SQL instance will prevent the SQL Server Browser from exposing the instance to the users who try to locate that instance using the Browse button too.
To hide a SQL Server instance, open the SQL Server Configuration Manager and expand the SQL Server Network Configuration node then right-click on Protocols for <instance Name> and choose Properties.
From the Flag tab, set the Hide Instance box value to YES, the click OK. Restart the SQL Server Service so that the change will take effect.
You should take into consideration that, when hiding an instance, the TCP port used for that instance should be provided by the client application in the connection string. Also, if this instance is involved in Failover Cluster or Always On Availability Group, you need to create an alias for that server with the static TCP port in all nodes and replicas, so that the replicas can connect to each other.

He is a Microsoft Certified Solution Expert in Data Management and Analytics, Microsoft Certified Solution Associate in SQL Database Administration and Development, Azure Developer Associate and Microsoft Certified Trainer.
Also, he is contributing with his SQL tips in many blogs.
View all posts by Ahmad Yaseen
- Azure Data Factory Interview Questions and Answers - February 11, 2021
- How to monitor Azure Data Factory - January 15, 2021
- Using Source Control in Azure Data Factory - January 12, 2021