
The Stretch database is one of the latest and most-exciting features that has been released with SQL Server 2016. In the previous article, we examined the concept behind it, the steps to implement it, monitor it and how it can be disabled. As a natural follow-up, we will explore the backup and restore topic when it comes to those kind of databases.
The theory
We are all aware that backups are an integral part of database administrators’ daily tasks. Rather than trying to persuade you how important is to have a proper backup strategy, we will directly jump to the topic.
Backups that have been created against a stretched database hold only the local data and also have a flag for the rows in the table that are still to be moved to the cloud as of the time of the backup creation. They do not keep the data that is already in Azure so the question then is: Do we need to take backups of a stretched database?
Yes!
If you are leveraging on this feature to migrate your “cold” data to the cloud, you have one or more tables that are continuously sending data to Azure and you do not store any rows locally for them (once the initial sync finishes), but in majority of the cases you would still be having some local-only tables. Regular backups are still essential in order to be sure that the data in the local tables would be protected. In theory, it is possible to move the data from all of the tables to the cloud (probably this would be a rare scenario), but even then you could benefit of taking backups in order to preserve other objects in the database like users, stored procedures etc.
With regards to the data in Azure, it is protected in several ways:
- Automatic Snapshots at least every 8 hours
- Geo-redundancy
- Creation of a Snapshot when Azure SQL Database is being dropped
Basically, we can be confident that the rows already sitting in the cloud are protected and our thoughts should be directed towards a proper backup strategy for the local data (as if we were not sending any data to Azure).
Having in mind the theory, we will now focus on the practical side and test several different scenarios, so the fun part begins here 🙂
Backup difference
First, let’s examine the backups in terms of sizes before and after we transfer our data to Azure. We are using again the “StackOverflow” database and one of its largest tables “dbo.Votes”:
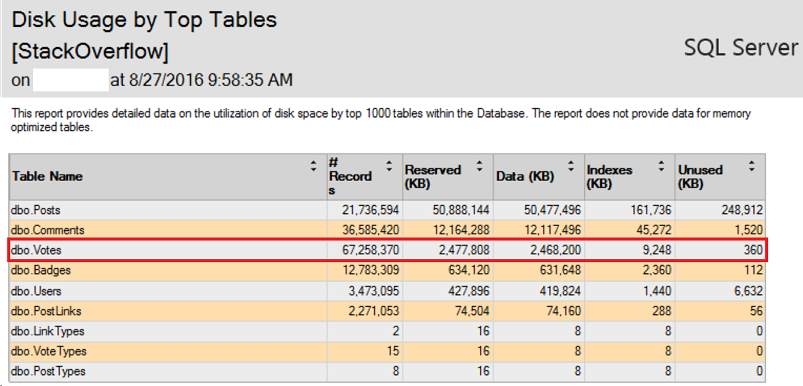
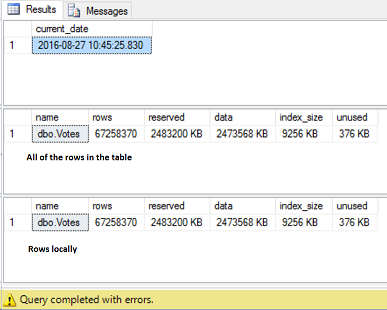
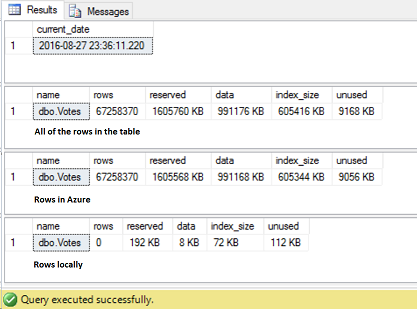
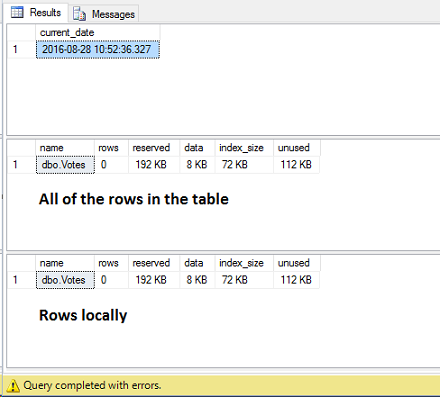
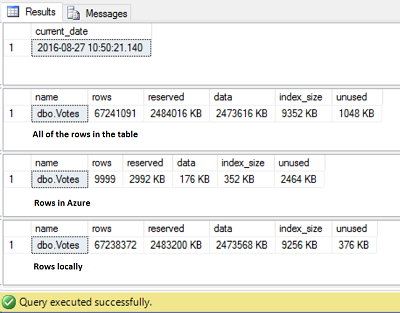
For the time being, all of the records from this table are sitting locally on our SQL Server:
|
1 2 3 4 5 6 7 8 |
USE [StackOverflow] GO SELECT GETDATE() as [current_date] EXEC sp_spaceused N'dbo.Votes' EXEC sp_spaceused N'dbo.Votes', @mode = 'REMOTE_ONLY' EXEC sp_spaceused N'dbo.Votes', @mode = 'LOCAL_ONLY' |

Create a FULL backup of the database and enable data movement for table “dbo.Votes”:
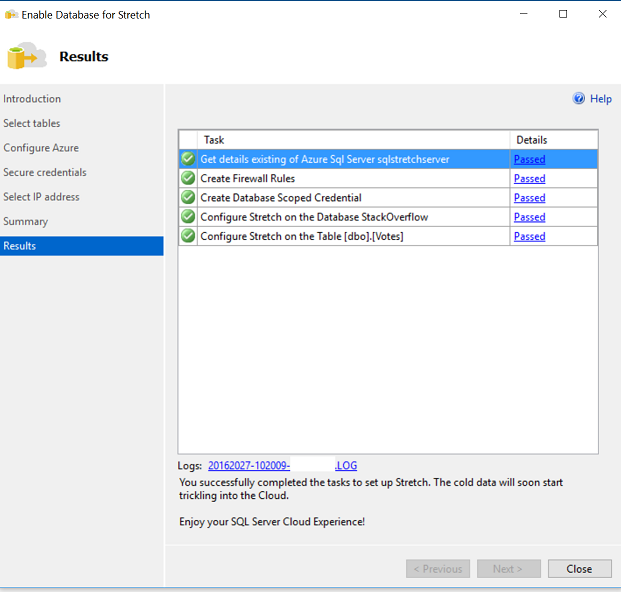
Note: we are not going in details through the whole process as it is described in the previous article.
The migration of 67 million rows to the cloud will take some time, so be patient and have several coffees/beers 🙂 . While you are waiting, create an intermittent FULL backup in the middle of the data movement process (it will be used at a later stage).
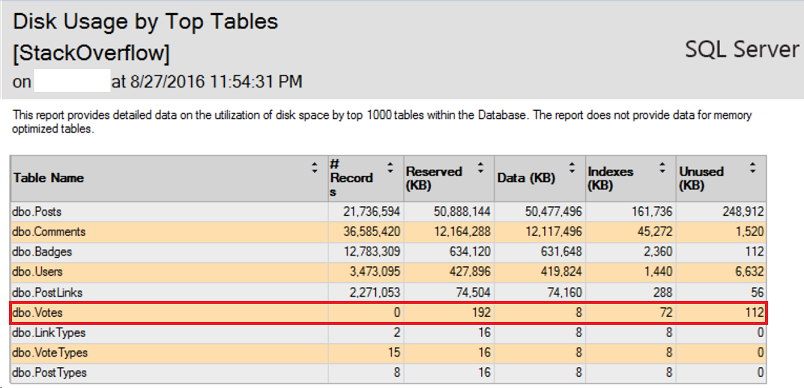
After several hours, the process is over:
|
1 2 3 4 5 6 7 8 |
USE [StackOverflow] GO SELECT GETDATE() as [current_date] EXEC sp_spaceused N'dbo.Votes' EXEC sp_spaceused N'dbo.Votes', @mode = 'REMOTE_ONLY' EXEC sp_spaceused N'dbo.Votes', @mode = 'LOCAL_ONLY' |
Create another FULL backup and compare the one taken prior to the migration with the most recent one:
|
1 2 3 4 5 6 7 8 9 10 11 12 13 |
SELECT msdb.dbo.backupset.database_name, msdb.dbo.backupset.backup_start_date, msdb.dbo.backupset.backup_finish_date, msdb.dbo.backupmediafamily.physical_device_name FROM msdb.dbo.backupmediafamily INNER JOIN msdb.dbo.backupset ON msdb.dbo.backupmediafamily.media_set_id = msdb.dbo.backupset.media_set_id WHERE (CONVERT(datetime, msdb.dbo.backupset.backup_start_date, 102) >= GETDATE() - 1) AND msdb..backupset.type ='D' ORDER BY msdb.dbo.backupset.database_name, msdb.dbo.backupset.backup_finish_date |

There is a difference between the backups which is approximately with the size of the table (backup_size column is in bytes) we already moved to Azure. Once our tables have been moved to the cloud, they do not occupy space on-premise and respectively, in the backups.
Restore a dropped SQL Azure database
Our “cold” data has already been sitting in Azure for quite some time, we can access it whenever it is required and it is not occupying additional space locally. That is perfect, but what will happen if the SQL Azure database is not available due to any reason or completely dropped? As discussed in the first section of this article, automatic snapshots are being created on a regular basis for the data in the cloud and additionally, one more snapshot prior to its deletion. For the sake of the demo, we will deliberately drop the SQL Azure database and try to restore it using this last, supplementary snapshot.
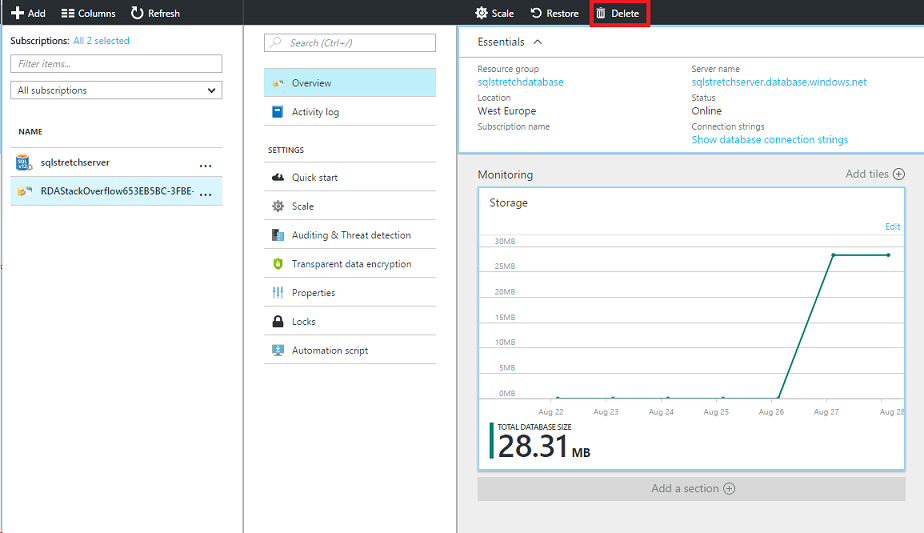
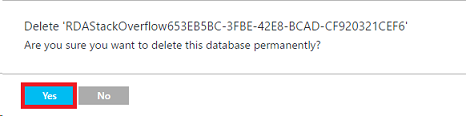
Open the Azure portal, select the database that is being used for the migration of the rows and delete it:
The database has been completely dropped and we have “lost” the data that was already residing in Azure:
|
1 2 3 4 5 6 7 8 |
USE [StackOverflow] GO SELECT GETDATE() as [current_date] EXEC sp_spaceused N'dbo.Votes' EXEC sp_spaceused N'dbo.Votes', @mode = 'REMOTE_ONLY' EXEC sp_spaceused N'dbo.Votes', @mode = 'LOCAL_ONLY' |
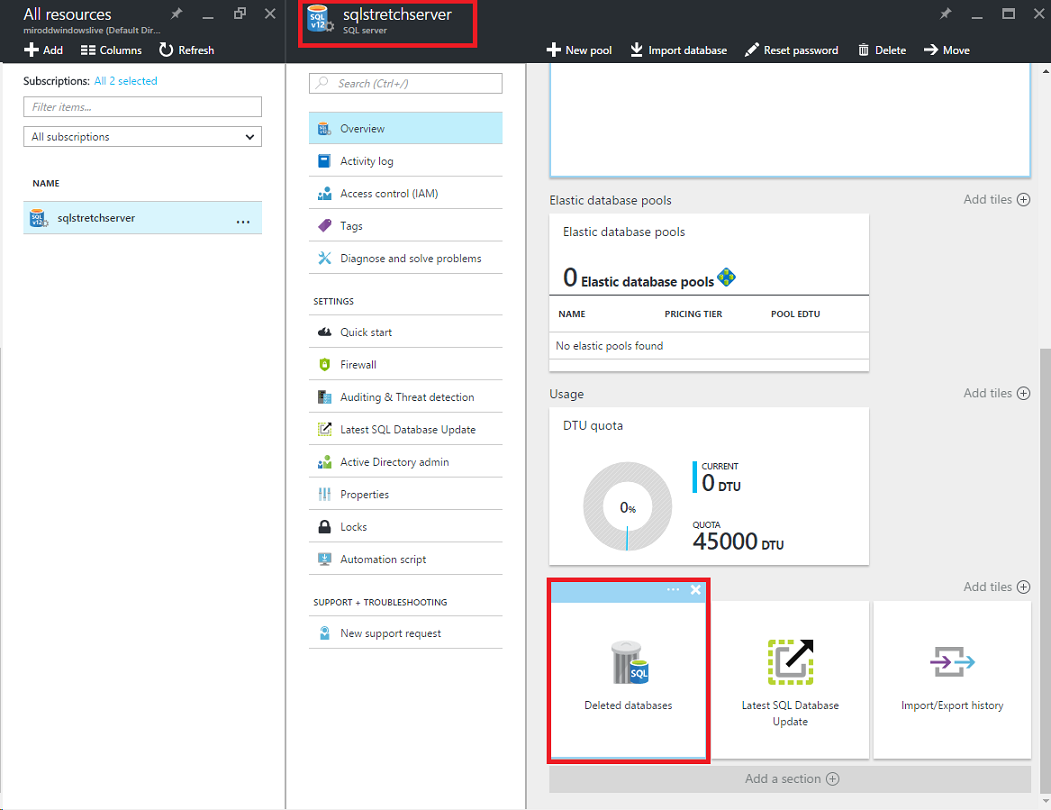
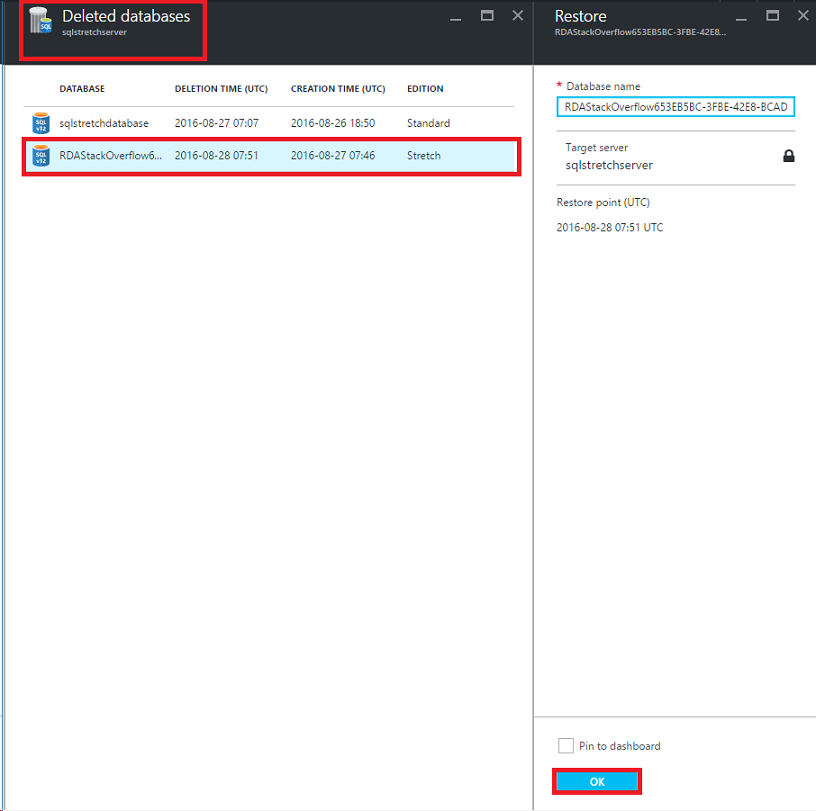
The data has been “lost”, but not completely as we have this extra snapshot and relatively easy, straightforward process to restore it. From the Azure portal, open the respective server that was hosting your database, go to Deleted Databases, select the one you want to recover and hit OK:
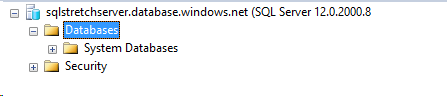
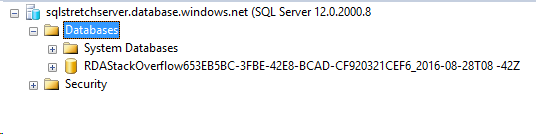
The operation might take several minutes depending on the size of the data and how fast your network is. After the restoration completes, you should be able to see the database again:
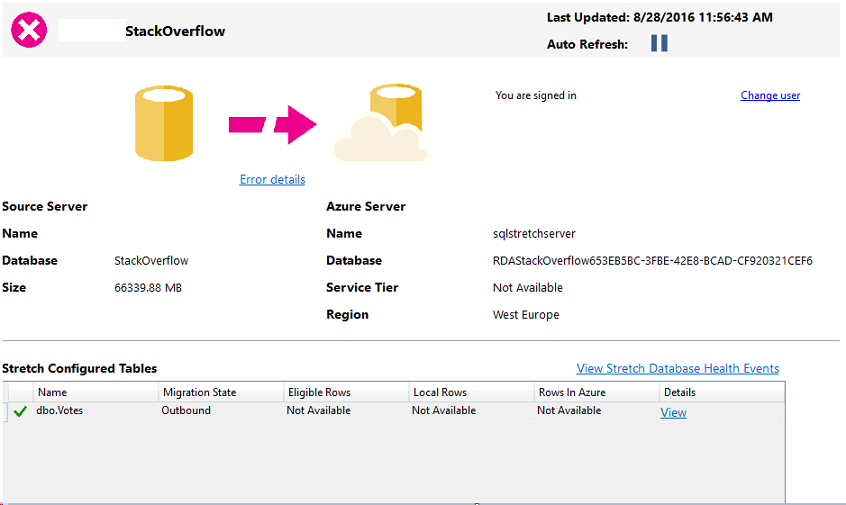
Is that all? Are we ready to access our table again? The database is there, but the status of the Stretch Database is not healthy and we are still unable to query the rows in Azure:
There is one more step missing – after the restore, we have to reauthorize the connection between the on-premise database and the remote Azure one. This has been implemented as a security measure which prevents someone from taking the backup of your database, restore it on another instance and access both your local and cloud data directly. In order to resume the connection, we need the credentials that have been used prior to the restore:
|
1 2 3 4 5 |
USE [StackOverflow] GO select * from sys.database_scoped_credentials |

As soon as we have them, we can now do the actual reauthorization:
|
1 2 3 4 5 6 7 8 9 10 11 |
USE [StackOverflow] GO EXEC sp_rda_deauthorize_db USE [StackOverflow] GO EXEC sp_rda_reauthorize_db @credential = N'sqlstretchserver.database.windows.net', @with_copy = 0 ; -- mandatory parameter - 0 if you will use the old db and 1 if you will use a new db and copy the rows to it GO |

Yes, but we are not quite there yet. We receive an error which might be very misleading unless we carefully read it: “Cannot open database “RDAStackOverflow653EB5BC-3FBE-42E8-BCAD-CF920321CEF6” requested by the login”. Comparing this name with the recently restored database is the key in our situation as they are different:

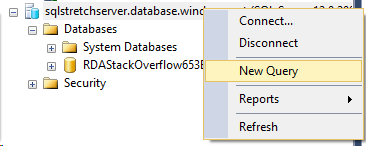
By default, Azure is putting a suffix representing the date of the snapshot used for the restore operation. One additional step is required before the reauthorization which is to rename it:
|
1 2 3 |
ALTER DATABASE [RDAStackOverflow653EB5BC-3FBE-42E8-BCAD-CF920321CEF6_2016-08-28T08 -42Z] MODIFY NAME = [RDAStackOverflow653EB5BC-3FBE-42E8-BCAD-CF920321CEF6] |
Now, retry to reestablish the connection:
|
1 2 3 4 5 6 7 8 9 10 11 |
USE [StackOverflow] GO EXEC sp_rda_deauthorize_db USE [StackOverflow] GO EXEC sp_rda_reauthorize_db @credential = N'sqlstretchserver.database.windows.net', @with_copy = 0 ; -- mandatory parameter - 0 if you will use the old db and 1 if you will use a new db and copy the rows to it GO |

The query succeeds and our Azure data is live again:
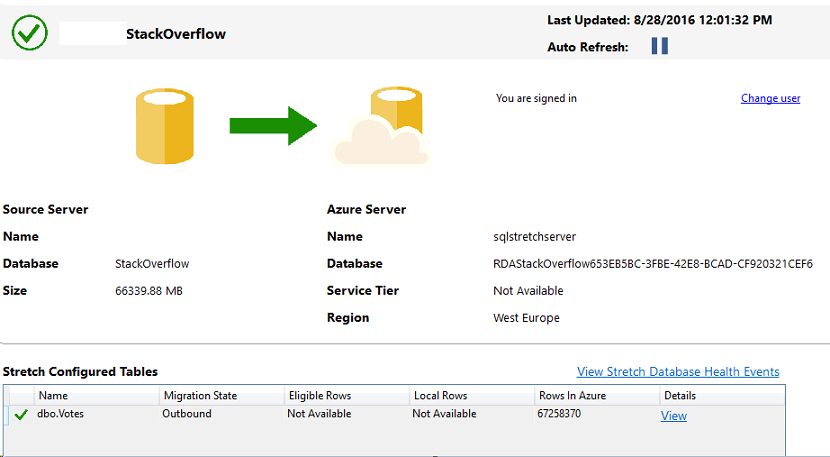
With several simple steps our data is back and accessible again Note that the procedure for restoring a live SQL Azure database is identical and you can basically follow the same drill.
Restore an on-premise database in the middle of Azure migration
The last use case that we are going to explore in this article is what will happen if we restore a database as of date and time when the migration to cloud has not finished yet and we have rows sitting locally and rows in Azure. We have already enabled the data movement for table “dbo.Votes” and the data is being sent to the cloud:
|
1 2 3 4 5 6 7 8 |
USE [StackOverflow] GO SELECT GETDATE() as [current_date] EXEC sp_spaceused N'dbo.Votes' EXEC sp_spaceused N'dbo.Votes', @mode = 'REMOTE_ONLY' EXEC sp_spaceused N'dbo.Votes', @mode = 'LOCAL_ONLY' |
As of this moment, the table has rows locally and in Azure (67 million of rows still to be migrated). Use the on-demand, intermittent backup that was created while the migration was taking place and restore it:

Check what happened with the data:
|
1 2 3 4 5 6 7 8 |
USE [StackOverflow] GO SELECT GETDATE() as [current_date] EXEC sp_spaceused N'dbo.Votes' EXEC sp_spaceused N'dbo.Votes', @mode = 'REMOTE_ONLY' EXEC sp_spaceused N'dbo.Votes', @mode = 'LOCAL_ONLY' |
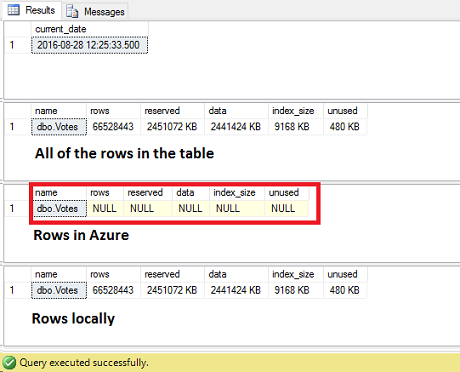
The rows in Azure are still not available as we need to perform the reauthorization after the restore:
|
1 2 3 4 5 6 7 8 9 10 11 |
USE [StackOverflow] GO EXEC sp_rda_deauthorize_db USE [StackOverflow] GO EXEC sp_rda_reauthorize_db @credential = N'sqlstretchserver.database.windows.net', @with_copy = 0 ; -- mandatory parameter - 0 if you will use the old db and 1 if you will use a new db and copy the rows to it GO |
Once the connection has been reestablished, the data in the cloud is now accessible and the migration picks up where it left off.
There are some tricky moments when it comes to the restoration of an on-premise SQL database that is marked as a Stretched one and SQL Azure database part of such configuration. I have tried to cover them in this article and hope it will save you time and efforts next time you face the need to recover either one of them.
Thanks for reading!
Useful sources

In the last years, he is working on a great variety of customers' environments and involved in complex transitions and transformation projects.
Miroslav is also leading courses at Sofia University and participated as a speaker at various events.
View all posts by Miroslav Dimitrov
- How to perform backup and restore operations on SQL Server stretch databases - September 7, 2016
- SQL Server stretch databases – Moving your “cold” data to the Cloud - August 18, 2016
- Tips and tricks for SQL Server database maintenance optimization - January 11, 2016