

This article will explain how to use the Business Intelligence Markup Language to create an SSAS tabular model.
Introduction
As mentioned in the previous article, using Biml to create SSAS databases is only available using BimlStudio. You can refer to this article, Building SSAS OLAP cubes using Biml, to learn more about installing and getting started with this product.
In the previous article, we started from an article already published on a different website. One of the motivations to write this article is that I didn’t find any similar article covering this topic. The only resource you may refer to is the Biml Book, noting that some of the code used in this article is taken from this book.
This article will explain how to build the SSAS tabular model using the BimlStudio user interface. We will check the generated Biml scripts at the end to learn how the tabular model can be defined. Note that there are some steps that we need to write the Biml code manually since not all features are available in the user interface.
Before getting started, If you are not familiar with the SQL Server Analysis Services or don’t know the difference between tabular and multidimensional models, you can refer to the following articles:
- Comparing Analysis Services tabular and multidimensional models | Microsoft Docs
- Creating your first SSAS tabular model database
- OLAP Cubes in SQL Server
This tutorial is done using the AdventureWorksDW2017 sample database.
Getting things ready
First of all, we open BimlStudio and create a Blank project. Then we should define the working environment of the SSAS tabular model. We will add a Biml script file named “Environment.biml” containing information about the data source connection and database objects. We didn’t mention the schema like in the previous article since it will be generated automatically when importing tables from the SQL Server database. The script should look like the following:
|
1 2 3 4 5 6 7 8 |
<Biml xmlns="http://schemas.varigence.com/biml.xsd"> <Connections> <OleDbConnection Name="AdventureWorks_DW" ConnectionString="provider=SQLNCLI11;data source=.;integrated security=SSPI;Initial Catalog=AdventureWorksDW2017" /> </Connections> <Databases> <Database Name="AdventureWorksDW2017" ConnectionName="AdventureWorks_DW" /> </Databases> </Biml> |
After adding the Biml script, we should change its status from “Reference” to “Live”. To do so, right-click on the script file in the “Project View” and click on “BimlStudio Action > Live” as shown in the following image:
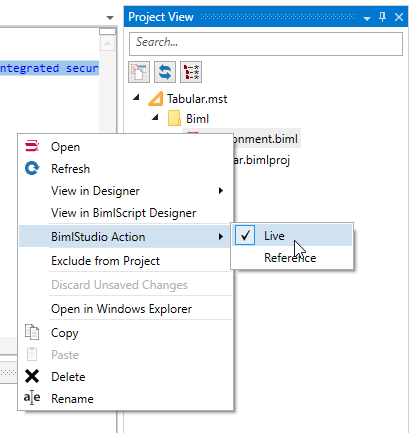
Figure 1 – Changing Biml script mode to “Live.”
In the Logical View, the data source connection, table, and schema defined within the Biml script file should be recognized by BimlStudio.
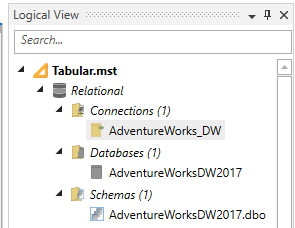
Figure 2 – Data source connections and objects recognized
The next step is to provide the data source tables that we need to build the SSAS tabular model. Since we are using the AdventureWorkdsDW2017 sample database, we will import tables to avoid defining them manually.
On the logical view, within the “Relational” tree node, right-click on the “Tables” folder and click on “import Tables”.
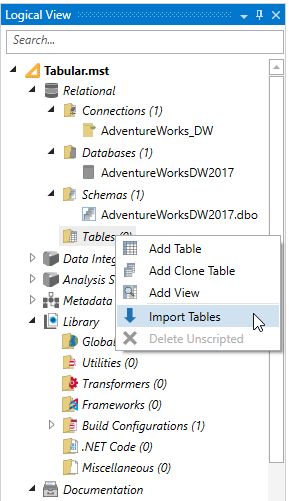
Figure 3 – Importing tables
After clicking on the “Import Tables” button, the tables import dialog is shown.
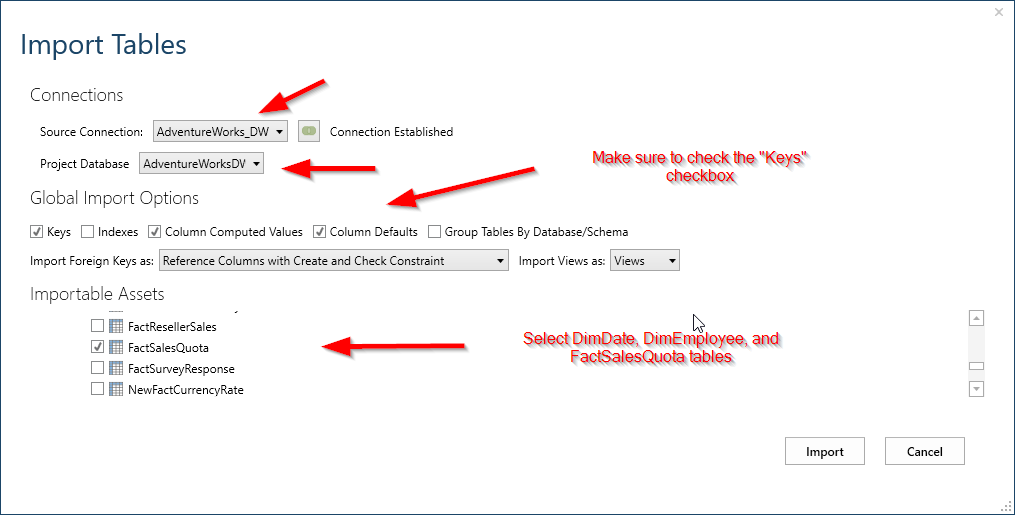
Figure 4 – Import Tables dialog
In the table import dialog, select the source connection and the project database we defining in the “Environment.biml” file we created previously. Then, make sure the check the “Keys” check box since they are required to define a tabular table (will be illustrated later). You can also import the computed columns and default values.
After clicking on the “Import” button, the selected tables and their schemas are added to the project as shown below.
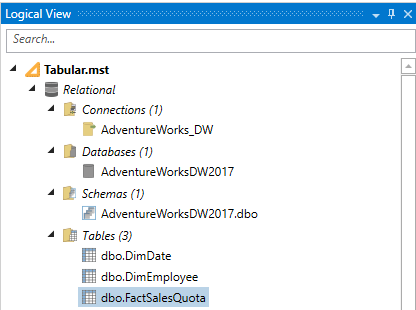
Figure 5 – Tables and schemas added to the project
Defining Tabular tables
After defining the connections and data source objects (database, schema, tables), we should define those tables as SSAS tabular model tables. To do so, in the Logical view tab, double click on a table to open the table design. As shown in the image below, in the top menu, click on the “Tabular” icon.

Figure 6 – Use table in SSAS tabular model
Once the button is clicked, a combo box will appear in the table design form. Select the tabular table you need to associate with this table. This step should be repeated for each table needed in the SSAS tabular model we are building.
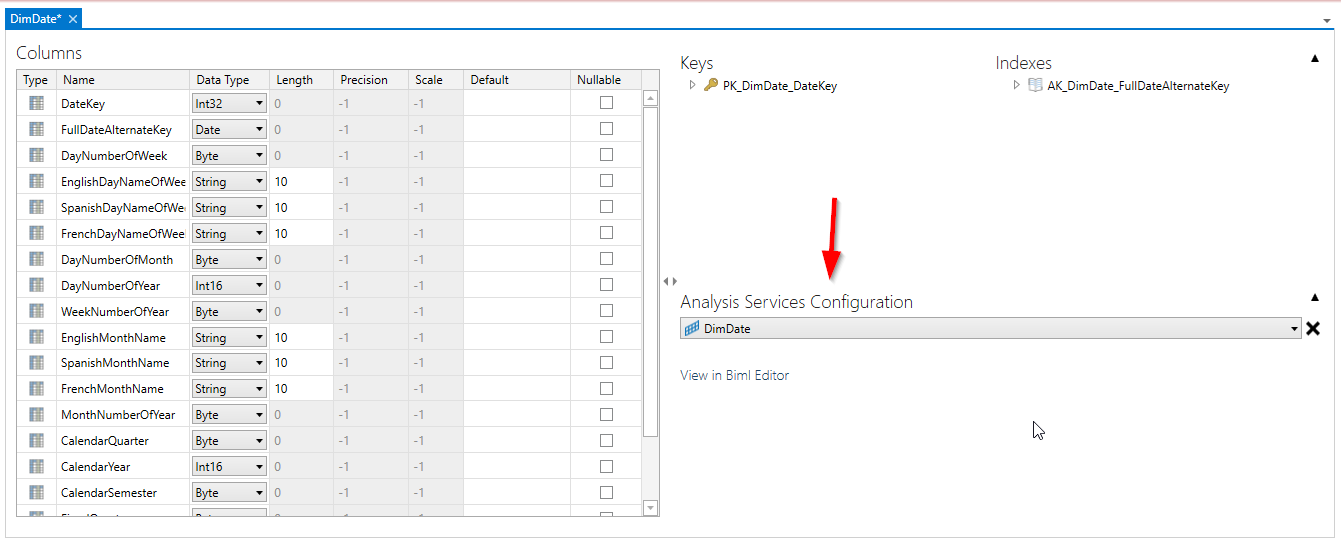
Figure 7 – Analysis Services configuration combo box
After defining tabular tables, they should appear in the “Tabular tables” folder within the “Logical View” tree.

Figure 8 – Tabular tables are shown in the Logical View tab
Configuring Tabular tables
One more step to configure tabular tables. The Tabular tables configuration consists of the following tasks:
- Define the mapping between tabular columns and source tables columns
- Define partitions
- Define measures
The tabular table configuration is not available via the BimlStudio user interface. It should be done using Biml scripts. In the logical view, double click on a table and click on “View in Biml Editor”.
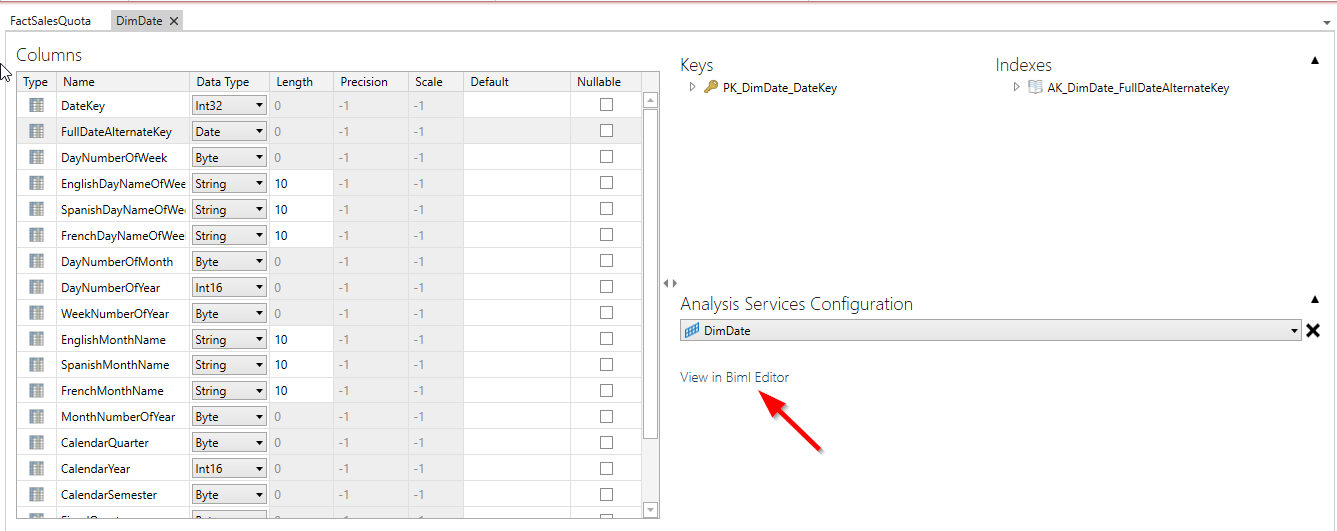
Figure 9 – View table script in Biml Editor
In the Biml editor, you can check that the tabular configuration is empty.
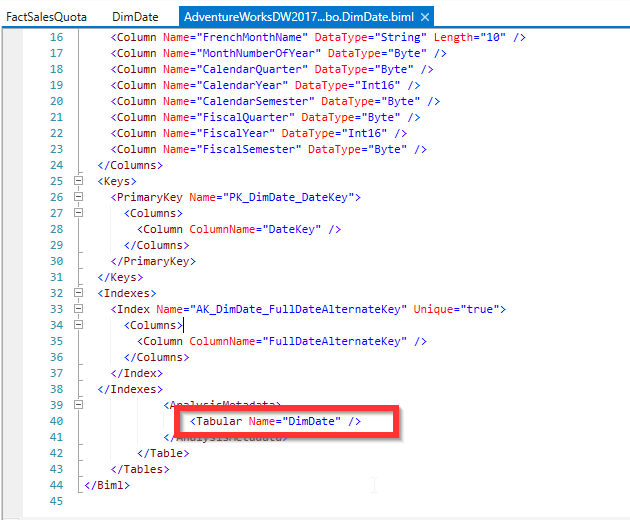
Figure 10 – Empty tabular configuration
What we will do is to replace the empty Tabular element with the following code for the “DimDate” table:
|
1 2 3 4 5 6 7 8 9 10 11 12 13 14 15 16 17 18 19 |
<Tabular Name="DimDate" AutoCreateSinglePartition="true" AutoCreateColumns="true" > <Columns> <Column Name="DateKey" SourceColumnName="DateKey" IsHidden="true" /> <Column Name="FullDateAlternateKey" SourceColumnName="FullDateAlternateKey" /> <Column Name="DayNumberOfWeek" SourceColumnName="DayNumberOfWeek" /> <Column Name="EnglishDayNameOfWeek" SourceColumnName="EnglishDayNameOfWeek" SortByColumnName="AdventureWorksDW2017.dbo.DimDate.DayNumberOfWeek" /> <Column Name="DayNumberOfMonth" SourceColumnName="DayNumberOfMonth" /> <Column Name="DayNumberOfYear" SourceColumnName="DayNumberOfYear" /> <Column Name="WeekNumberOfYear" SourceColumnName="WeekNumberOfYear" /> <Column Name="EnglishMonthName" SourceColumnName="EnglishMonthName" /> <Column Name="MonthNumberOfYear" SourceColumnName="MonthNumberOfYear" /> <Column Name="CalendarQuarter" SourceColumnName="CalendarQuarter" /> <Column Name="CalendarYear" SourceColumnName="CalendarYear" /> <Column Name="CalendarSemester" SourceColumnName="CalendarSemester" /> <Column Name="FiscalQuarter" SourceColumnName="FiscalQuarter" /> <Column Name="FiscalYear" SourceColumnName="FiscalYear" /> <Column Name="FiscalSemester" SourceColumnName="FiscalSemester" /> </Columns> </Tabular> |
For the DimEmployee table, we will use the following code:
|
1 2 3 4 5 6 7 8 9 10 11 12 13 14 15 16 17 18 19 20 21 22 23 24 25 26 27 28 29 30 31 32 33 34 |
<Tabular Name="DimEmployee" AutoCreateSinglePartition="true"> <Columns> <Column Name="EmployeeKey" SourceColumnName="EmployeeKey" IsHidden="true"/> <Column Name="ParentEmployeeKey" SourceColumnName="ParentEmployeeKey" IsHidden="true" /> <Column Name="EmployeeNationalIDAlternateKey" SourceColumnName="EmployeeNationalIDAlternateKey" IsHidden="true" /> <Column Name="ParentEmployeeNationalIDAlternateKey" SourceColumnName="ParentEmployeeNationalIDAlternateKey" IsHidden="true" /> <Column Name="SalesTerritoryKey" SourceColumnName= "SalesTerritoryKey" /> <Column Name="FirstName" SourceColumnName="FirstName" /> <Column Name="LastName" SourceColumnName="LastName" /> <Column Name="MiddleName" SourceColumnName="MiddleName" /> <Column Name="NameStyle" SourceColumnName="NameStyle" /> <Column Name="Title" SourceColumnName="Title" /> <Column Name="HireDate" SourceColumnName="HireDate" /> <Column Name="BirthDate" SourceColumnName="BirthDate" /> <Column Name="LoginID" SourceColumnName="LoginID" /> <Column Name="EmailAddress" SourceColumnName="EmailAddress" /> <Column Name="Phone" SourceColumnName="Phone" /> <Column Name="MaritalStatus" SourceColumnName="MaritalStatus" /> <Column Name="EmergencyContactName" SourceColumnName="EmergencyContactName" /> <Column Name="EmergencyContactPhone" SourceColumnName="EmergencyContactPhone" /> <Column Name="SalariedFlag" SourceColumnName="SalariedFlag" /> <Column Name="Gender" SourceColumnName="Gender" /> <Column Name="PayFrequency" SourceColumnName="PayFrequency" /> <Column Name="BaseRate" SourceColumnName="BaseRate" /> <Column Name="VacationHours" SourceColumnName="VacationHours" /> <Column Name="SickLeaveHours" SourceColumnName="SickLeaveHours" /> <Column Name="CurrentFlag" SourceColumnName="CurrentFlag" /> <Column Name="SalesPersonFlag" SourceColumnName="SalesPersonFlag" /> <Column Name="DepartmentName" SourceColumnName="DepartmentName" /> <Column Name="StartDate" SourceColumnName="StartDate" /> <Column Name="EndDate" SourceColumnName="EndDate" /> <Column Name="Status" SourceColumnName="Status" /> </Columns> </Tabular> |
For the FactSalesQuota, we will use the following code:
|
1 2 3 4 5 6 7 8 9 10 11 12 13 |
<Tabular Name="SalesAmountQuota" AutoCreateSinglePartition="true"> <Columns> <Column Name="SalesQuotaKey" SourceColumnName="SalesQuotaKey" /> <Column Name="EmployeeKey" SourceColumnName="EmployeeKey" /> <Column Name="DateKey" SourceColumnName="DateKey" /> <Column Name="SalesAmountQuota" SourceColumnName="SalesAmountQuota" /> </Columns> <Measures> <Measure Name="SalesQuota" DataType="Decimal" FormatString="$#,0.00;($#,0.00);$#,0.00"> <Expression>SUM(SalesAmountQuota[SalesAmountQuota])</Expression> </Measure> </Measures> </Tabular> |
It is recommended to define partitions rather than using the AutoCreateSinglePartition=true option since partitioning will improve management and processing performance.
Defining the Tabular model
After defining the tabular tables, we should create a tabular model to define those tables’ relationships. To add a new tabular mode, on the top menu, go to the “Home” menu, and click on the “Tabular model” button.

Figure 11 – Adding a tabular model
Clicking on the button will add a new Tabular model to the logical view treen, and it will open a new Biml script editor, as shown below:
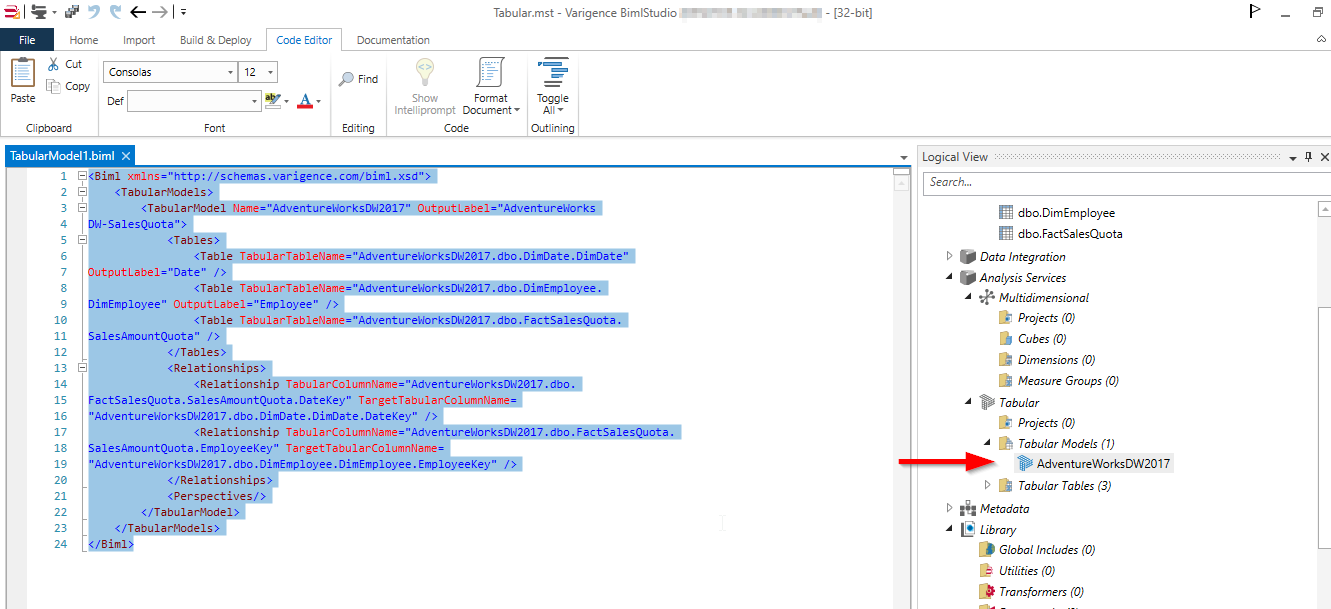
Figure 12 – Biml script editor
Let’s add the following Biml code:
|
1 2 3 4 5 6 7 8 9 10 11 12 13 14 15 16 |
<Biml xmlns="http://schemas.varigence.com/biml.xsd"> <TabularModels> <TabularModel Name="AdventureWorksDW2017" OutputLabel="AdventureWorks DW-SalesQuota"> <Tables> <Table TabularTableName="AdventureWorksDW2017.dbo.DimDate.DimDate" OutputLabel="Date" /> <Table TabularTableName="AdventureWorksDW2017.dbo.DimEmployee.DimEmployee" OutputLabel="Employee" /> <Table TabularTableName="AdventureWorksDW2017.dbo.FactSalesQuota.SalesAmountQuota" /> </Tables> <Relationships> <Relationship TabularColumnName="AdventureWorksDW2017.dbo.FactSalesQuota.SalesAmountQuota.DateKey" TargetTabularColumnName="AdventureWorksDW2017.dbo.DimDate.DimDate.DateKey" /> <Relationship TabularColumnName="AdventureWorksDW2017.dbo.FactSalesQuota.SalesAmountQuota.EmployeeKey" TargetTabularColumnName="AdventureWorksDW2017.dbo.DimEmployee.DimEmployee.EmployeeKey" /> </Relationships> <Perspectives /> </TabularModel> </TabularModels> </Biml> |
In the code above, we defined the tabular table that we need to use in the model within the “Tables” elements. In addition, the relationship between those tables must be defined within the “Relationships” elements, where each relationship should mention the columns used to join both tables.
One thing worth mentioning is that the code above will add all columns defined in the tables into the SSAS tabular model we are creating. This is why we can use the “Perspectives” tags to creates a subset of tabular objects from an original tabular model.
Let’s try to add the following code within the Tabular Model we defined previously.
|
1 2 3 4 5 6 7 8 9 10 11 12 13 14 15 |
<Perspective Name="Limited Employee Data"> <Tables> <Table TabularTableName="AdventureWorksDW2017.dbo.DimDate.DimDate" IncludeAllColumns="true" /> <Table TabularTableName="AdventureWorksDW2017.dbo.DimEmployee.DimEmployee"> <Columns> <Column TabularColumnName="AdventureWorksDW2017.dbo.DimEmployee.DimEmployee.EmployeeKey" /> <Column TabularColumnName="AdventureWorksDW2017.dbo.DimEmployee.DimEmployee.ParentEmployeeKey" /> <Column TabularColumnName="AdventureWorksDW2017.dbo.DimEmployee.DimEmployee.SalesTerritoryKey" /> <Column TabularColumnName="AdventureWorksDW2017.dbo.DimEmployee.DimEmployee.DepartmentName" /> </Columns> </Table> <Table TabularTableName="AdventureWorksDW2017.dbo.FactSalesQuota.SalesAmountQuota" IncludeAllColumns="true" /> </Tables> </Perspective> </Perspectives> |
Creating a Tabular project
To deploy the SSAS tabular model we created to a database, we should create a Tabular project. To do so, we should click on the “Tabular Project” button in the “Home” tab within the top menu, as shown below.

Figure 13 – Creating a Tabular project
Clicking on this button will add a Tabular Project object into the “Logical View” tree and open a Biml script editor as shown in the following image.
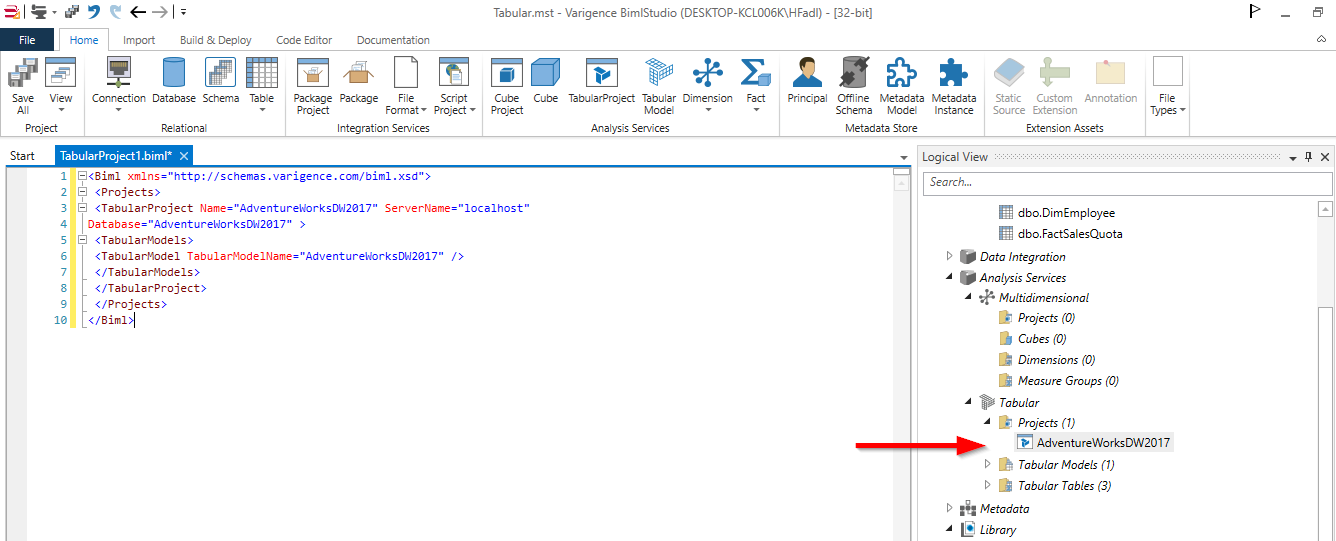
Figure 14 – Tabular project added
We used the following code to connect the tabular project to the SQL Server Analysis Server.
|
1 2 3 4 5 6 7 8 9 10 |
<Biml xmlns="http://schemas.varigence.com/biml.xsd"> <Projects> <TabularProject Name="AdventureWorksDW2017" ServerName="servername\ tabular” Database="AdventureWorksDW2017" > <TabularModels> <TabularModel TabularModelName="AdventureWorksDW2017" /> </TabularModels> </TabularProject> </Projects> </Biml> |
Building project
To build the project, click on the “Build” button to generate the SSAS tabular model objects and needed DDL SQL Statements.
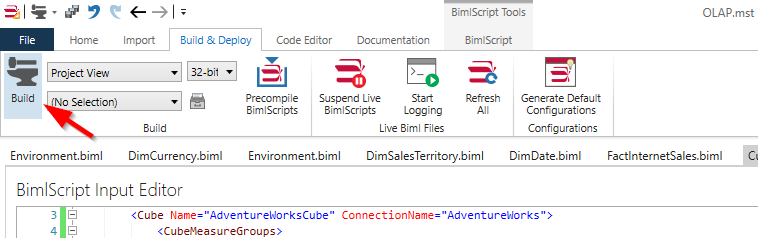
Figure 15 – Building the project
Now, if we go to the project output directory, two folders were created:
- DDL: contains the SQL Statement to build the data source objects defined
- SSAS: contains the SSAS database objects generated
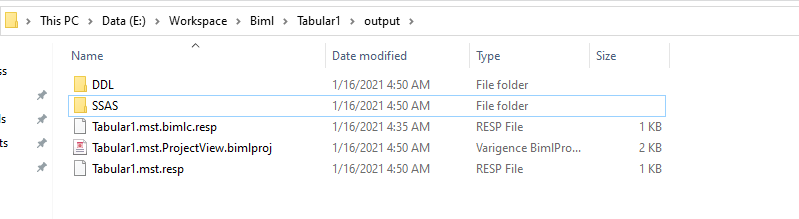
Figure 16 – Output directory
In the DDL directory, we will find the generated SQL DDL statement to create the database objects.
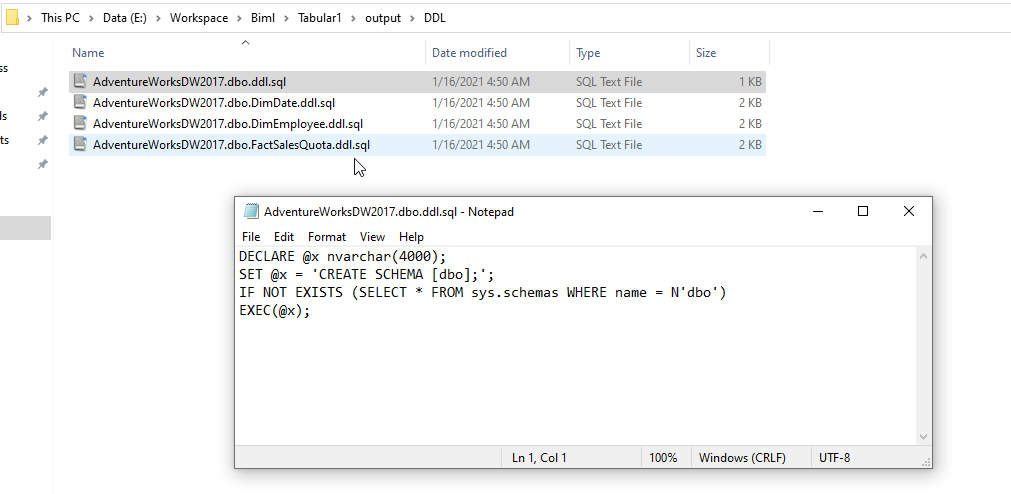
Figure 17 – generated DDL statements
In the SSAS directory, we will find an SSAS tabular project solution.
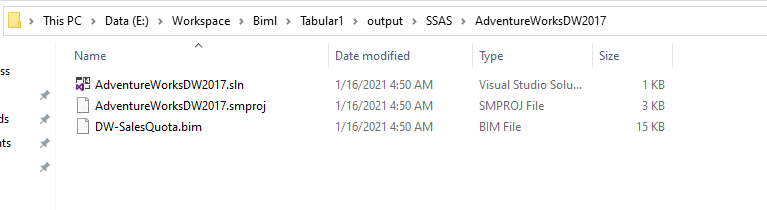
Figure 18 – Created tabular model solution
Conclusion
This article is last on in the “Learn Biml” series. We covered how to use this language to define and build SQL Server database objects, integration services packages, and SSAS tabular and multidimensional models.
Table of contents

Besides working with SQL Server, he worked with different data technologies such as NoSQL databases, Hadoop, Apache Spark. He is a MongoDB, Neo4j, and ArangoDB certified professional.
On the academic level, Hadi holds two master's degrees in computer science and business computing. Currently, he is a Ph.D. candidate in data science focusing on Big Data quality assessment techniques.
Hadi really enjoys learning new things everyday and sharing his knowledge. You can reach him on his personal website.
View all posts by Hadi Fadlallah
- An overview of SQL Server monitoring tools - December 12, 2023
- Different methods for monitoring MongoDB databases - June 14, 2023
- Learn SQL: Insert multiple rows commands - March 6, 2023