
Introduction
In my previous article, we went over the reasons why DBAs should use version control, as well as the benefits of Mercurial as a specific choice. We also gave three examples of instances where source control can come in handy (though to be honest they were picked from a much longer list). In this article, I’m going to go a step further and actually walk you through setting up your first repository (locally for now, we’ll go into setting up a remote one later), making your first commit, and making (and viewing) changes to your newly tracked files. Let’s get started!
Setting up a repository
Now that we have some ideas for things to actually put in version control, how do we actually go about getting it setup? The steps are not difficult, so we’ll go through them here one at a time. Note: I’m very much a command line guy, so I will tend to give examples using that as a method when possible.
Downloading TortoiseHG
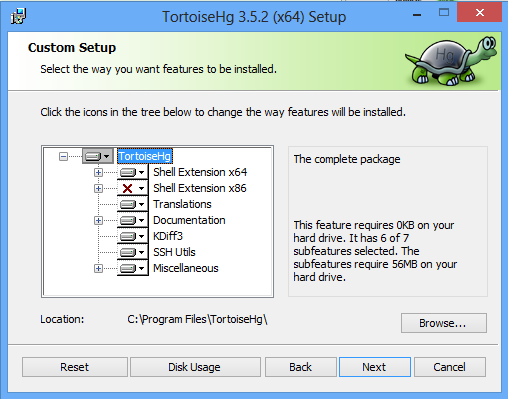
First we need to download the Mercurial tools. I find the best way to get this is to go and grab TortoiseHG, an excellent variation on the popular TortoiseSVN Subversion client. Yes, I know I just said I love the command line, and yet I’m advocating downloading a GUI tool. I do this for two reasons: 1) it’s an easy way to grab everything you need in one shot, 2) there are still times when I find a GUI nice, such as looking at revision history. I’d also recommend that you download and install WinMerge, which at least in my opinion is the best visual comparison tool available. As we’ll see, viewing the differences between files is a huge part of using version control.
When running the installation package, I recommend leaving the default options selected.
Once the installation finishes we can go on to creating our first repository.
Creating the repository
Before we go on, it bears repeating that the concept of a “repository” is very different with a distributed version control system than with more tradition server-centric models. Remember, each and every user has their own complete copy of the repository kept locally, including all history.
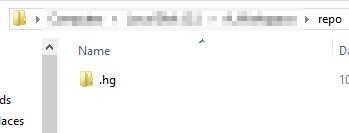
To create a new repository, simply open a command prompt, navigate to the folder where you want the repository created, and type “hg init”. This command initializes the repository, and if it works you’ll see a folder called “.hg” in your directory.
Next, we’ll want to change a few settings. Mercurial stores its settings at three levels: computer wide, the current user, and the current repository. There’s a few settings that we’ll want to configure at the user level, so we’ll start there. Navigate to your user profile directory (powershell shortcut: “cd $env:userprofile”) and look for a file called “mercurial.ini”. If it’s not there, then simply create an empty file with that name and open it in your favorite text editor. Then, paste in the following lines:
|
1 2 3 4 5 6 7 8 |
[ui] username = Your Name And E-Mail Here merge = winmergeu [extensions] mercurial_keyring = |
These settings tell Mercurial the following:
- The user name to record when changes are committed (you could use an e-mail address but I like an actual name).
- To use the aforementioned WinMerge utility for all visual merging activities.
- Activate the mercurial_keyring extension, which allows you to securely save credentials for remote repositories (believe me, this is worth its weight in gold, unless you like entering in user names and passwords over and over again).
Now, we’re ready to try our first commit of a file.
Your first commit
First, we need something to commit, so create a text file and put some content in it. We can do this easily from the command line. Note that for ease of use I’m using some Powershell commands to add the text to the file, rather than through a text editor (I’m a command line guy, remember?).
|
1 2 3 |
PS C:\A_Workspace\repo> Add-Content .\helloworld.txt "Hello World!" |
Now we can check to see what the status of the file is.
|
1 2 3 4 5 |
PS C:\A_Workspace\repo> hg status ? helloworld.txt PS C:\A_Workspace\repo> |
The “hg status” command tells Mercurial we want to see the status of all the files in our repository working directory. The “?” tells us that Mercurial isn’t sure what to do about that file, because it’s not currently being tracked. By default Mercurial doesn’t track files in a folder until we ask it to, which we can do with the following command:
|
1 2 3 4 5 |
PS C:\A_Workspace\repo> hg add adding helloworld.txt PS C:\A_Workspace\repo> |
Note that we could specify a specific file name with the “hg add” command, or even a path or pattern. If you want to know all the different combinations, all you need to do (as with any Mercurial command) is type “hg help add”.
Now we’re ready to actually commit our change, meaning it will be stored in the repository.
|
1 2 3 |
PS C:\A_Workspace\repo> hg commit -m"My first commit!" |
This commits the change into Mercurial with the comment “My first commit!”. Don’t believe me though, let’s verify that it’s there. There’s two ways to do this: 1) via the command line or via TortoiseHg’s graphical interface. First, the command line:
|
1 2 3 4 5 6 7 8 9 10 11 |
PS C:\A_Workspace\repo> hg status -A C helloworld.txt PS C:\A_Workspace\repo> hg log changeset: 0:5b776a994ea9 tag: tip user: Josh Feierman date: Sun Oct 25 09:06:20 2015 -0400 summary: My first commit! PS C:\A_Workspace\repo> |
The “status -A” command shows us all files in the working directory and their status (the “C” means “clean”, I.e. the file has not changed since its last committed state); the “log” command shows us the history of changes committed to the repository.
If we’d rather see this in the graphical interface (and even a hard core command line guy like me does admit this is a case where a graphical interface is pretty nice), we can look in the folder in Windows Explorer, where we’ll see this.
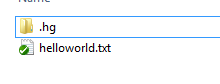
That little green “check” tells us the file is unchanged since its last commit. We can also right click in the directory and choose “Hg Workbench”:
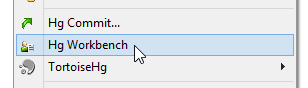
Then we’ll see this.
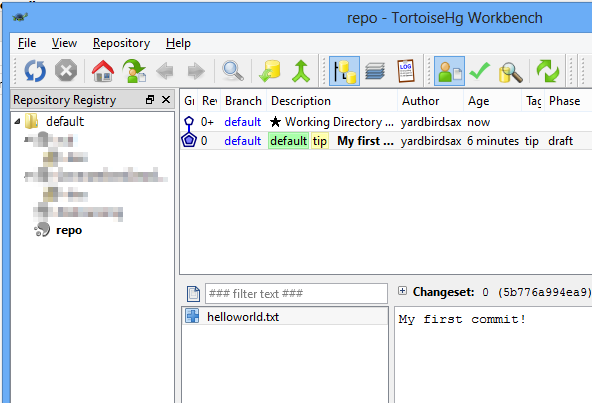
Here you can see the complete history of the repository, including the files changed in each revision and (as we’ll later see) the differences between them.
Making modifications
Now let’s learn how to make modifications to a file, see the differences between what we’ve committed, and finally commit our changes back to the repository.
First, let’s make some changes to the file.
|
1 2 3 |
PS C:\A_Workspace\repo> Add-Content .\helloworld.txt "Hello again!" |
We can then use the “hg status” command to see that the file has been modified.
|
1 2 3 4 |
PS C:\A_Workspace\repo> hg status M helloworld.txt |
We can also look at the file in Windows Explorer, where we will notice a change in its appearance.

See that little red exclamation point? That tells us the file has been modified since the last commit. To see what changes have been made, we can right click on the file and choose “Visual Diff”.

This will bring up a window showing the differences between the committed version of the file and the one currently in your working directory. Note that your window’s appearance may vary from the one you see below, depending upon what tool is configured for Mercurial to use for comparisons. For me, there is no better option than WinMerge.

Now, let’s suppose that we’ve accidentally made changes to the file and wish to remove them. Again, this is exceptionally easy with Mercurial. All we need to do is issue a command from the command prompt in the repository folder.
|
1 2 3 |
PS C:\A_Workspace\repo> hg revert .\helloworld.txt |
Now if we run the “hg status” command, we will see that there are no differences. We can also see that the familiar green check mark has returned.

Let’s say that we did in fact want to commit these changes. If that’s the case, the procedure is exactly the same as our first commit.
|
1 2 3 |
PS C:\A_Workspace\repo> hg commit -m"Committing change." .\helloworld.txt |
Note that I specified the file name here. If you have multiple modified files and only want to commit one, this is how to do it.
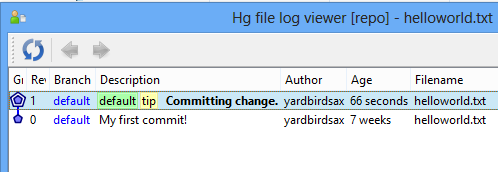
The change has now been committed, and we can see the results in the history of the file.
Fixing history
One of the neat things about Mercurial is that it enables you to go back in time and fix your mistakes. Those changes are then propagated to any downstream versions with minimal further intervention. This makes fixing bugs a lot less painful since there is less work to do. Let’s look at an example.
|
1 2 3 4 5 6 7 8 9 10 |
PS C:\A_Workspace\repo> Add-Content .\helloworld.txt "Here's a change that introduces a bug." PS C:\A_Workspace\repo> hg status M helloworld.txt PS C:\A_Workspace\repo> hg commit -m"Commit of bug" PS C:\A_Workspace\repo> Add-Content .\helloworld.txt "Here's another change." PS C:\A_Workspace\repo> hg status M helloworld.txt PS C:\A_Workspace\repo> hg commit -m"Commit of another change." |
What we’ve done above is the following: 1) made and committed a change that introduced a bug, 2) made and committed another change.
At some point in the future, we discover the bug. In this case we’re only one step ahead, but in many cases you might have committed many more changes before the bug was discovered. How would we go about solving this?
First, we need to determine when the change that introduced the bug was committed. Mercurial has a great feature for this, aptly called “blame” (technically it is called “annotate”, but “blame” is a shortcut and besides, I like the name better). Blame lets you list out the file and see who last modified a particular line of code and in what revision it was modified.
|
1 2 3 4 5 6 7 |
PS C:\A_Workspace\repo> hg blame -u -d -l -c .\helloworld.txt Josh Feierman 8779c69e108f Mon Jan 25 06:28:31 2016 -0500:1: hello world! Josh Feierman 0daec33bfe0d Mon Jan 25 06:31:36 2016 -0500:2: Hello Again! Josh Feierman 1aa44aa5accf Mon Jan 25 06:37:27 2016 -0500:3: Here's a change that introduces a bug. Josh Feierman f8ddcc0802ff Mon Jan 25 06:37:45 2016 -0500:4: Here's another change. |
Curse that rascal Josh…
Moving on, here’s the step by step process for actually fixing this bug. First, we need to “update” to the revision where the breaking change was made. In the list shown above, the revision is identified by that odd looking string of characters right after the user’s name. So in this case, the target revision is “1aa44aa5accf”.
|
1 2 3 4 |
PS C:\A_Workspace\repo> hg update 1aa44aa5accf 1 files updated, 0 files merged, 0 files removed, 0 files unresolved |
Next, we need to edit the line of code causing the bug to occur. We can use the “Visual Diff” feature to see our change.
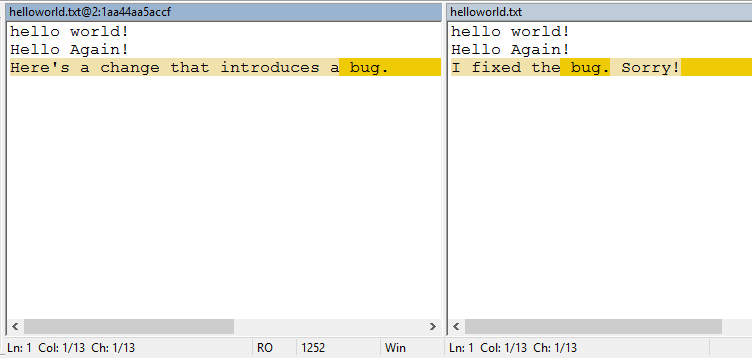
Then, we commit the change.
|
1 2 3 4 |
PS C:\A_Workspace\repo> hg commit -m"Fixed the bug." created new head |
You’ll notice that Mercurial let us know that we “created a new head” when we issued the commit command. What this means is that we now have two paths of changes in the repository; one where our bug still exists and our final change (that line that says “Here’s another change”) was added, and one where the bug has been fixed but that last change doesn’t exist. To complete the process, we need to merge the two of them together.
|
1 2 3 4 5 6 |
PS C:\A_Workspace\repo> hg merge merging helloworld.txt 0 files updated, 1 files merged, 0 files removed, 0 files unresolved (branch merge, don't forget to commit) |
When you issue the merge command, in general Mercurial is pretty good at merging the contents of two files together and will do so on its own. Sometimes it will need a nudge in the right direction however, such as cases where the edit conflicts with changes made later (such as editing the same line of code or adding on to the end of the file). When this happens, Mercurial will pop up a window of your chosen differential viewer, and let you choose the exact result. In our case, I had to copy and paste that last change into the merged file to get everything looking right.
Finally, we need to issue the commit command to get everything back in order. You can then use the “hg log” command to see the complete list of changes.
|
1 2 3 4 5 6 7 8 9 10 11 12 13 14 15 16 17 18 19 20 21 22 |
PS C:\A_Workspace\repo> hg commit -m"Merge of bug fix." PS C:\A_Workspace\repo> hg log changeset: 5:d56d0cadaa51 tag: tip parent: 4:681119c99a77 parent: 3:f8ddcc0802ff user: yardbirdsax date: Tue Jan 26 06:13:25 2016 -0500 summary: Merge of bug fix. changeset: 4:681119c99a77 parent: 2:1aa44aa5accf user: yardbirdsax date: Tue Jan 26 06:04:42 2016 -0500 summary: Fixed the bug. changeset: 3:f8ddcc0802ff user: yardbirdsax date: Mon Jan 25 06:37:45 2016 -0500 summary: Commit of another change. |
Notice how the second change listed (changeset 4:681119c99a77) lists the “parent” as not the one directly before it? This is because we essentially went back in time and created a new line of changes by fixing the bug. Then, we merged the two together for the final committed changeset (5:d56d0cadaa51), hence that one has two parents listed.
If all this sounds a little confusing, don’t worry, it all becomes very natural with time and experience. The important thing to understand is how to go through the steps detailed above in order to fix problems introduced in our code. And if you ever find yourself in a situation where you’re not quite sure how to proceed, always review the documentation first and experiment. It’s a good idea to make a copy of your repository before trying anything new. Since each copy is a complete isolated repository in and of itself, this minimizes risk. (And yes, it’s true that you could just undo anything you accidentally did, but when playing around it’s often easier to just do it in a sandboxed copy rather than having to go through a long series of steps to back out mistakes.)
Conclusion and next steps
Congratulations, you’ve successfully configured and setup Mercurial, created a repository, and made your first commit! You are well on your way towards leveraging the remarkable power of version control to better standardize and maintain your tools and scripts as a DBA.
In the next installment, we’ll dig deeper into Mercurial, looking at how to use branches to make experimental changes to our code without risk, and even create linked copies of existing files (something that will come in very handy as we’ll see). Finally, we’ll look in more depth at the specific cases mentioned earlier, and how we can leverage Mercurial to keep track of all the scripts in our DBA’s toolbox. Stay tuned!

In what was originally a temporary job creating reports for clients of a financial company, he decided we would rather write some VBA macro code than repeatedly push the same buttons on a keyboard .
After working in low level development and support roles, he transitioned to the role of a full time SQL Server DBA, supporting both production and development systems, and has never looked back.
He currently works as a senior DBA for Gateway Ticketing Systems, advising customers on maximizing SQL Server performance and availability. He also recently co-founded the independent software startup Do It Simply Software. He loves learning about what makes SQL Server tick, and how to make it go faster. For more information, follow him at sqljosh.com
View all posts by Joshua Feierman
- A DBAs Introduction to Mercurial – Branching and merging - February 19, 2016
- A DBAs introduction to Mercurial – Working with files and changes - January 28, 2016
- A DBA’s introduction to Mercurial – When and why we should use version control - December 18, 2015